I wrote this free, detailed, step-by-step guide with pictures just to show you how ridiculously easy it is to make your own off the grid washing machine. If you enjoyed it, please subscribe to my newsletter and you’ll get more articles like this.
Most of the materials You’ll need can be found around your house and most certainly at your local hardware store. See what other tools you will need when SHTF.
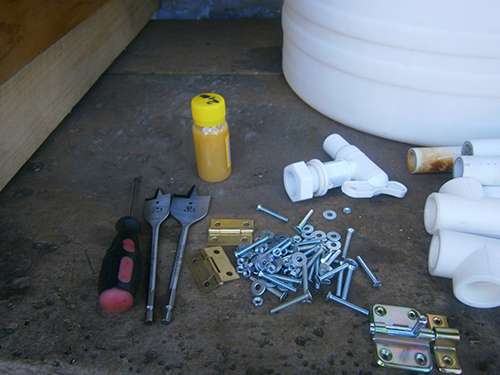
Let’s see what essential things you’ll need:
- A bottle of rubber glue. Here’s how our forefathers made glue out of pine resin.
- Flat wood drill bits, one 25 and the other 35
- One door latch
- Two hinges
- Around 25 screws with nuts and washers
- Around 6.6 inches of PVC piping
- A barrel
- One inner and outer bicycle tire
- Two PVC T-shaped pieces
- A PVC tap (optional)
- Six 37 3/8 x3x3-inch (approx. 95x8x8-cm) rectangular logs

 Now that you have everything ready, let’s get started!
Step One: Building the Stand for the Washing Machine
First of all, you need to take the wood and measure out 9 7/8 inches (approx. 25 cm) from the base of the wood and then mark it.
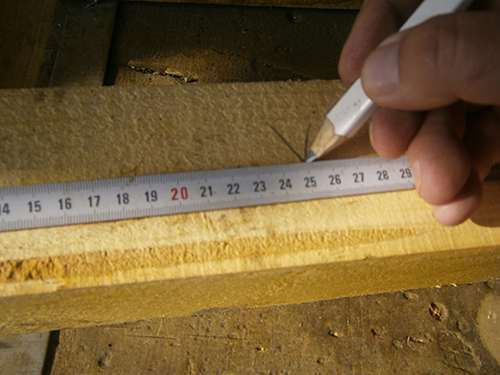
From that mark, you’ll have to draw a horizontal line to reach the other half of the wood piece or reach the halfway point and draw another mark 3 1/8 inches (approx. 8 cm) to the right of the previous mark and then draw a line on that mark too. Connect the two lines to form a rectangle.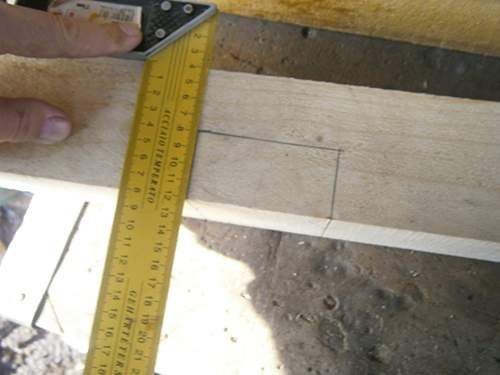
Now do the same on the bottom side of the lumber; then connect them to get a brick-like shape. You can start cutting it out. I’d recommend using a jigsaw; it makes the whole process faster and will give you a cleaner cut.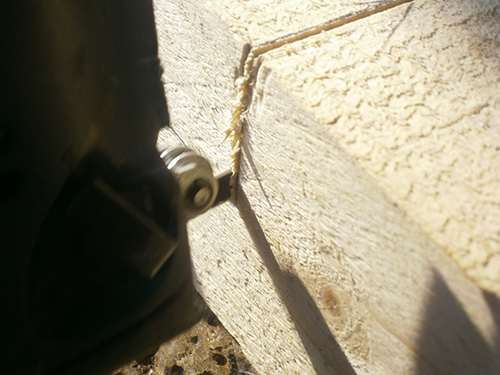
By using a chisel and a wooden hammer, you can easily remove the pieces.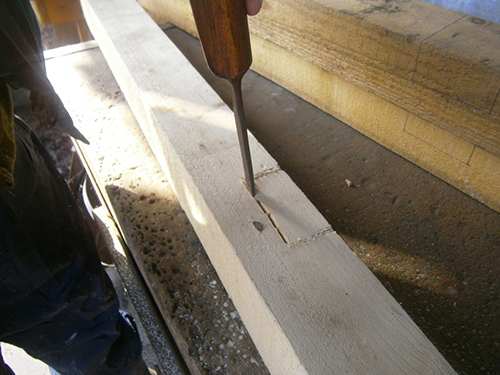
It should look something like this.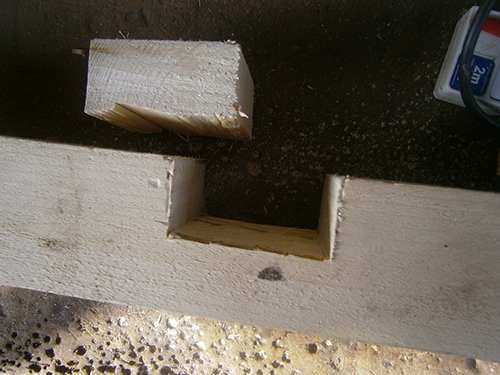
Now that we’ve done that, do the same with the rest of the lumber, and put them together.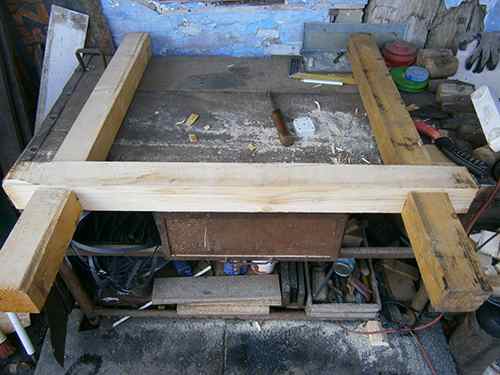
If you end up cutting the wrong size, don’t worry. You can always fill the gaps and fix them with a hammer to create enough support.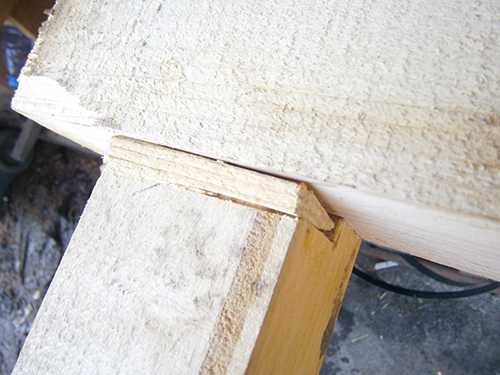
Put the two U-shaped structures in such a way that they form a V. You might need an extra hand for this part.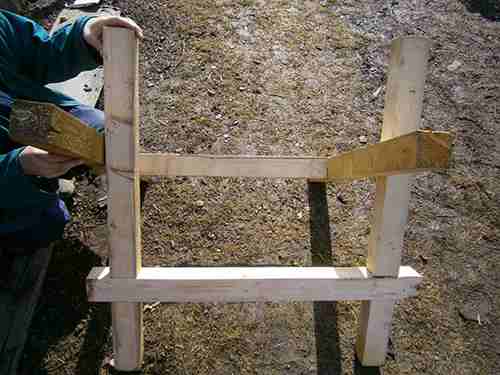
Now that you’ve set it up in a tight position at your desired height, you have to mark the places where the boards join on both structures so that you’ll know where to cut the wood.
Now simply cut away the wood using the same technique, and hammer the two pieces together until they support each other. If you do it right, you won’t need any nails. 
Related: Potassium Permanganate: Why You Need It in Your Survival Kit?
Step Two: Cutting the Hatch out and Helping the Rotation of Clothes
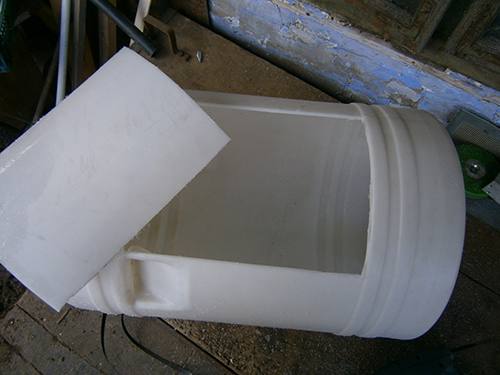
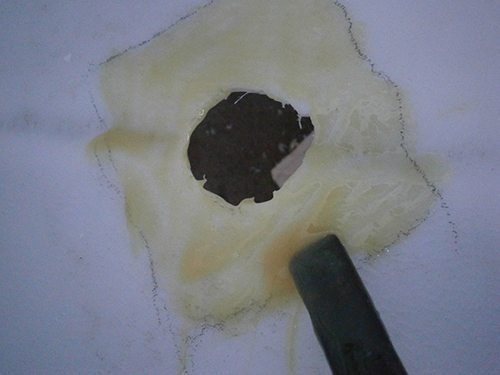
First, measure out a 1-inch by 1-inch area on the side of the barrel, and start cutting it out.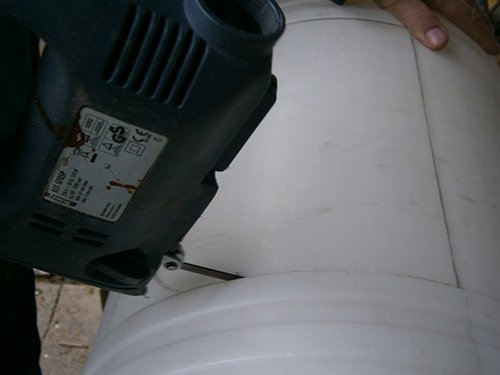
 Next, pick up your PVC pipes and cut off at least two 6 6/8-inch-long (approx. 17 cm) pieces. Drill one-one holes at the ends of the pipe, and drill through it with a 4 mm drill bit.
After that, using a 10 mm drill bit, drill through the holes again, but don’t go all the way through both sides. We only want to have one side of the pipe this size.
Put the pipes away, and cut some pieces of the bike’s inner tire into small cubes that are just bigger than the screw heads. Use a leather hole poker, and cut a hole that will fit your screw. Make two rubber pieces for each pipe.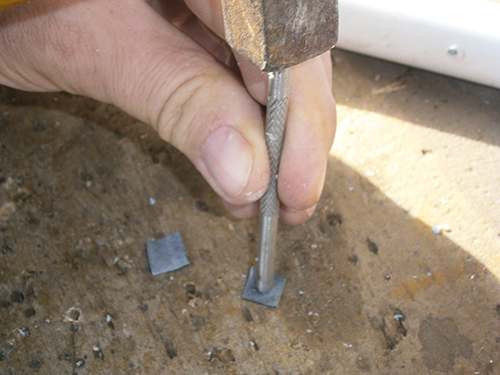
After that, grab the same number of screws, washers, and nuts as the number of pipes you have.
Now put the pipe against the barrel where you want the pipe to be, and drill through it with the 4mm drill bit so it punctures the barrel. I’d recommend putting the pipe up outside first; that way you will have an easier time drilling through it. Put the rubber square through the screw, and then place the screw through the pipe and drill it in. Reach inside the barrel, and push the second rubber cube through the exposed end of the screw. Put the washer on, and secure it with a nut.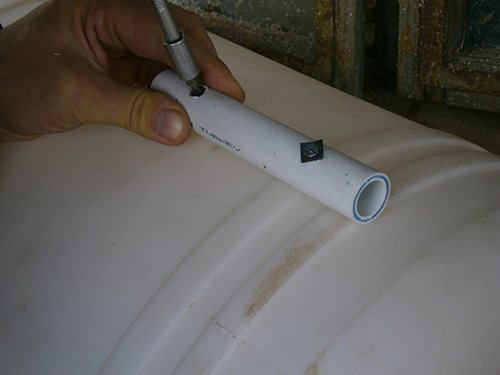
Now that the holes are roughly the size we need them to be, do the same thing in reverse so the pipe is inside the barrel. Repeat this process as many times as you want. I put up three pipes for good rotation. I also cut the ends of the screws with a metal-cutting saw so they wouldn’t stick out.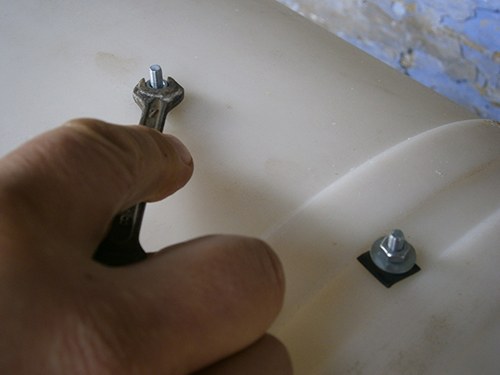
Step Three: Securing the Barrel onto the Wooden Structure
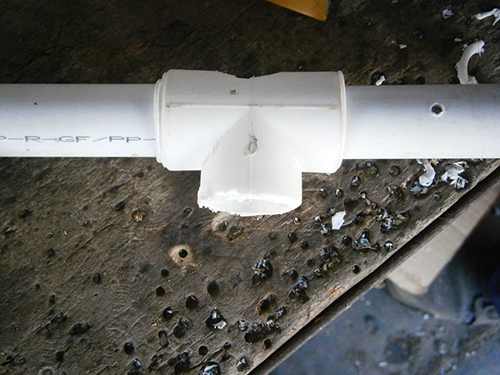
Grab the T-shaped PVC connectors, and drill a hole at the top-middle part of the T with your size 25 flat wood drill bit.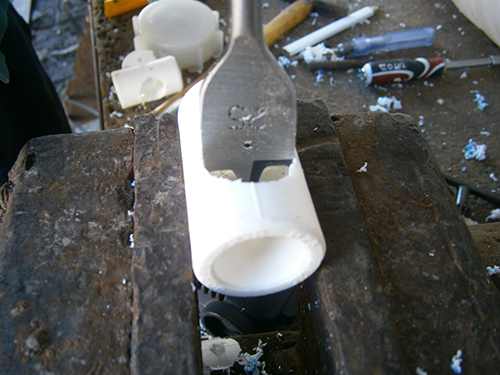
If the cap is not in the middle of the barrel, drill through it with the size 35 wood drill bit. Do the same for the bottom of the barrel with the same-sized bit.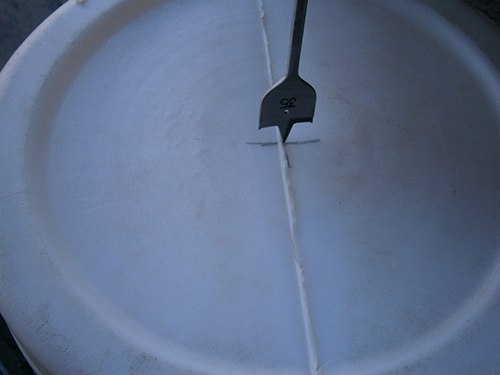
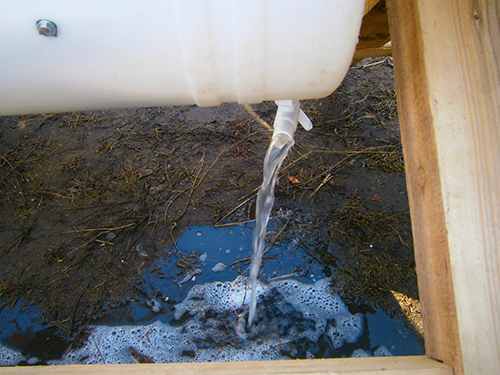
Optional: Make a hole at the side of the barrel for the tap, and drill it out with the size that fits your tap; for mine, it was size 20. Put on the plastic nut that comes with it, and close the tap for now.
Related: The Ultimate Bug Out Home For Just $250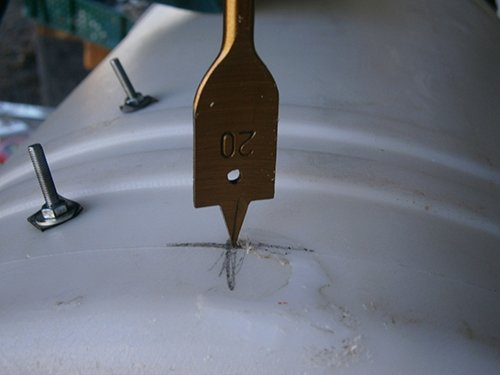
I attached the T pipe connectors with two pieces of pipe for extra help distributing the weight when we put in the water and the clothes. Simply turn the PVC pipe welder on, and push the PVC pipes onto it.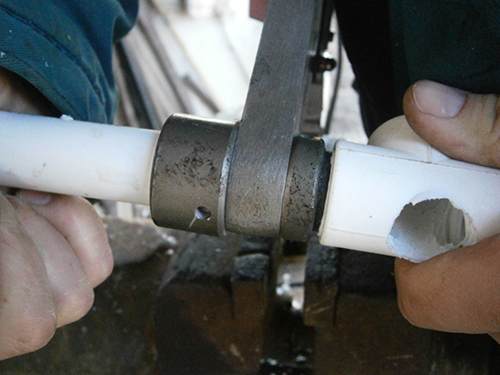
 I used a sander bit to make the hole a little bit bigger and to smooth out the hole I made on the T connector.
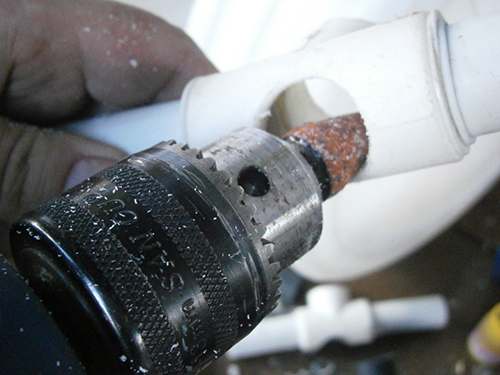
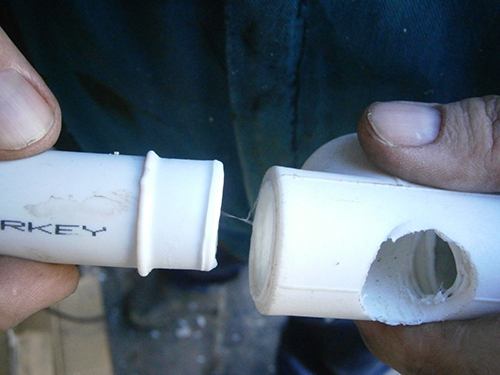
I placed another pipe onto my PVC so that there wouldn’t be any space between the barrel and the T connector.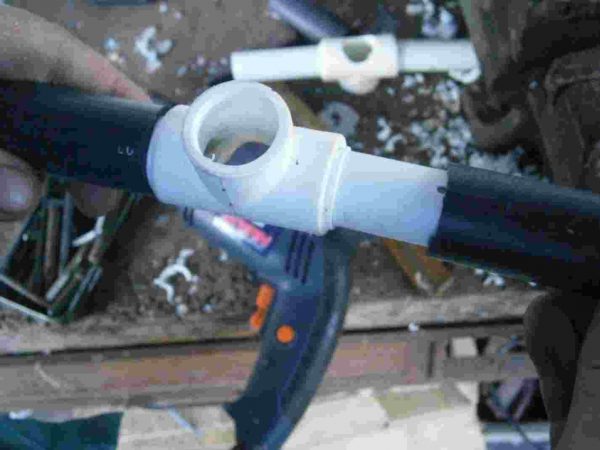
Now cut two pieces of rubber that could fit onto the holes you’ve completed on the barrel’s bottom and top. Use the rubber glue on the rubber and on the area that will be covered. The instructions on the glue that I had said to leave it on until it dried and then attach it to each other. I recommend following the instructions on the bottle since they could vary depending on the glue.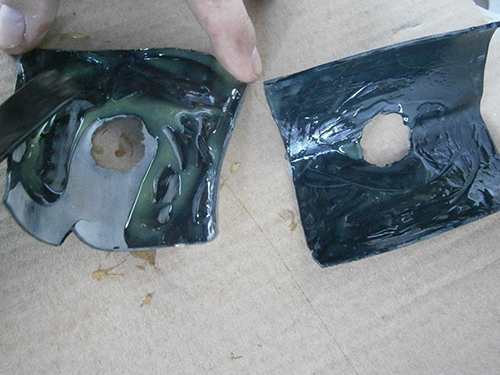
Related: How To Build A Cheap Sod House (Soddy)
 Put the two pieces together, and let them dry until they are completely affixed.
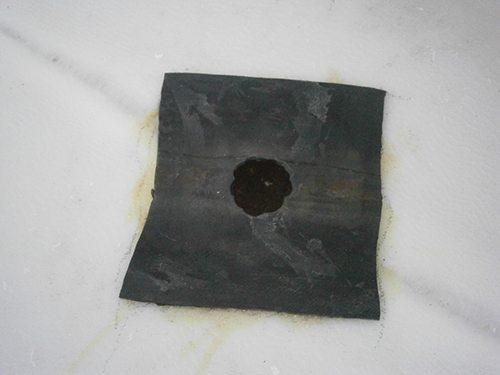
This is how it looks from the outside.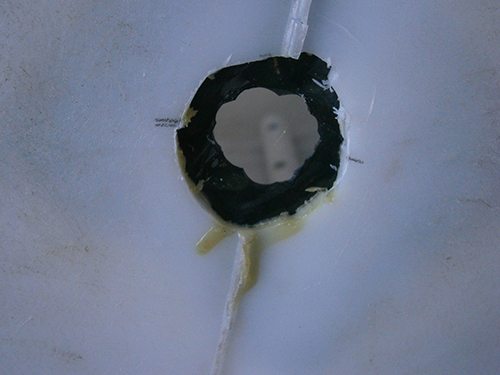
Now grab the hatch you cut out of the barrel, and measure out pieces from the bike’s inner tire. Apply glue to the edges of the hatch and to one side of the cutout tire pieces so the hatch overhangs when it is put up.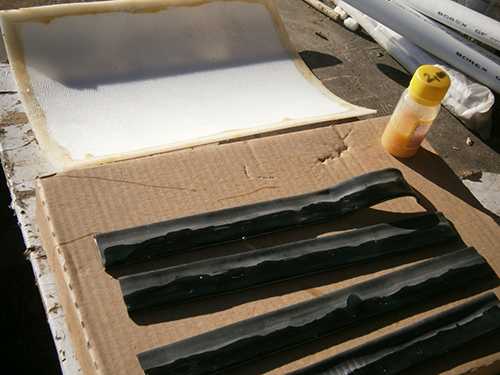
While you wait, push the T connector through the barrels’ holes, and secure it to the pipes you welded to it. Use the same method with the screws to secure it.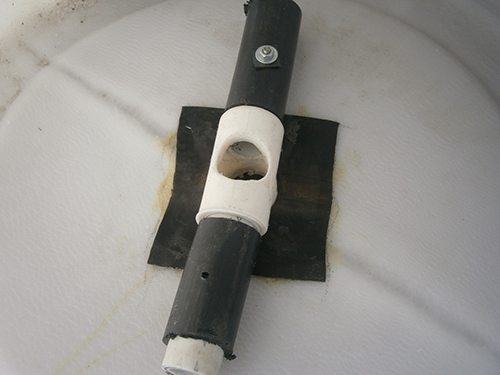
After the glue is applied, put the pieces together, and wait for it to dry.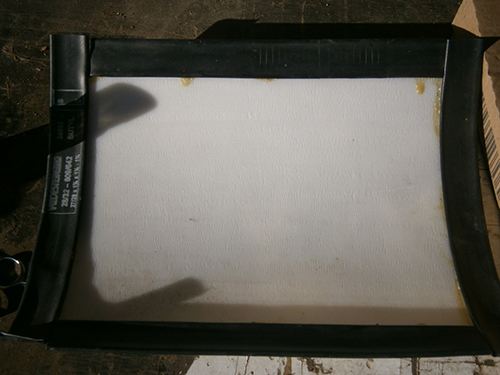
I pushed a metal bar through the holes and placed a PVC pipe through the T connectors so the metal won’t rust from the water.
After that, attach the hatch with the latch and hinges, and use a bit of rubber to place it on—the same idea as with the screws.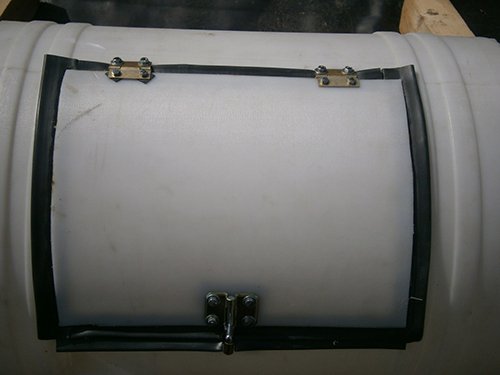
After that, place the barrel onto the wooden structure and secure it with fencing staples.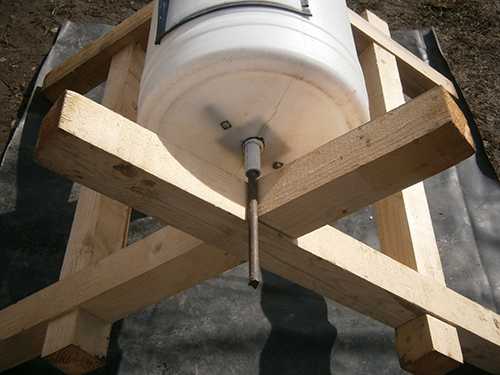
Step Four: Making It Spin
Grab the bike tire’s outer layer, and cut out the metal rods as you will not need those parts.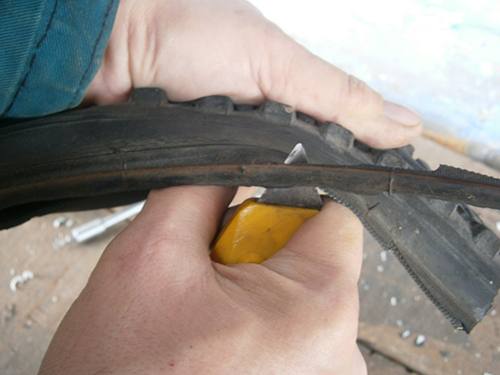
Using the rest of the glue, apply it to the tire’s outer layer and the barrel. Let the two dry, and then glue them together.
It should look something like this.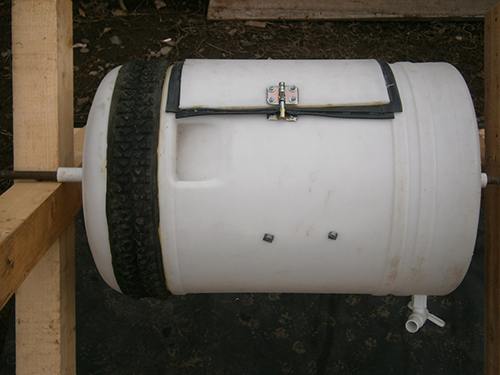
Related: How To Build an Earthen Oven; DIY Easy Tutorial With Pictures
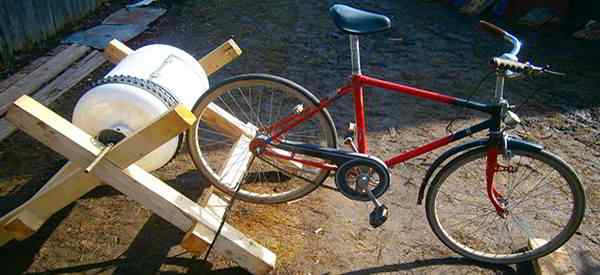
Step Five: Connecting the Bike and the Washing Machine
I found part of an old shelf and thought I would use it up. At this point, you have to be creative and find a way to attach the bike. You could make a wooden support or use some scrap metal. Anything works as long as it can hold the bike up.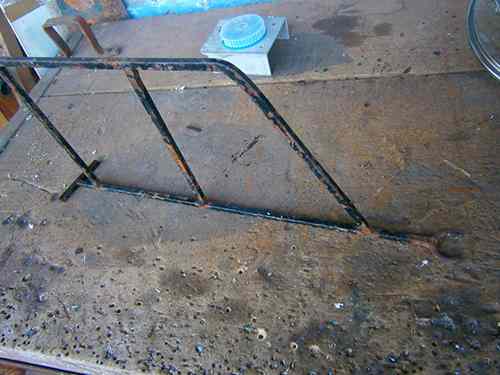
Using fencing staples, I attached it to the side of my support. Conveniently, it had a hole on top where the bike would fit perfectly.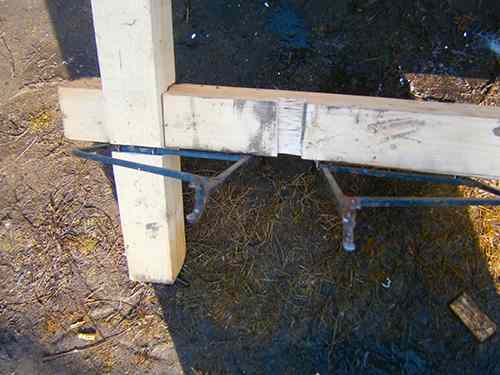
This is how I used the fencing staples.
This is how it ended up looking.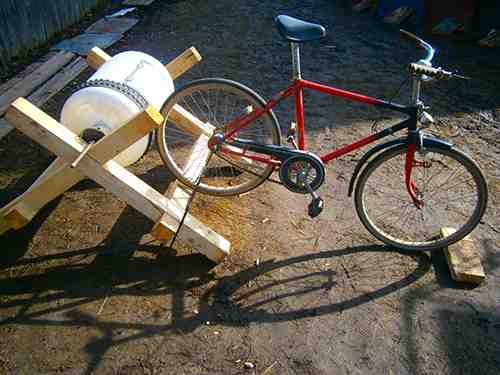
Related: How to Build a Smokehouse In Your Backyard (with Pictures)
Step Six: Trying It Out
First of all, I got the water, soap, and clothes ready. I filled it halfway with water then put the clothes in. With a grater, I grated some soap into it.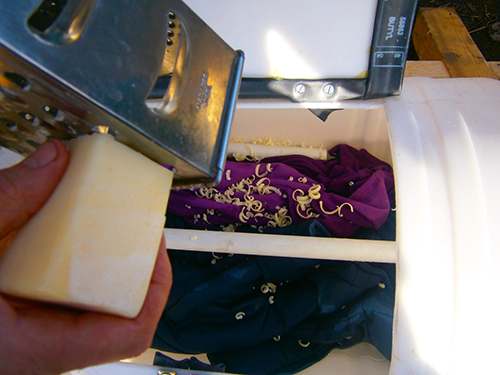
After 10 minutes of work, the clothes ended up pretty clean. They did need to be rinsed, but that is the smallest of my troubles if I can clean my clothes without electricity. Here’s how to make antibacterial laundry detergent at home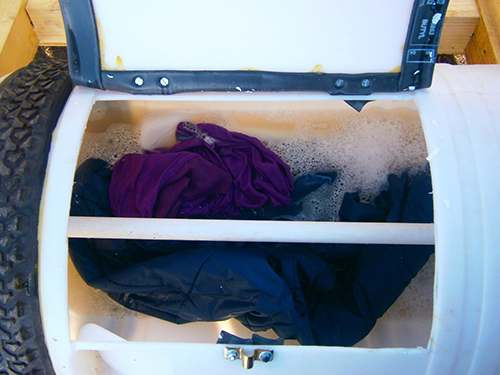
And of course, I had to try out the tap to see if it worked as I wanted it to.
And that’s it—you just made yourself a man-powered washing machine that will save you incredible amounts of electricity if you have a big family. The best part is that if you like working out, this can be a great way to get in a cardio workout. Although it can tire you out pretty quickly, it’s worth it for all the money you’ll save.
You may also like:
 Spider Hole Tactics to Defend Against Looters
You Will Not Survive An EMP Strike Without This (watch video)
13 Survival Uses for a Tin Can
Emergency Bag to Keep in Your Car in Case of an EMP
12 Essential Things You Can Scavenge from Cars when SHTF
Similar to Morphine: The Best Natural Painkiller that Grows in Your Backyard


Nice setup…AND you get your exercise as well!!!
Solo corta el tambor a lo largo, y tendras dos ” BATEAS” multiproposito, puedes usar una con jabon y otra con agua para enjuagar tu ropa, FACI Y BONITO—
Great washingmashine! I also know another way. Put your clothes to soak with some soap in a tub. After some soaking take a toilet plunger and plunge away. You can make it a competition for the children, who gets them cleanest, who can do it the longest or whatever. It also gives you a good work-out!
That will save the knuckles for sure. Great idea! I’ll have to buy a NEW plunger – don’t want to use an old one. LOL.
Lets ” plunge right in”…Just take a marker and write toilet on one washer on the other! If children are small draw a picture on it🤗 paint handle red for toilet whit for laundry?🤔
Have done that with both a 5gal bucket and an old ice chest. Used a new plunger each time. Drain soap water. Add cold clean water and plung away 2x. Washed rinsed. Cheap and easy.
WW2 dad was a Kansas kid. He used a wash tub and built a windmill to plung the laundry. There was no other laundry service available on a south pacific attole. He also cut hair for 25 cents a head.
After walking through this tutorial, I am driven to comment…this contraption is ridiculous. The return on investment of time, effort, and resources required to build and operate it is not at all practical. Additionally, I would not trust the door seal against show stopping leakage or the bike fixture failing and dumping the operator on their ass. Really, unless you’re just totally into building Rube Goldberg-ish devices, the bucket/plunger method as in another comment here, is practical and efficient for a simple chore like washing clothes.
Easy there Old C….. there is always a better way, but the purpose of a forum is to spur those ideas or different ones. I agree a better bike set-up is needed and as plentiful as old bikes are, a dedicated pedal-power unit would be stronger. Or how about a bike powered wringer washer, Or using this to wash hides for tanning, Or making a heavier unit for dry-mixing building materials, Or tumbling whatever……
Being a cranky old machinist, it’s not to my liking either but it does make me think a little 🙂
and Rube G still makes me laugh
You’re right…I was harsh (therein the “curmudgeon”) in armchair critiqueing what in essence is a good basic concept that is just somewhat questionable in this construction example. I’m afraid I’ve come to expect better of information presented in a survival forum. My apologies to C. Davis, who put in the work to make this presentation. Next time I feel the need to pop off, I’ll try to do it in a more constructive manner.
For me the instruction of using screws with nuts and washers was a reading ender. Bolts go with nuts and washers but saying that, it did give me an idea for a rock polisher. Just hop on and get your exercise and in a few weeks you get polished rocks (a 2 inch pvc connection to replace the trap door makes it solution tight with easy filling and removal
There is always one asshole on every page. CONGRATULATIONS!!! YOU WIN!!!
Justanold…..
I agree. This process is too complicated by far.
I got about halfway through and thought, good grief! And gave up. I already have about 4 different power-less washing machines, and although it would be nice to have one that hooks up to a bike, this one is NOT the one! Maybe I can make some adjustments and come up with a fix for the ones I have. Or just forget it.
TOO COMPLICATED!!
My wife is 1/4 Cherokee, and she said her ancestors used a rock along a riverbank.
Just sayin.
Gee really? I bet no one ever heard of that before…….just sayin
There is a much easier way, and I have used it a lot. Get 2- 5 gallon buckets with lids. Fill bucket about 1/2 full with warm water, 1/2 tsp laundry butter(have recipe somewhere around here) and add clothes. Bounce the clothes around with hands. Scrub only on known spots. Wring out(can use a hand cranked version over the bucket if you have one). Rinse, wring out and hang. You can use plastic clothes hanger and a PVC clothes storage rack to dry indoors or outdoors. Very easy. Not much else needed besides buckets, water and detergent and a place to hang the clothes to dry. Gloves can be used to keep hands out of the detergent, but I have never had a problem with it.
This contraption reminds me of the things they invented on the old “Gilligan’s Island” TV show. Some of them were outlandish, some were practical, and they all made you think. Those writers were very creative!
If you WERE to want to make one of these, note that the opening you are cutting in the barrel is not 1″ x 1″ but more like 1 foot square. Also if you were to be willing to dedicate a bike to driving it you might consider attaching a sprocket to the tub axle and permanently mounting the bike so that the chain drives that sprocket directly, no need for the bike rear wheel/tire at all.
Best to actually use a “laundry plunger” rather than a toilet plunger. The laundry-type is specifically made for plunge-washing laundry in a tub or even a small batch in a 5 gallon bucket. One can buy a bright blue high-impact plastic with a wooden handle relatively cheaply..
I did not know that. Thanks.
@ Carol: You can buy them on line at Lehmans.com. Not shilling for Lehmans, there may be other suppliers that I don’t know about, but I know they have all kinds of old-fashioned laundry equipment.
Got something like this that’s been working in the back of my thoughts for a while now, and I’m hoping that this summer I’ll be able to have all the parts gathered to start construction. Mines a bit different in the fact that it reduces the possibility of leaks. The drive is different as well, and it works a lot more like a regular washing machine when its all done.
As for the plunger type washer, I recently bought one from Lehman’s, and am going to be buying another very soon. I have plans for a washer that will use these type plungers, and do so a bit more efficiently.
Now for the really handy types who didn’t think about this before,if you have one or can get one that is junk because the motor or transmission took a dump, adding a bicycle with a belt drive to power it…..a regular washing machine can be set up to be human powered with a bit of work. You just have to look at any problem with a bit of “how can I make this work?”, and with a bit of serious thought the answer will soon come.
The real problem with hand washing is wringing out the clothes. There are hand wringers but they are quite pricey and they need to be anchored to something sturdy. I thought about the wringer you used to see on buckets when janitors actually mopped the floors but haven’t seen any recently. They also are probably pricey if they still exist. If anyone knows a source for bucket mounted wringers, please post it here.
Here’s homemade wringer diagram that you can attach any way you want.
http://www.umitusta56.com/oybs-01-brosuru/
I have the tub and plunger set back but also have a commercial mop bucket with a wringer built on it. I have it all in the tub with clothes pins and 5 gallons of liquid soap and softener. I also have a scrub board and portable clothes line.
Well, I actually used a windfall of cash to buy a wringer from Lehman’s. A mop wringer would work as well I guess, but would be limited to smaller articles. Things like sheets and blankets would not fit, and so these types are not really a best choice, but if you can work around this one flaw a mop wringer and bucket specifically earmarked for emergency/survival clothes washing would be a pretty good choice for a way to wring out most of the water when washing clothes and small articles like wash cloths, dish towels, cleaning rags,etc,etc,.
This is Badass! Keep ’em coming!
The object in washing clothes is to move the water through the clothes.
I took a 20 gallon plastic barrel, cut one end out of it. On the side, near the end that is still sealed, I drilled a hole to fit a 3/4 inch faucet and secured it on the inside with a threaded piece of PVC connector cut to the same length as the threaded portion of the faucet protruding on the inside. A gasket on the outside seals the faucet against the side of the barrel. This is to be able to drain the barrel.
I cut out a 12 inch diameter circle of 3/4 inch treated plywood, drilled a 1/64th hole in the center and applied a liberal amount of wood sealer before coating it with polyurethane.
I took a 30 inch piece of 2 inch diameter wooden dowel, applied a liberal amount of wood sealer before coating it with polyurethane.
Using a single 3 inch deck screw and flange washer, I attached the dowel to the plywood through the center hole in the plywood. This constructed my plunger which is much like the plunger in a butter churn.
For my height (6 ft.), I place the barrel on three pieces of 4X4 to put the barrel at a more comfortable height for plunging. A shorter person may want to put it on three pieces of 2X4. Any height that keeps the faucet off the surface will work.
Small pieces of clothing (socks, underwear t-shirts, etc.) can be wrung out by hand. For larger items (pants, dresses, shirts, etc), I take one end and my wife takes the other. We twist in opposite directions to wring the piece out.
Using treated 4X4’s, I built an old fashion 4-line clothes line 20 feet long for hanging the clothes to dry. I used 1/4 inch galvanized wire for the lines and 6 inch turnbuckles to pull each line tight.
As an added plus, I can position the barrel at the edge of my deck, attach a garden hose to the faucet and run the water out to water my garden.
Meathead: That is the same theory as the laundry plunger/toilet plunger & 5 gallon bucket method except on a grander scale. The 5 gallon bucket method is, I suspect, physically easier to operate and less work to make, but is limited to the amount of clothing that you can fit in a 5 gallon bucket. You can extend the life of clothing between washings if you wear it one day and hang it outdoors on a clothes line inside out the next day. Unless you were slopping hogs all day or some other such work where your clothing actually gets dirt on it, an airing will freshen the clothing so that it may go longer between washings. I read a while back that an executive for Levi Straus only washes his jeans once a year. Of course, as an executive for Levi Straus, working in an air conditioned office, riding in an air conditioned limo, he rarely works up a sweat except, perhaps, at the gym and doesn’t wear his levis for working out. He definitely doesn’t spend any time slopping hogs or splitting wood, grubbing with a hoe or any of the other tasks we will be performing in an EOTW scenario.
Interesting conclusions….How long ago was that Levi Stauss employee doing that???? Back in the day it was “socially acceptable” to wash your jeans Once a year!!!!!! But i really DO LIKE YOUR IDEA FOR PLACING WORN CLOTHES OUT IN SUN AND BRINGING THEM BACK!!!!!! That really sounds good, power saving and I hope it works! I love the freshness and will set something up for the future!
I live in southeastern Brazil. Interior of the state of São Paulo.
Here clothes in the sun are the order of the day …
But in relation to bikelaundry or laundrybike, I think it must be very interesting to have one at home. If only to show it to neighbors at the time of the SHTF, it would be an ostentation … AHAHAH
HATS WRONG W/ USING A REAL WASHER TUB? TRANSFORM A REAL WASHER INTO A MECHANICAL ONE?
That’s really inventive. I can see a lot of cross over between this and creating bicycle powered generators and other similar devices.
‘Tire’ you out, heh.. 😉 Great design, Thanks for sharing..
What an Awesome Idea! I LOVE It. I have been mostly washing my closthes out by hand, wringing them out in an Industrial Mop Bucket with a Mop Wringer, THEN Hanging them to dry…but Hey, this will work even better, and Be Much More Productive for me, Health wise! It’s Like Multi Tasking, utilizing all of my Time more wisely and efficiently! Thanks for Sharing!
Love Sister Abagail