Today we’re proud to present another DIY project from a fellow Doing the Stuff Networker. Jamie Burke is a master at repurposing trash and junk. His latest project shared on our DTSN Facebook Group not only saves money but would be very useful both now (free is always good) and after an SHTF event.
If you’d like to see more of how he and our other members are Doing the Stuff, join us on our journey to self-reliance and preparedness!
Firebricks and Wood Stove Logs Tutorial
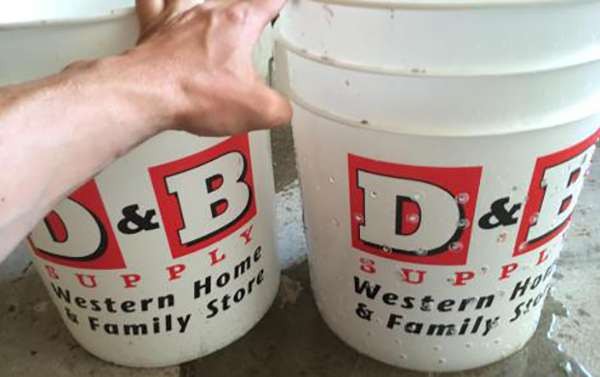
This process only requires: Two buckets, a drill (or stabbing weapon), a piece of wood (or bottom of another bucket), kinda a custom drill bit, water. + your TRASH!
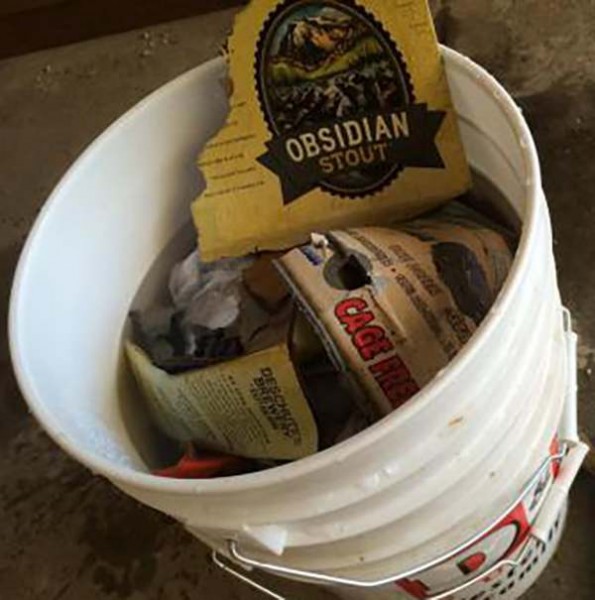
Out of all of the physical spam you receive in the mail, leaves you rake, dead foliage, paper towel rolls, paper plates, napkins, beer boxes, egg cartons, etc., etc., etc., (any biomass material you can think of) – why not turn it into useable logs for your furnace, campfire, or cooking? Just don’t use the plastic coated things.
I’ve seen ‘devices’ you can buy that makes ‘newspaper logs’, but they never seem efficient, require you to pre-shred, take way too much time and the logs are not very solid. This is a much better method and doesn’t really cost anything.
Step 1
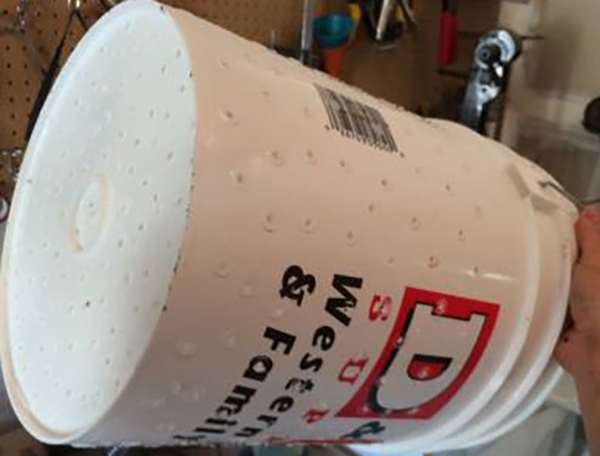
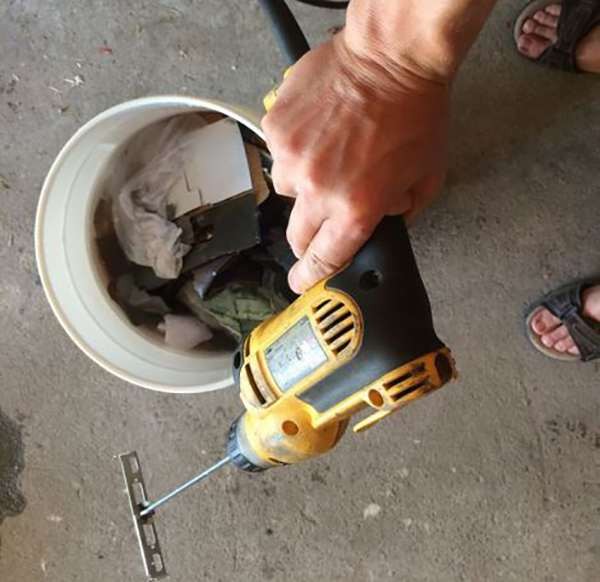
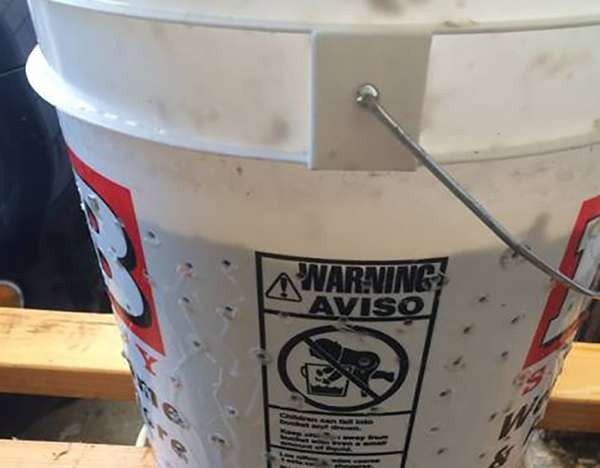
Get two 5 gal buckets. $3 each at Walmart. Drill a lot of holes in it, about 2 inches down from the lips and around 3/16 size-ish. I used a soldering iron. You can use a screw driver and stab holes all in there. Go around all the bucket and on the bottom. [Todd’s note: Buckets can be had for free at bakery’s and construction sites]
Step 2
Place the holy bucket inside the other normal bucket. Start putting your papers, leaves, bio material in it. Add your water and fill’r up. Doesn’t really matter if you have too much water. You can leave these buckets of water setup by the mailbox, then just walk by and toss stuff in.
Step 3
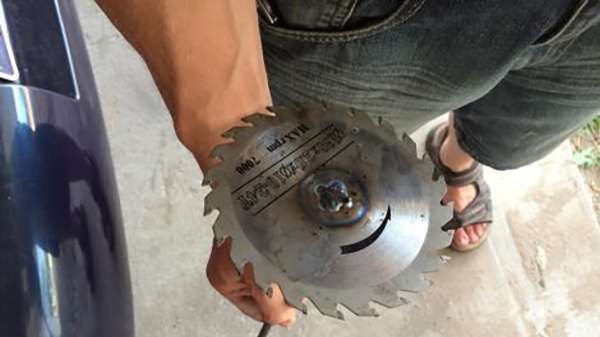
You need a custom drill bit, which I have. A good thing to do is find an old table saw blade and weld it to s shaft of steel. This is “the hardest” part of this setup. Drill away and in seconds you will have a nice pulpy wet mess.
Step 4
Next, pull out the holy bucket and let it drain. I put the draining bucket on top of the other bucket to save the water – you can re-use the same water many times.
Step 5
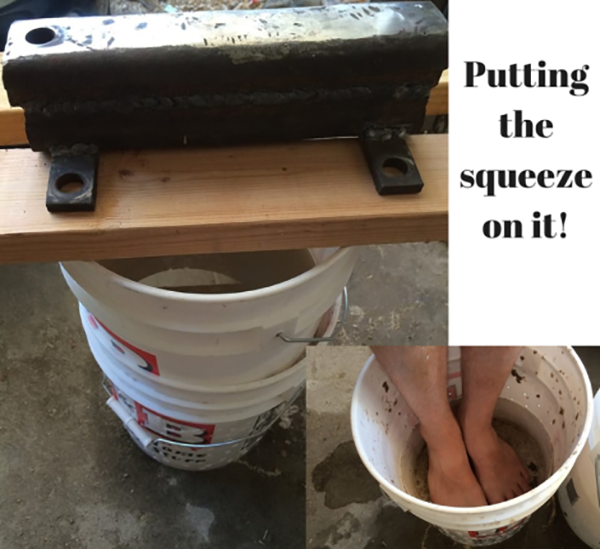
You should have a press that goes far down into the bucket to press out the remaining water. I found a bucket that someone cut the bottom off.. well perfect. But you will probably want to place a bucket down on some wood, trace around the base and cut out that piece of wood to use as a press.

Step 6
Set your press inside the bucket over the pulp. Then I set the re-used water bucket inside of that bucket (because water is heavy). That will work over time. I also sat on it.. put my anvil on it.. and stood in it. It’s pretty quick. whatever heavy you have for the top.
Step 7
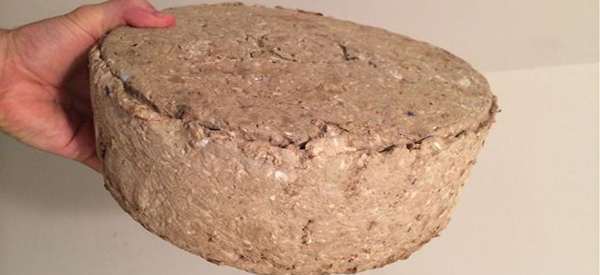
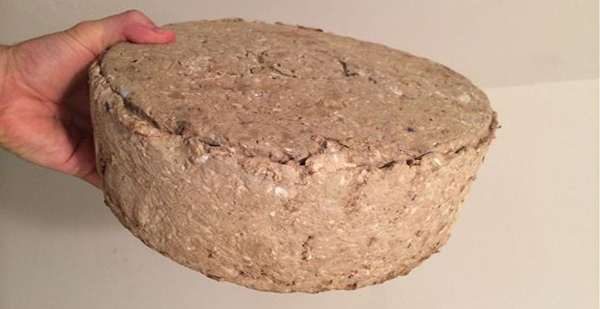
Now once most the water is pressed out – take it out to a sunny/dry place. Turn over the bucket and tap on the top. It will take some time to dry, depending on your location. We live in the desert so this will happen fast. If you want it to dry faster, cut these logs as you would a pizza, into sections.
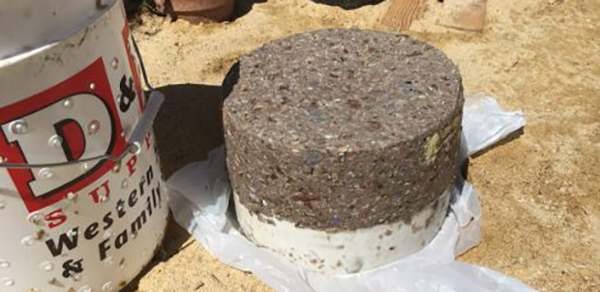
Once dry, these will burn a long time and cost you: nada.
This article was written by Todd and first appeared on Survival Sherpa
You may also like:

H2O Dynamo – The Awesome Device That Turns Air Into Fresh Water! (video)
Making Butter at Home, Like Our Grandparents
12 Woodworking Projects for Preppers and Homesteaders


You’re instructions sucked
Really a comment like that is not needed or required.
The instructions were a little vague but the jest of it is there and very easy to follow. For one as a prepper you better be able to improvise-adapt- & overcome, read between the lines and come up with your own answers.
I would like to thank the writer for sharing this and thank them for giving me my own idea on how to improve and make this my own.
I agree, Peter. Comments such as posted do very little to drive an intelligent discussion. If there are errors or mistakes in the original article, it is much more constructive to post a helpful addendum to the original article or point out errors in the original article. I have tried the pulp logs as I pointed out in my post. This post opened my eyes to a larger scale operation than I had used and I may try the author’s method. It certainly is a process to tuck away in one’s memory banks for possible future use.
GIST!!! not jest. I agree not elaborating did squat to address his confusion.
Only to the illiterate who can’t read. I read them and they were quite explanatory. If you don’t know that word, look it up in the dictionary. That is a book which explains what words mean…
“You’re instructions sucked”
Says the guy who will be among the first to die off when the SHTF.
I read them…once…and fully understood them. So…if you can’t understand them…perhaps something else “sucks”.
Either way…feel free to GO AWAY!
I agree. The instructions don’t suck; it’s not complicated. Water and paper/trash in a bucket with holes in it so water can drain. Modified drill bit to simplify shredding. Press to expel water. Remove and let dry. If someone can’t figure this out, perhaps he/she should focus on keeping up with the Kardashians.
The instructions were through, so thinking you may have some comprehension problems.
I would use smaller containers,like butter tubs,they dry faster,and fit in,the stove with out having to be cut.
your ignorance is profound!
Nothing complicated about these instructions, they were brief and to the point.
I saw a video on youtube, on how to clean up your yard, and make fire starters at the same time. Here is the link:
https://www.youtube.com/watch?v=sZmON3ISJYY
Great info, easy to understand.
You can also roll up long grass,or dead lily fronds to make great fire bundles.
I saw a video on youtube, called
make free fire starter bundles with yard waste,
guess I cannot add a link here, as when I tried to
my comment did not post
It might be great to make both the smaller and larger versions….as sometimes one would want something that would burn longer and other times a small chunk or two..might be all thats needed…
Your. At least get right.
They seem straightforward and easy to follow to me. You might want to slow down… Actually read the instructions… And you will probably find… That you were the one that sucks.
This worked great. I use it a lot as I get a lot of junk mail.
I see no reason this shouldn’t work fine for anyone who is smart enough to follow your easy to follow directions. thanks 🙂
looks like fun to make -what about after it dries you add a little bit of kerosene to the dry mixture to make sure it lit up quicker
I agree with Peter; Dsiebert24 is just a neg. type of person or not a prepper; which would explain the lack of knowledge or comprehension on Dsiebert24’s part.
As Cecountry pointed out that he puts his empty towel rolls in the mix, I keep them and cut them down and make smoke bombs out of them. I keep the empty toilet paper rolls also. They are a lot of fun out camping and you want to mess with your comrades.
I tried pulp bricks before, using the cuttings from my shredder which broke down quite nicely. It was a lot of work and the bricks didn’t release a lot of heat. It seemed to me my time was better spent cutting wood. If one is in a desert location as this writer seems to be, this is an alternative to wood or cow paddies but if wood is available, most wood releases more heat than these pulp bricks and is the same or less labor. An idea to tuck away. For pulping, one can buy a 5-gallon paint mixer at big box hardware stores or paint stores that goes on a 3/8 drill in place of making your own saw blade pulper. They are cheap. I would like the sieve bucket with window screen, otherwise you wind up with tiny paper fragments all over the ground and it makes a mess. The finer the sieve, the less detritus from the water extraction step.
That should be “I would line” rather than I would like.”
If you do the squeezing out the water step with the holy bucket inside the non holy bucket, sitting on a spacer to lift it off the bottom, it contains any small fragments in the water bucket.
i.e.: Water bucket, (without water in it,) spacer like a piece of wood the size of the bucket bottom, then the holy bucket, you can squeeze the water out into the water bucket.
I think a brick size would work a little better
I bought the brick making device that you see advertised. I sent it back. It wasn’t sturdy enough to squeeze the water out of the slurry. If I pressed hard enough, the handle bent and the pressure device also bent. Of course, I could have applied less pressure and stood there all day gently squeezing water out of the slurry, but then I could have spent all day cutting wood and had a lot more to show for my time. Take my advice, do not spend your good money on that brick making device that you see advertised. The beauty of this system is you put weights on the slurry and then walk away and come back much later when the water has self-extracted.
I think it’s a fantastic idea. I’ve done the newspaper logs and don’t have a lot of luck with them. All the junk mail and the paper towel rolls , toilet paper rolls paper plates it would take long to have a bucket full. Not sure but I would probably make mine about 1/2 the thickness of yours . My hardest would be the drill think you made. Being a female I’d had more problems with that but have some sons and gr-sons that probably could make it for me. thanks for sharing
You can buy drill bits similar to this : usually used to stir paint
An idea for a pulping. An old circular saw blade on a piece of all thread, add a couple bolts and lock washers
I don’t think you could get the nuts tight enough to hold the blade once it hits the slurry. I think the blade would rotate on the threaded rod. I believe it must be fastened some other way. Lacking welding it to the rod, one could cut a square notch in the rod and the blade and insert a square key. Even using shake-proof washers or lock washers I don’t believe would hold against the slurry as the blade rotated. Could be wrong, but I think if you tighten down on the nuts as tightly as possible you will strip the thread out. I am certain the threaded rod is 1/2″ and you can get a lot of torque on it, but it is a big load that you are moving too. Don’t be disappointed if it doesn’t hold.
You can easily tighten nuts on all thread tight enough to hold the blade. That’s no different than the bolts holding your car together.
I’ve done it. It works well.
What about double nutting. Tighten two nuts against each other on either side of the blade. That might hold betther than just the torque of on nut against the blade.
I had trouble with the saw blade to cut up the paper so I use a paint stirrer that fits into my drill. I let the paper sit till I can get to it and it may take a few more seconds or mins to get the pulpy mixture, but it seems to work really well for me. I love it, I get tons of paper trash and now I don’t have to pay to have it hauled away.
I use dryer lint, old candle wax and a paper egg carton and break them off as you need them
Are you in AZ???
Loved the idea. Some people should be more thankful!
This was a great idea, I used it as a lesson for my children. We made some and used them in the fire pit when we went camping. The wood in the area when we arrived was a little damp but we put one of these down first and then add kindling and other smaller wood and it lit right up and burned hot enough to dry out the other wood. We have made more and I use them in our fire pit in the back yard.
At first I started cutting cardboard boxes to size and soaking them and then rolling them into logs after watching these U tubes –I now run paper , cardboard through a micro shredder and soak it and cut some 6″ metal air conditioning duct to 15″ length and put a cap on the bottom with a lot of holes drilled all around and clamps around the duct about every 2″ up the length to keep it closed because it splits down the length – us a Mastic mixing tool and drill make it into oatmeal consistency – use a kitty litter spoon and load the duct pipe full put a weight on it to compress – I use an old AC condenser fan motor – it fits perfect in the 6″ diameter – I drain it into a bucket to reuse the water for the next one — once the motor weight stops compressing I use a harbor freight 12 ton press to compress it more – I use a 5 gal bucket of soaking wet shredded paper to fill the 6″ by 15″ long metal duct pipe – then I remove the bottom with a hammer and screwdriver – remove the clamps split open the seam up the length — remove the wet log – put in the sun to dry and turn it over every day until dry
Add plastics to increase the BTU value of the log. Avoid PVC as it is toxic when burned. (Releases chlorine gass) Stick to “ethylene’s such as milk jugs, shampoo bottles, etc., avoid abs, and nylon as they smoke too much.
Sorry stupid shit…. Not worth the time it may take…. Nothing to see here, move along children….
@loco: Well, I was going to comment on your name vis a vis your post, but I will eschew negative comments. As I pointed out above, I felt my time spent cutting wood was more productive than this method of producing fire material. However, that assumes that wood will always be available. If it isn’t, other media will assume greater importance. This is a good back up method to produce fuel for fires. While I haven’t compared it to cow patties, I suspect it produces more BTUs than cow patties and less odor. We don’t know what circumstances may face us in end of the world situation and the more knowledge we can store away, the better shape we will be in to survive. Negative comments such as yours do nothing to add to the general knowledge we all will need to survive.
It’ll be hard for me to do this. Most of my biodegradable paper goes into the compost pile or the center of my keyhole garden. Although, this might be a good use for the thermal printed cash register receipts and beer boxes.
The saw blade is an excellent use of re purposing something that is worn out but I may try and electric fence post. It is just a rod of about 4′ long with a angle piece welded on to it about 8″ to 10″ from the bottom. Cut off maybe 1/2 of the bottom part and how much of the top you want left. This also works great for mixing 5 gallon buckets of paint
use shredded paper or a paper shredder, then compress it
I see you don’t monetize your blog, don’t waste your traffic, you can earn extra bucks every month because you’ve got
high quality content. If you want to know how to make extra
$$$, search for: best adsense alternative Wrastain’s tools
I am very glad you don’t monetize your site. If you did I would miss out on all this great information. So thank you very much for being willing to share.
Excellent thank you for sharing that with everyone! !!
Your instructions were great,the person with the nasty comment will be remembered in my book.For the rest of us we are smarter than 5th grader.Thanks for the instructions.
I really like the content…..I have another idea about, fire logs….that may help….I receive lots of magazines, so, the question was to myself…..what do i do with them after I have enjoyed all i want from them…..and paper towel tubes, what to do with them….and the next thing is, roll those magazines up tight enough to fit inside the tubes till there is a small hole in the middle for air to go through and use small pieces of candle wax and strings as lighter points…..on the ends…..use them as fire logs…..
As far as nuts working their way loose,try running the drill in reverse
Has anyone tried to turn these ‘logs’ into charcoal? Just curious, wonder if they’d burn hotter.
Theoretically, yes. they would burn hotter as paper is typically made of wood, thus making it a hydrocarbon. The process of pyrolysis should still apply, it´s likely that these charcoal ¨bricks¨ or ¨Logs¨ would burn hotter than their average counterparts. it´s entirely possible to make a small charcoal mound to test this, which i may do (and if i do i will post an update of sorts)
To The writer of this article.
The machine that you spoke of, that turns newspapers into logs, is very versatile. If you want a fast burning fire, wrap the “newspaper” loosely. If you want the paper log to burn longer, then wrap the “newspaper” tightly. When you really tighten it down, it burns exactly like hardwood. The downside is that when wrapped tightly, it will burn slowly. I’ve made these logs to burn for 6 hours, whereas a loosely wrapped log will burn hot, but only lasts anout 30 minutes. Therefore, I can only surmise that you haven’t used a log maker very much, if at all. Otherwise, you taught me a different way to make burning “logs”, and I thank you for doing so.
Do I let them dry in the bucket before pulling them out? If so, how long do you keep it in there before taking it out? Thanks I can’t wait to try this!
RE: Todd’s Note on free buckets: 30 years ago, I COULD get free buckets from bakeries or grocery stores. No more. I have asked at MANY stores and their answer is they no longer give these buckets away, or even sell them. Seems they would rather pay to send them to the trash…How very sad!