If you’ve never done it before, making bread can seem a bit daunting, prone to disaster at every turn. It’s not really so bad as all that, though. While it’s obviously more time consuming to make bread from scratch than it is to buy it, learning how could make your life much easier if society as we know it ever collapses.
You see, there’s a reason that bread has been a dietary staple for eons, long before food came from grocery stores. For one, it’s satisfying. Bread fills us up and gives a sense of satiation due to its high carbohydrate content. Carbs, while demonized by today’s fad diets, are a fast way to get energy. It contains many vitamins and minerals we need, too. Bread is also flexible in its formulation. It can be made from the most basic ingredients with little special equipment. Its history traces back to the Stone Age, where tools of all kinds were simple and few and far between.
Related: How To Build an Earthen Oven: DIY Easy Tutorial With Pictures
In today’s society, the art of baking bread has become something of a specialty as bread is so readily available on supermarket shelves. The Amish in many places have maintained their tech-free, non-consumerist lifestyle, and therefore continue to make their own bread. Here are the 5 lost survival lessons I learned from the Amish.
Bread Basics
There are several types of bread, including batter bread, sourdough, and yeast bread. Batter bread is more cake-like and you don’t need to allow it to rise before baking. Sourdough bread uses what’s known as a starter, which you can create by allowing flour and water to ferment, to help the dough rise, creating a loftier bread. Sourdough is an ideal type of bread to make in a SHTF situation because you only need the most basic, easily obtainable ingredients, but starter takes time to properly ferment and you have to continue feeding it so that the fermentation process continues. There is no shortcut, unless you can talk someone into sharing some of their starter, which you’ll still need to feed. The famous Amish Friendship Bread is made using a basic sourdough starter like this, hence the name. Women would share their starter with friends and family. Yeast bread uses, you guessed it, yeast to help raise the dough. We’re making a yeast bread here, but the yeast in this recipe can easily be replaced with a sourdough starter.
The great thing about baking bread is that once you understand the basic science behind it, you can make adjustments to the process and recipes as you see fit. This flexibility makes it a great skill for survival situations.
This particular recipe is great as an all-around bread. You can cut down the sugar some if you’re looking for a more savory bread.
Getting Started
For this yeast-risen Amish sweet bread, you will need the following:
- 2 cups of warm water (110 degrees Fahrenheit). In a survival situation, water temperature matters. Without a thermometer, the water should feel warm but not hot on the inside of your wrist, similar to a comfortable bath. Too hot and it kills the yeast. Too cold and the yeast will not activate. Store note: water is water, but if you are on a well or using stored water, make sure it is not heavily chlorinated as chlorine can inhibit yeast activity. Let heavily chlorinated water sit uncovered for 30 minutes before using it in bread.
- 2/3 cup granulated white sugar. Sugar feeds the yeast and adds a mild sweetness to the finished loaf. Survival substitute: raw honey or maple syrup both work as direct replacements. Use the same quantity but reduce the water by 2 tablespoons to account for the extra liquid. Honey also has natural antimicrobial properties that can slightly extend the shelf life of the finished bread. Store note: white sugar stored in an airtight container keeps indefinitely. Honey also stores indefinitely and is one of the best long-term pantry staples you can stockpile.
- One packet dry active yeast (2 and 1/4 teaspoons). Yeast is the leavening agent that makes this bread rise. Store note: unopened packets of dry active yeast stored in a cool, dry place keep until the printed expiration date. Refrigerated yeast lasts significantly longer. Frozen yeast can last up to 4 years without significant loss of activity. Always proof your yeast before baking (instructions below) to confirm it is still active before committing a full batch of ingredients. In a long-term survival scenario, yeast is best replaced by a homemade sourdough starter. See the sourdough substitution section later in this article for how to make that swap in this recipe.
- 2 teaspoons of salt. Salt controls yeast activity, strengthens gluten structure, and is responsible for most of the flavor in a plain bread. Do not skip it and do not add it directly on top of the yeast before mixing as direct contact can kill active yeast. Store note: plain iodized or non-iodized salt stores indefinitely. It is one of the most important items in any long-term food storage pantry.
- 1/4 cup vegetable oil. Oil adds moisture and tenderness to the crumb and extends the shelf life of the finished loaf by a day or two. Survival substitutes: melted coconut oil, lard, bacon grease, or olive oil all work as direct replacements in equal quantity. Lard and bacon grease produce a slightly richer, more flavorful loaf and are easy to render and store on a homestead. Store note: refined coconut oil has a shelf life of 2 years or more. Lard rendered and sealed properly keeps for up to a year at room temperature and much longer refrigerated or frozen.
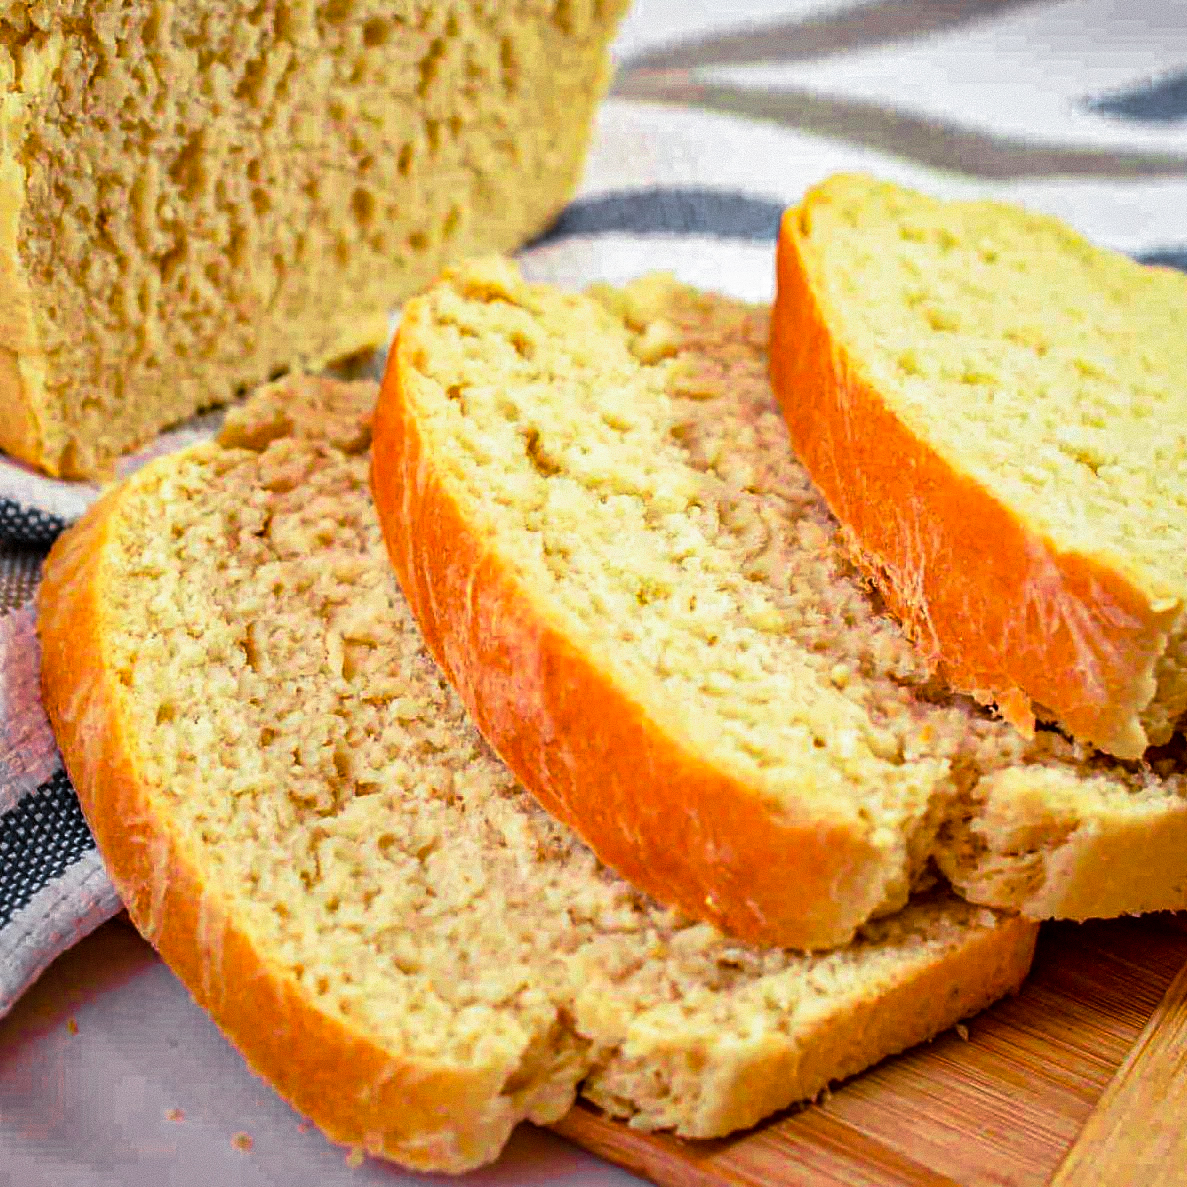
- 6 cups white all-purpose flour. Flour is the foundation of the recipe. Store note: all-purpose white flour stored in an airtight container at room temperature keeps for 1 to 2 years. Sealed in Mylar bags with oxygen absorbers it keeps for 10 years or more, making it one of the best bulk storage staples available. Survival substitute: you can replace up to half the white flour with whole wheat flour for added nutrition and fiber. Expect a denser, slightly heavier loaf. Using 100 percent whole wheat flour requires adding extra water (about 2 tablespoons more) and produces a significantly denser result. A mix of 4 cups white to 2 cups whole wheat is a good starting point for beginners experimenting with the substitution.
Now, time to get down to the business of learning to make Amish sweet bread.
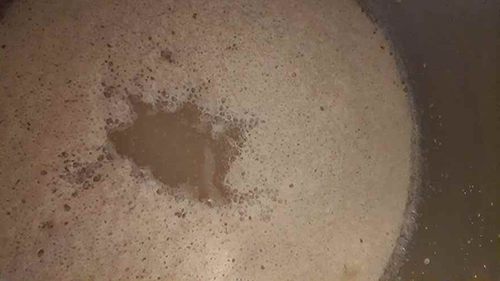
- Put sugar and warm water in a bowl, stir until dissolved. Now add the yeast packet. Let it sit until the mixture becomes foamy on the top. This means that the yeast has proofed and it’s ready to bake with. If your yeast doesn’t begin to foam up within about ten minutes, it may not be active anymore, or your water may be too cool or too hot. To get your water at the right temperature without a thermometer, put ½ cup of water in the microwave for one minute and add to the other 1 ½ cups of room temperature water. This should put it at right about the correct temperature, and if that doesn’t work, the yeast is likely no longer active. Yeast doesn’t live forever, so you may need to buy new. Carefully store yeast you’ve bought so that it’s not exposed to extreme temperatures or moisture.
Using Sourdough Starter Instead of Commercial Yeast
If you are using a sourdough starter in place of the commercial yeast packet, here is exactly how to make that substitution work in this recipe.
Replace the one packet of yeast (2 and 1/4 teaspoons) with 1/2 cup of active, recently fed sourdough starter. Your starter should be bubbly and active before you use it. The best time to use starter is 4 to 8 hours after feeding, when it is at peak activity and has visibly risen in its container.
Because the starter adds both flour and liquid to the recipe, adjust the remaining ingredients as follows: reduce the water to 1 and 3/4 cups (from 2 cups) and reduce the flour to 5 and 1/2 cups (from 6 cups). The dough should still come together with the same feel as the yeast version. If it seems too sticky after mixing, add flour a tablespoon at a time until it is manageable.
The proofing step changes entirely. Skip the sugar-water-yeast proofing step described below. Instead, combine your water, starter, sugar, oil, and salt first, mix well, then add flour gradually as described in the main recipe.
Rise times are significantly longer with sourdough starter than with commercial yeast. Expect the first rise to take 4 to 8 hours rather than 1 hour, and the second rise in the pan to take 2 to 4 hours rather than 30 to 45 minutes. This is normal. The flavor of a sourdough-leavened loaf develops during this extended fermentation and the finished bread will have a slightly tangy, more complex taste than the commercial yeast version.
In a long-term survival scenario, sourdough starter is the more valuable skill because it requires no purchased inputs beyond flour and water to maintain indefinitely. A well-maintained starter is a permanent leavening resource. Commercial yeast, however well stored, will eventually run out.
- Once the yeast mixture is proofed, add the oil and salt and stir.
- Now, you’ll need to add in the flour, but not all at once. Mix it in one cup at a time, making sure it’s well incorporated before adding the next cup.
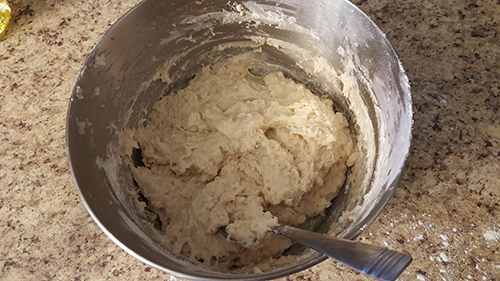
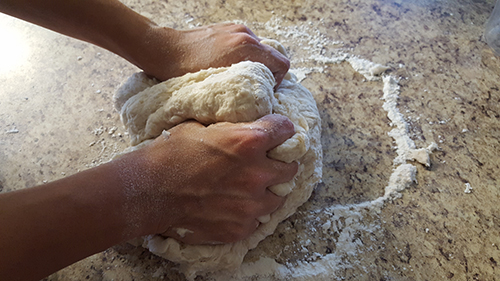
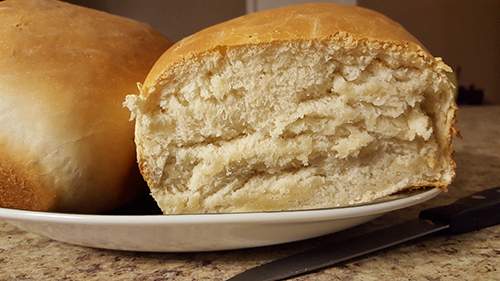
- Turn the dough out onto a lightly floured surface and knead for 8 to 10 minutes by hand. Kneading is not complicated but it does require a specific motion to be effective. Push the dough away from you with the heel of your hand, fold the far edge back toward you, give the dough a quarter turn, and repeat. That push, fold, turn rhythm is the whole technique. Keep the surface lightly floured to prevent sticking but do not add so much extra flour that the dough becomes dry. A small amount of tackiness is correct.
You will know the dough is properly kneaded when it is smooth and slightly elastic, springs back slowly when you poke it with a finger, and has a surface that looks almost satiny rather than rough and shaggy. Under-kneaded dough produces bread with a dense, crumbly texture because the gluten structure has not developed enough to trap the gas produced by the yeast. Over-kneading by hand is essentially impossible, so if you are unsure whether you have kneaded long enough, keep going for another two minutes.
This kneading step is the single most important technique to get right in bread making. It is also the step that most beginners shortcut because their arms get tired. Ten minutes of hand kneading is a genuine workout. If you find yourself stopping at five minutes, push through to ten. The difference in the finished loaf is significant and worth the effort.
 This abuse helps give the dough elasticity by stretching the infamous gluten fibers until they become more structured.
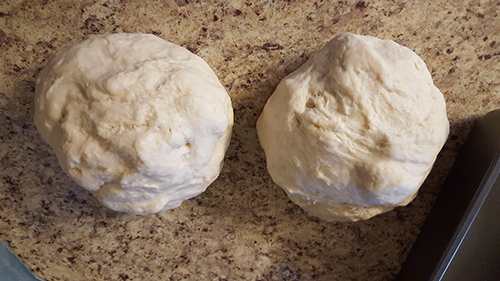
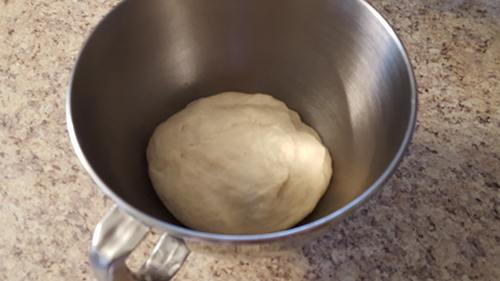
- Place the dough into a lightly oiled bowl and turn it once to coat the surface of the dough with oil. This prevents a dry skin from forming on the surface during rising. Cover the bowl with a damp cloth, a clean tea towel, or plastic wrap if you have it.
The dough now needs a warm, draft-free environment to rise properly. Yeast is most active between 75 and 85 degrees Fahrenheit. Below 65 degrees, rising slows dramatically or stops. Above 95 degrees, yeast begins to die. Getting the environment right is especially important in a grid-down or off-grid scenario where your kitchen temperature may not be controlled.
Here are practical ways to create the right rising environment without a modern heated kitchen. Place the covered bowl in an oven with only the oven light switched on. The light alone generates enough warmth to bring the interior to roughly 80 degrees Fahrenheit, which is ideal. Place the bowl near a wood stove or fireplace but not directly beside it. The ambient warmth from 3 to 4 feet away is usually sufficient without overheating the dough. Set the bowl in a sunny window on a warm day. Direct sunlight through glass can raise the temperature inside a covered bowl significantly. Place the bowl inside a larger bowl or pot of warm water, refreshing the warm water every 30 minutes if needed. In winter, the top of a refrigerator generates a small but consistent amount of warmth that is often just right for a slow, steady rise.
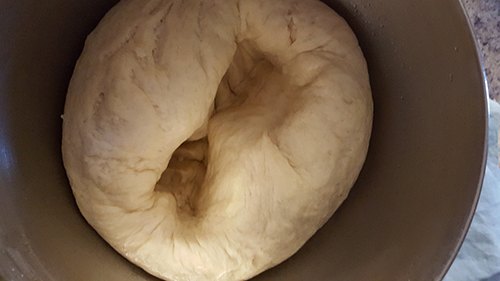
Allow the dough to rise until it has doubled in size. This takes approximately 1 hour under ideal conditions but can take 2 hours or more in a cool environment. Do not judge by time alone. Judge by size. When the dough has clearly doubled, it is ready regardless of how long it took to get there. A slow, cool rise is not a failed rise. It often produces slightly better flavor than a fast rise because the yeast has more time to develop complex flavors in the dough.
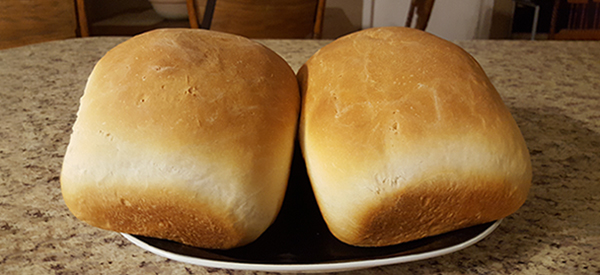
- Punch down the dough and divide it into two equal parts.
- Form the dough half into a loaf-like shape and place each in a 9×5 loaf pan that has been oiled.
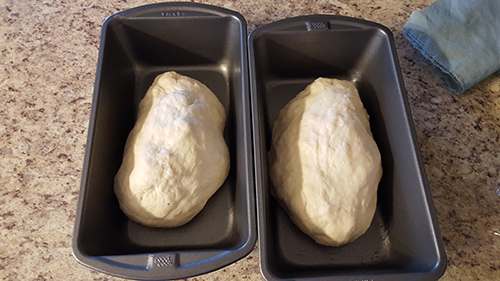
- Allow the dough to raise again until it doubles in size, or until it fills the pans.
- Bake in a 350° F oven for 30 minutes.How to Tell When the Bread Is Done
The 30-minute baking time is a guideline, not a guarantee. Oven temperatures vary significantly between units and baking at altitude also affects timing. Relying on the clock alone will occasionally produce underbaked bread. Use these tests instead to confirm doneness with confidence.
The tap test: remove one loaf from the pan and tap the bottom firmly with your knuckle. A fully baked loaf sounds hollow, similar to knocking on a wooden door. An underbaked loaf sounds dense and dull. If it sounds dense, return it to the oven for another 5 to 8 minutes and test again.
The internal temperature test: the most reliable method for beginners is an instant-read thermometer inserted into the center of the loaf through the bottom or side. The bread is fully baked when the internal temperature reads between 190 and 200 degrees Fahrenheit. Below 190 degrees and the crumb will be gummy and underbaked even if the outside looks golden. This test works regardless of oven variation, altitude, or any other factor.
Visual cues: a properly baked loaf is deep golden brown on the top and sides, and has begun to pull slightly away from the edges of the pan. If the top is golden but the sides are still pale and clinging to the pan, give it more time.
If you are baking off-grid without a thermometer, the tap test combined with visual inspection is your most reliable option. When in doubt, give the bread 5 more minutes. A slightly over-baked loaf is far more edible than an underbaked one.
Baking This Bread Without a Conventional Oven
The recipe as written assumes a working oven, but the entire premise of learning this skill is preparation for situations where that oven may not be available. Here is how to bake this bread using three practical off-grid methods.
Dutch oven over a fire or wood stove. This is the most historically reliable method and produces an excellent loaf with practice. You will need a cast iron Dutch oven with a lid. Preheat the Dutch oven by placing it over your heat source for 10 minutes before adding the dough. Grease the interior well with lard or oil. Shape the dough into a round loaf rather than the standard rectangular pan shape and place it inside the preheated Dutch oven. Cover with the lid. For a wood fire, place the Dutch oven on a bed of medium coals and place additional coals on top of the lid to create heat from above and below simultaneously. For a wood stove, place the Dutch oven directly on the stove surface and manage the fire to maintain a steady medium heat. Bake for approximately 35 to 45 minutes. Check doneness using the tap test or thermometer as described above. The bottom crust will be darker than an oven-baked loaf, which is normal and desirable.
Rocket stove with a covered pot. A rocket stove produces intense, focused heat from a small amount of wood fuel. Use a heavy pot with a tight-fitting lid as a makeshift oven, preheating it before adding the dough. The technique is identical to Dutch oven baking but requires more attention to heat management as rocket stoves burn hotter than an open fire. Keep the flame at a moderate level and check the bread at the 30-minute mark.
Solar oven. A solar oven or solar cooker can reach temperatures of 250 to 350 degrees Fahrenheit on a clear, sunny day, which is sufficient to bake bread. The process is slower than conventional baking, typically 60 to 90 minutes, and requires repositioning the oven to track the sun every 20 to 30 minutes. The advantage is zero fuel consumption. Solar-baked bread has a softer crust than fire-baked bread due to the more even, gentle heat. Use a dark-colored pot or pan inside the solar oven for best heat absorption.
For all off-grid methods, the doneness tests remain the same. The tap test and internal temperature check work regardless of your heat source.
- If you’d like, butter the top of each loaf while it’s still hot.
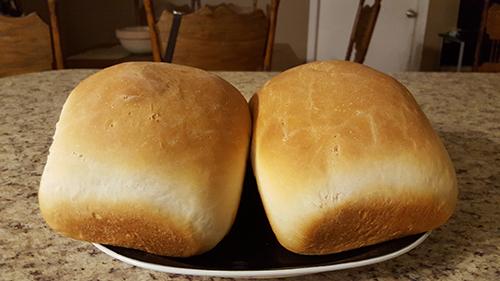
- Let the bread cool in the pans for ten minutes or so. Then, remove the bread from the pans by turning them upside down over a baking rack. Turn the bread right-side up and allow it to cool completely.
- Slice the bread carefully. This is one of the biggest challenges with satisfying homemade bread. There’s a reason for the expression ‘The greatest thing since sliced bread’. To get neat, non-squashed slices, use a sharp, serrated bread knife, or even employ an electric knife.
Storing Your Finished Bread
How you store this bread determines how long it stays good and how useful it is in a practical survival context.
At room temperature, fully cooled bread wrapped tightly in a clean cloth or placed in a sealed container keeps well for 3 to 4 days. Do not store bread in the refrigerator as the cool temperature actually accelerates staling by causing starch retrogradation, making the bread dry and firm faster than leaving it at room temperature would. The refrigerator is the worst place to store fresh bread unless mold is your primary concern, in which case the trade-off of faster staling for slower mold growth may be acceptable in a humid environment.
For longer storage, freeze the bread. Slice the fully cooled loaf before freezing so individual slices can be pulled out as needed without thawing the whole loaf. Wrap slices or the whole loaf tightly in whatever you have available: plastic wrap, aluminum foil, or a zip freezer bag with the air squeezed out. Frozen bread keeps well for up to 3 months. Thaw at room temperature or toast slices directly from frozen.
In a grid-down scenario without refrigeration or freezing, bread keeps longest in a cool, dry, well-ventilated location. A cloth bread bag or a wooden bread box both allow just enough airflow to prevent mold while protecting the crust. Wrapping bread in beeswax cloth is an effective modern alternative to plastic wrap that requires no electricity to produce or use. In hot or humid conditions, bake smaller batches more frequently rather than storing large quantities that may spoil before they are used.
Stale bread is never wasted on a homestead. Dry it completely in a low oven or beside a heat source and it becomes breadcrumbs or croutons. Soak it in an egg and milk mixture and pan fry it for French toast. Cube it and use it as the base for a savory bread pudding with whatever vegetables and protein are available. The shelf life of bread is not the end of its usefulness.
Baking bread is not as hard as it looks from the outside. Once you have made a few batches and understand how the dough should feel at each stage, the process becomes instinctive. Practice this recipe now, while you have the luxury of a controlled kitchen, reliable ingredients, and the ability to learn from a failed batch without consequence. That is when skills are built. The goal is to reach a point where you could produce a usable loaf of bread under pressure, with improvised equipment, in an unfamiliar environment. That level of competence only comes from repetition. Start the repetition today.
Troubleshooting Common Bread Problems
- The yeast did not foam during proofing. The yeast is either dead or the water temperature was wrong. Water above 120 degrees Fahrenheit kills yeast. Water below 100 degrees Fahrenheit may not activate it within the expected 10-minute window. Discard the mixture and start the proofing step again with fresh yeast and water at the correct temperature. Do not proceed with a batch where the yeast did not proof. The bread will not rise and the result will be inedible.
- The dough did not rise, or rose very slowly. The most common cause is a cool environment. Move the dough somewhere warmer using one of the methods described in the rising section and give it more time. A dough that is slow to rise is not a failed dough, it just needs more time and warmth. The secondary cause is yeast that was technically alive enough to foam during proofing but not vigorous enough to raise a full batch of dough. If the dough has not risen at all after 3 hours in a warm environment, the yeast is the problem and the batch will need to be restarted.
- The bread rose well but came out dense and heavy. Under-kneading is the most likely cause. The gluten structure was not developed enough during kneading to trap the gas produced by the yeast effectively, so the gas escaped during baking instead of creating an open, airy crumb. The solution is more kneading time on the next batch. A secondary cause is adding too much flour during kneading to manage a sticky dough. A slightly sticky dough is correct. A dry, stiff dough produces a heavy loaf.
- The crust burned before the center was cooked through. Your oven runs hot. Reduce the temperature by 25 degrees on the next batch and tent a piece of foil loosely over the loaves after the first 20 minutes of baking to slow the browning while the interior finishes cooking. For off-grid cooking, this usually indicates too much heat from above relative to the heat from below. Adjust your coal placement or fire management accordingly.
- The bread is gummy and underbaked in the center despite looking done on the outside. This is almost always a timing or temperature issue. Use the internal temperature test: 190 to 200 degrees Fahrenheit at the center is the only reliable confirmation that the bread is fully baked. Return gummy loaves to the oven for 10 more minutes and test again. Do not slice into the bread immediately out of the oven as the center continues to set during the cooling period. Slicing too early releases steam and can make a properly baked loaf seem gummy.
- The dough is sticking to the bowl or work surface badly. Add flour a tablespoon at a time, incorporating fully before adding more, until the dough is manageable. Be conservative: every extra tablespoon of flour you add beyond what is necessary makes the finished loaf slightly denser. A dough that sticks a little to your hands is correct. A dough that sticks dramatically and leaves large chunks behind is too wet and needs more flour.
- The bread did not rise in the pan for the second rise. The dough may have over-proofed during the first rise, meaning the yeast exhausted itself and has nothing left for the second rise. Over-proofed dough often smells very strongly of alcohol and may have collapsed slightly in the bowl. To avoid this, do not let the dough more than double during the first rise. The moment it has doubled, punch it down and move to the shaping step regardless of how much time has passed.
You may also like:

Why Walmart’s are Closing all Over America (VIDEO)
Mennonite vs Amish: What’s the Real Difference?


When you get the dough ready to bake how much dough do you take before you bake the dough. What do you do when you use the starter dough? The same amount of flour? Thanks
You only need a small lump to keep as a starter.
Check out James Townsend and Son videos on youtube.
They are an 18th and 19th century reenactors store and they have some really great videos on bread and a cooking series, preppers can learn a lot from them.
Not all breads require a starter like sourdough bread does. The dough made from the recipe is what you bake – simply divide in half, rise, and bake. I’m going to make this recipe either later today or tomorrow. I like simple bread recipes and this one appears to fit the bill.
Yes,, this recipe makes two loaves. It is the standard yeast bread recipe found in Betty Crocker, the Sourdough starter/ friendship bread follows. BTW, Sugar is the food for the yeast to grow.
Wow! A recipe even this 66 yr old guy can do! Thanks!
Dave, there is an even simpler way of doing this. No kneading involved. Artisan bread is extremely simple to make. I often do it without any sugar just a tsp of salt. If I want sweet bread I use honey. Look up artisan bread by Steve. I often add other ingredients such as onion powder, or some kind of broth to replace some of the water.
Love it, can’t wait to get started, this has been on my list to do for a very long time. I remember my Grandmother and Dad making homemade bread for us when we were young, in the 1950’s/1960’s. Grandma was born in 1905, she made the most delicious cinnamon buns, plus was an excellent all round cook. My Dad took after her.
There’s nothing like it . The whole house smells like bread ..sooo good and I usually eat a whole loaf with butter lol hard not to ..add your flour gradually ..you might not need the last cup of flour as you’ll be using some for kneading … enjoy!!!
I made this bread today. It’s flavor reminders us of King’s Hawaiian bread. This recipe is definitely a keeper.
I made this bread yesterday with gluten free flour, turbinado sugar and olive oil. Even though it did not rise enough because of my lack of experience and the age of the yeast, I will be trying again. The process was as easy as making a loaf of bread from a bread mix and the flavor is good.
gluten free flour doesn’t rise well because it is the 2 gluten-containing proteins in wheat that have the strong bonds to allow the rise. rye also has gluten, but somewhat less and barley has a bit. i would suggest a more neutral oil unless you are specifically wanting an italian style bread.
So happy to have found this site. Many of my recipes have been lost.
I know what you mean. Lost so many moving over the years. I am hunting for a Civil War era recipe passed down to my ex-husband’s grandmother. Lemon Cheesecake, 10 eggs, 6 lemons, flour and sugar. The lemons make a clear frosting.
Can you use oat flour as well?
You can always try it no one says that you can not. It may turn out different than what you expect, but that is how you learn. I once made brownies with Rye flour. It wasn’t all that good but would do in a pinch. I took it to work, and it got eaten, or at least people tried to eat it I did not check the trash cans, so I’m not really sure.
oh my! what a nice pair of buns!! lol
Been making bread for 80 years. way to young to stop now. Love yo read of others ideas and recipes. Thanks for this site, very enjoyable. Willa
P.S. I am on the Starch diet, and thankfully, Bread is on the menu. I am 89 years old, overweight, and have lost 11# this week I’ll never go back to eat all that food that is so bad for us. I’m never hungry and loosing like crazy. Willa
I buy my Yeast in 1 pound packages from Sams Club, and was wondering how much Yeast would I use from my big package equivalent to the 1 package in this recipe???
2 1/4 tsp
Sorry but Amish wouldn’t use and Electric Knife.
Can a bread maker be used for this bread??
An outstanding share! I’ve just forwarded this onto a co-worker who had been doing a little research on this. And he actually bought me dinner because I found it for him… lol. So let me reword this…. Thank YOU for the meal!! But yeah, thanx for spending time to discuss this topic here on your site.