As you might already know, a few weeks ago we published the first tutorial on how to make your own log rocket stove for free. You are now reading the second part of the tutorial on how to make two extremely cheap, yet extremely durable and portable rocket stoves. If you want to read the first part go to “How to Make A Cool Rocket Stove For Free“.
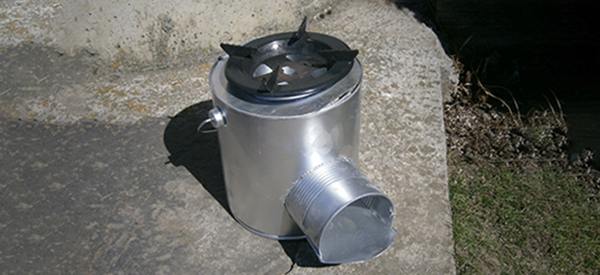
1. Tin Can Rocket Stove
This will be the most compact and the lightest rocket stove to move and carry around with you.
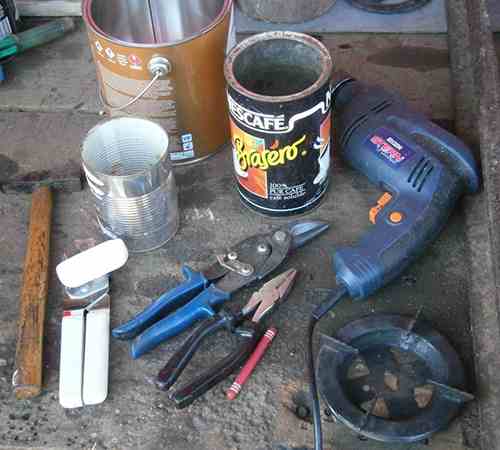
First, we will need to get everything we will be using:
- A large can (I’m using a paint can)
- A medium can
- A small can
- A drill
- A hammer
- A can opener
- A wax crayon
- A stove burner grate (I will also use a part of an old engine that I painted with heat-resistant spray paint.)
- Plate shears
- Pliers
- Heat-resistant spray paint (optional)
Related: 13 Survival Uses for a Tin Can
Step One: Cutting Out the Pieces
First, we will have to measure the bottom of the smallest can. Simply place it onto a piece of paper, and with the help of a pencil or the crayon, measure it out; then cut out the ring you made onto the paper.
Place the paper onto the side of the medium and then the large can, drawing the circle onto it. Make sure they are roughly the same level in height.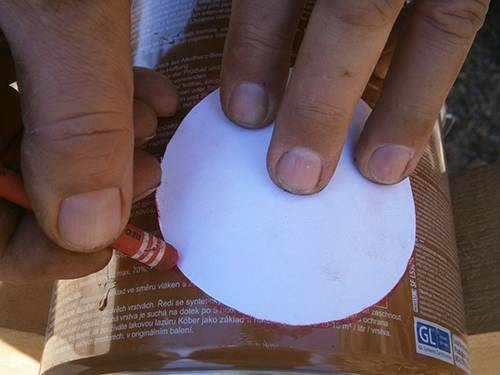
Now cut out the bottom of the smallest can using the can opener; this will be used to fuel and to feed the fire with air.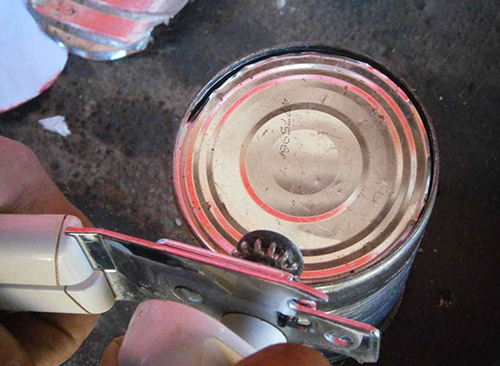
Now, with the help of the drill, make a hole in the medium can to help while cutting the circle out. Grab the plate shears, and cut along the line of the circle. After you’re done, repeat the process on the large can.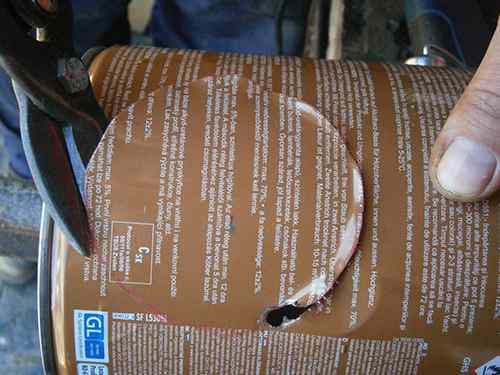
At this point, you can put it all together to get an idea of how it will look. Place the medium can inside the large one, and then push the small one through the holes of both cans.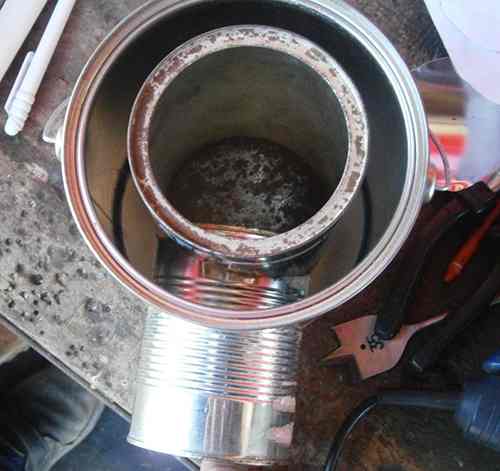
To make sure that the small can will stay stable, cut into the edges onto the side so that they can be bent inside the medium-sized can after placing inside.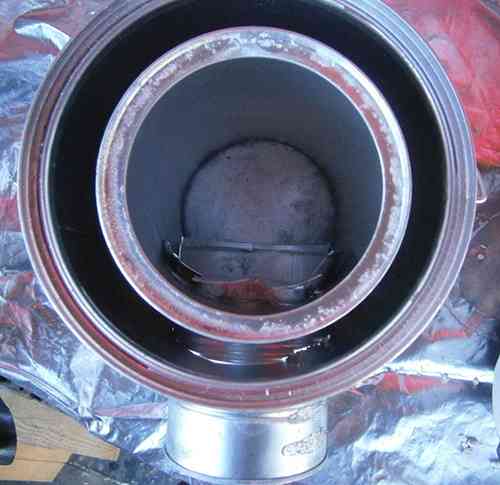
I grabbed a piece of sheet metal from around my house and cut it into this mushroom shape, making sure that the base of the mushroom would fit into the small can tightly. If you don’t have any scrap sheet metal lying around, you can use the top of the paint can.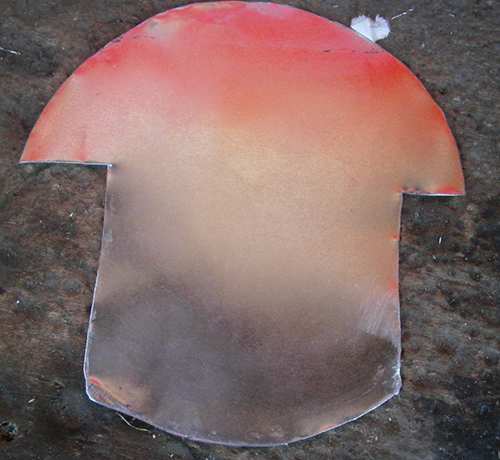
I cut lines into the head of the mushroom, following the line of the base so I could slide it in deeper and secure it inside the can. Make sure that you leave a small space at the bottom. This will let in the air to help the fire burn, and the top hole will be where we fuel it; this way, we can feed as much fuel to the flame as we want without having to worry about whether the fire will go out from lack of oxygen.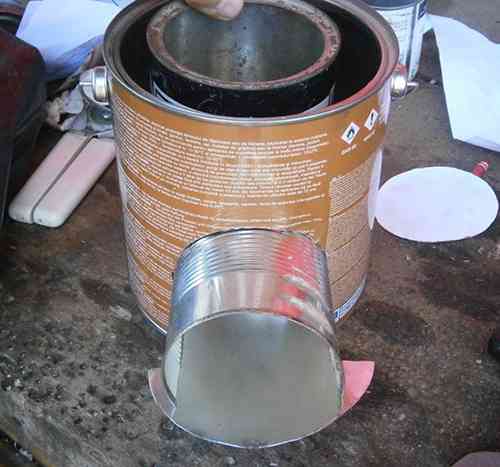
Step Two: Painting and Creating the Insulation Chamber
I decided to spray paint the cans with heat-resistant spray paint. This step isn’t necessary, but I like how it looks.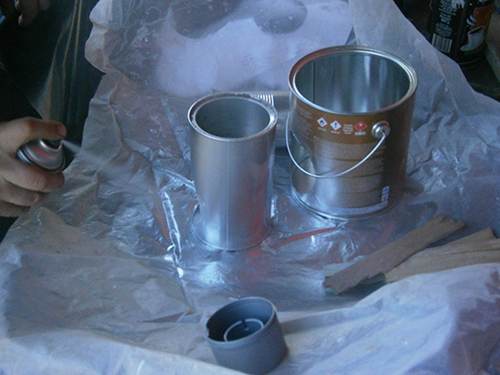
After they all dried, I grabbed the material I will be using to keep the heat in the insulation chamber.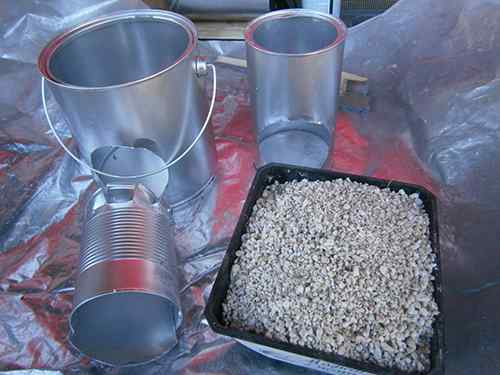
I’m using agro perlite that I usually use in my hydroponic greenhouse as soil for the plants. You can use any material that doesn’t catch on fire easily and keeps the heat in well.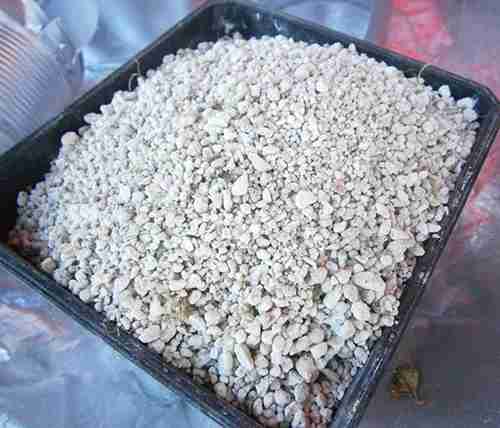
Place some on the bottom of the large can, and then put the whole thing together once again.
Fill up the space between the medium and large cans as much as you can. I used a two-liter bottle that I cut into two pieces to help out with filling.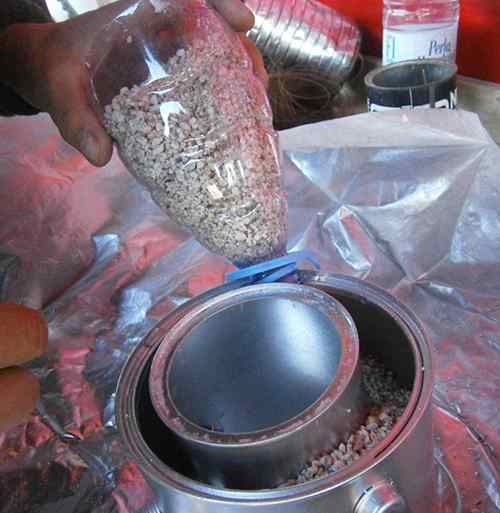
Fill it as high as you can. The more that can get in there, the better the insulation will be.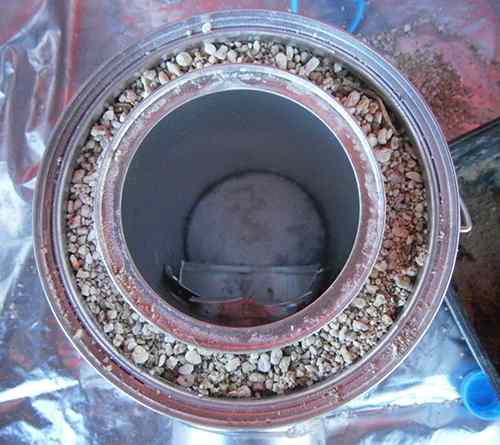
Cut out of a ring that will be placed on the top of the insulation chamber. This way, no fire or wind can get in there.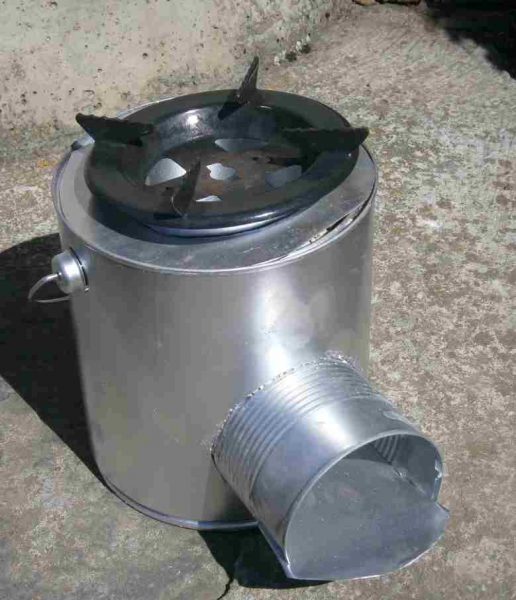
I also made a grate out of an old engine I found. I just spray painted it with heat-resistant spray.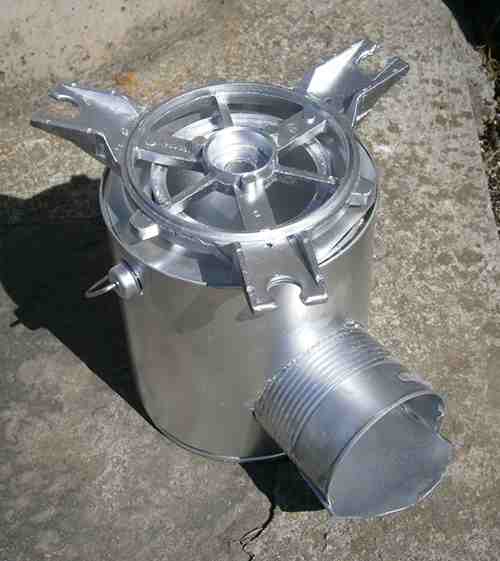
Step Three: Lighting It
You can use anything as fuel, but the better it burns, the stronger your fire. Here’s how to make fuel from birch.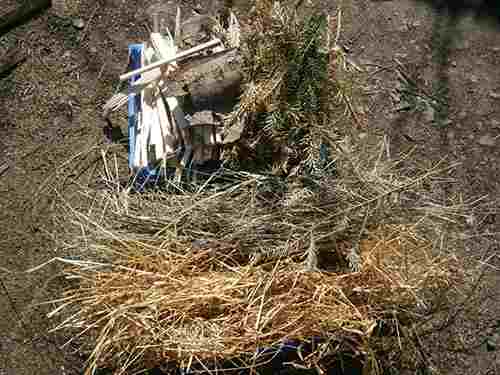
I started out with dried grass then changed over to bark and small kindling.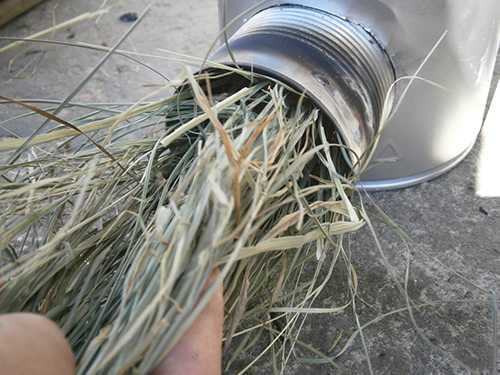
You can see that the oxygen hole is empty so the fire can get enough air to burn.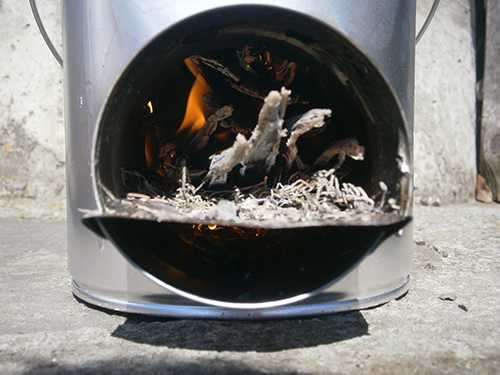
In a few minutes’ time, it was able to boil my cup of water.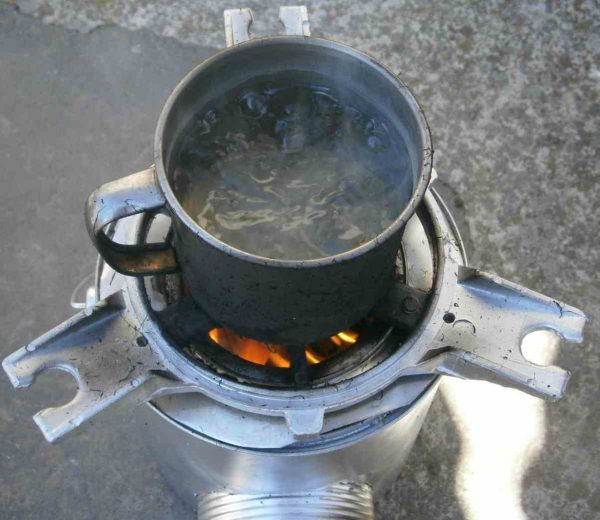
2. Long Burner Rocket Stove
This rocket stove is special because you can use up to six – to seven-feet-long wooden sticks, keeping the fire alive for a long time.
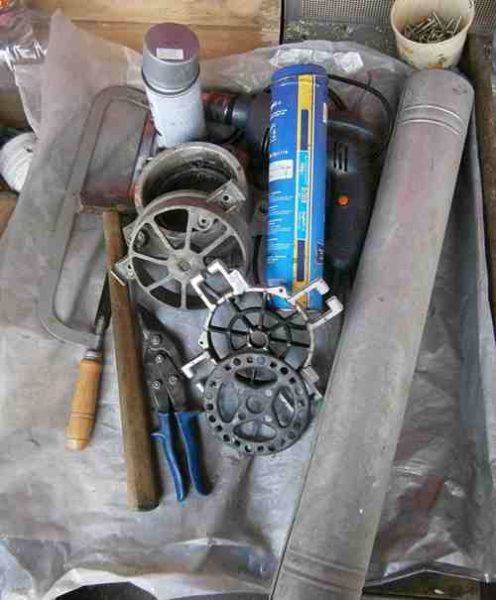
First, let’s gather the necessary items:
- A metal handsaw
- A hammer
- Plate shears
- Heat-resistant spray paint
- A drill
- A stove burner grate (I will also use a part of an old engine that I painted with heat-resistant spray paint.)
- A large pipe (I’m using a piece of a rain-water drain pipe.)
- A small pipe
- Heat-resistant spray paint (optional)
- Rivets and a rivet gun (optional)
- Heat-resistant paste (optional)
Related: Tools You Will Need When SHTF
Step One: Cutting Out the Pieces
Take a piece of sheet metal, and place the smaller pipe piece against it at an angle; then mark it with the crayon. You can use any type of surface that is straight enough; the important thing is to set the pipe at an angle so the wood pieces won’t fall out of it easily. This pipe will be used to fuel the flames.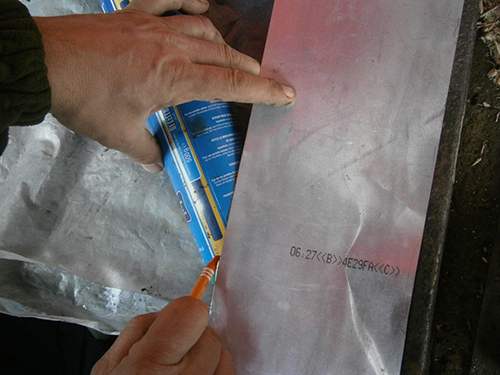
Using the metal cutting saw, we can start cutting it by following the lines of the crayon.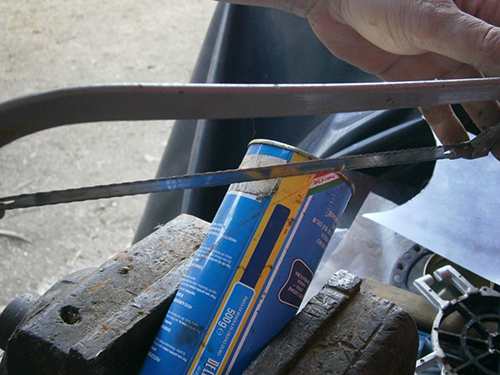
Place it onto the larger pipe, and put it on the side where you want the bottom of the rocket stove to be. Then cut the hole using the drill and the plate shears.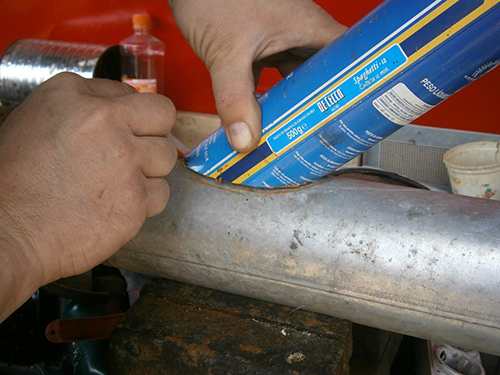
I also cut into the smaller pipe to hold it in place from the inside. This will give it more stability when handled.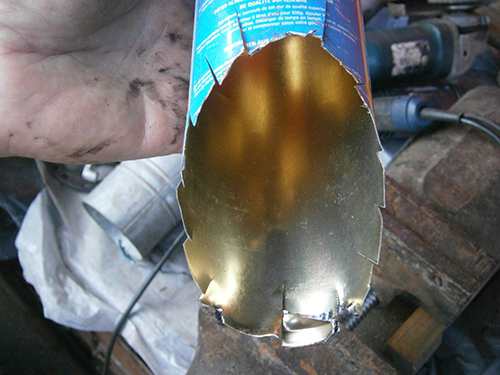
Put it in, and using the handle of the hammer, bend the metal to hold the smaller pipe.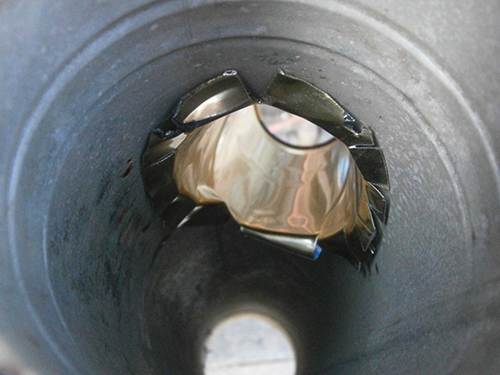
This is how it looks right now.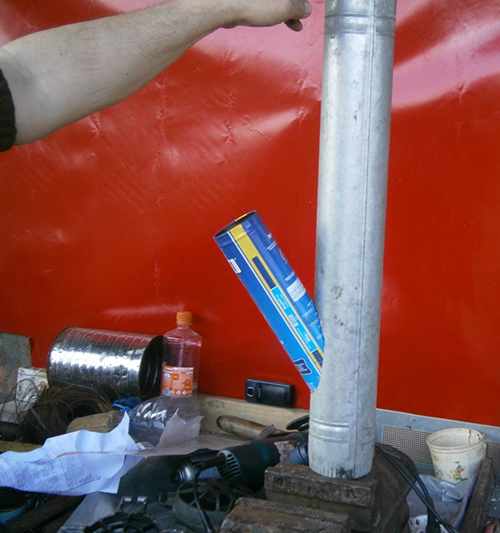
Step Two (Optional): Sealing and Painting
Using the rivet gun, I made sure the smaller pipe won’t move around.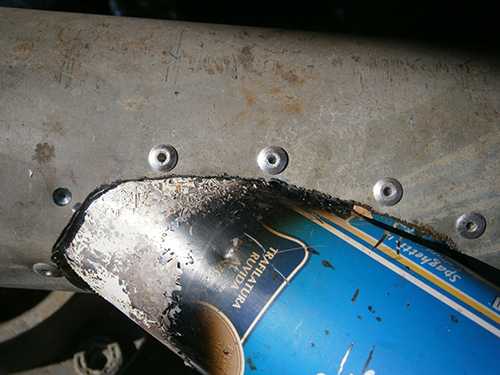
I finished the job with some heat-resistant paste to make sure the flames wouldn’t escape. Put enough onto it so it can last, but don’t overdo it either.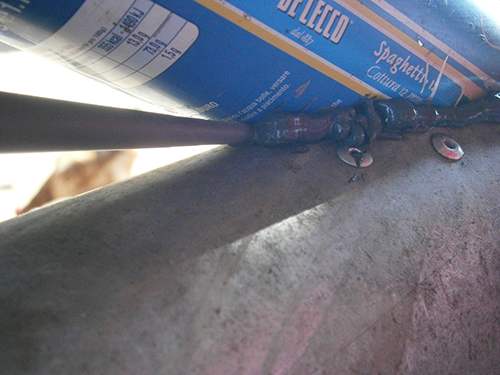
I smeared it around so it could seal evenly.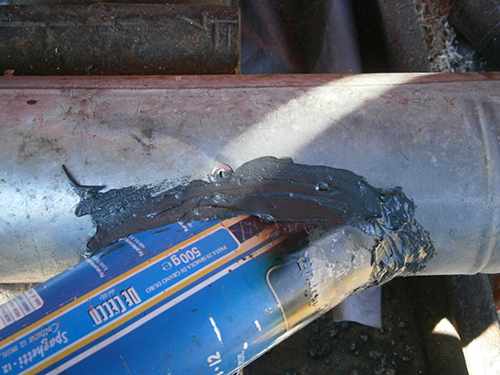
After it hardened, I used sandpaper to smooth it out to give it a cleaner look.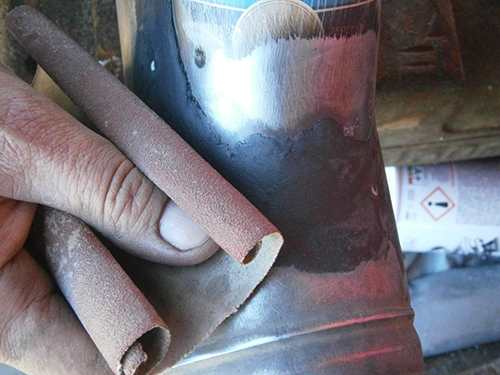
I spray painted the whole thing with heat-resistant spray paint and waited until it dried.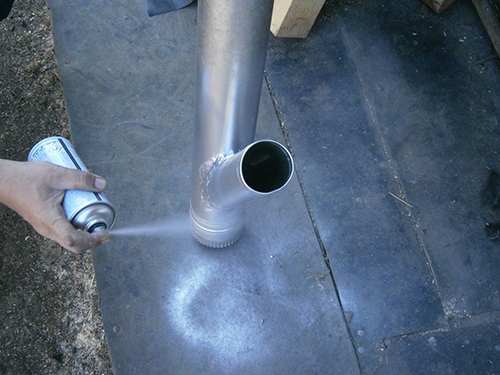
Step Three (Optional): Making a Stand for the Wood and Making a Furnace Ash Tray
I first looked around my house for some old pieces of scrap metal, hoping to find anything useful, and found an old broken metal chair that had one of its legs missing but was good for what I needed. I also found a bike seat and thought it would be good for holding the sticks up. They don’t need much support, so it should be enough.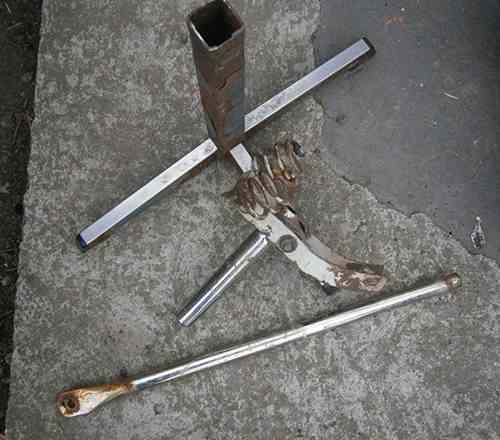
I spray-painted it to make it look a little better and then started looking for more pieces. I ended up going back to the engine I used to make the burner grates and took a few more parts out to make the ash tray. I also found a piece of metal that I think was part of an old washing machine. I spray painted these as well.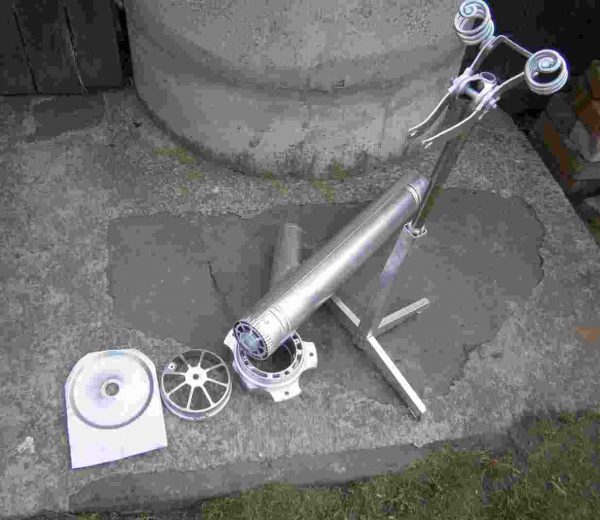
This is how I put it together.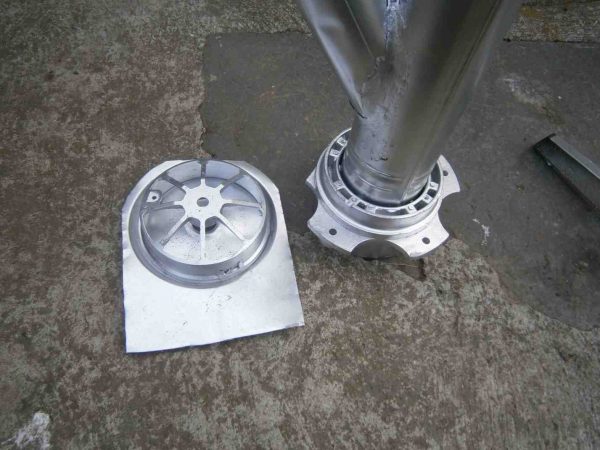
With the support, I was able to put four-feet-long pieces of wood into it, but you would be able to put longer pieces too, such as six-feet- or even seven-feet-long pieces.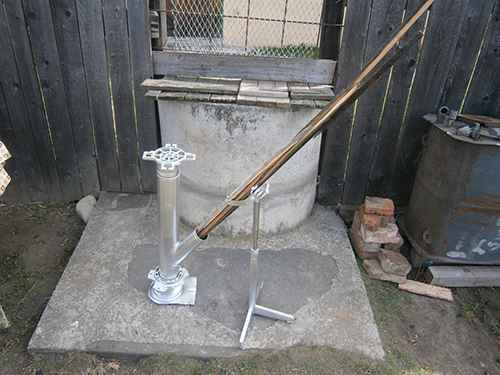
Step Four: Lighting It
I stuffed it with hay and pine needles to jumpstart the fire and placed the wood pieces in to keep the fire alive.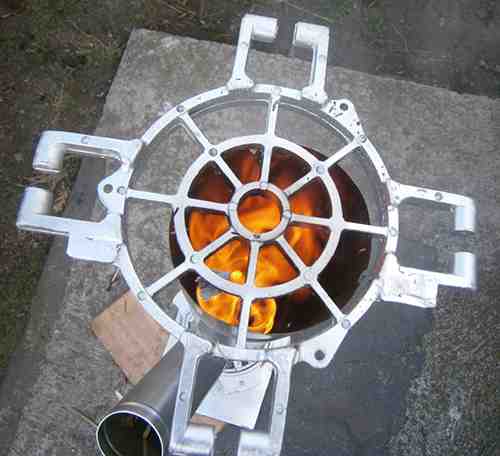
It was quite fun watching the wood slowly but surely slide down into the fire. I used an old plank that I cut into long pieces.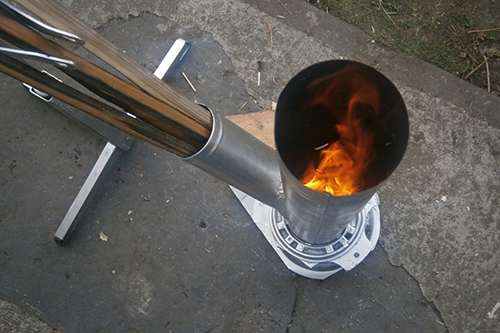
I put a cup of water onto the fire to test its power out. It boiled faster than I expected.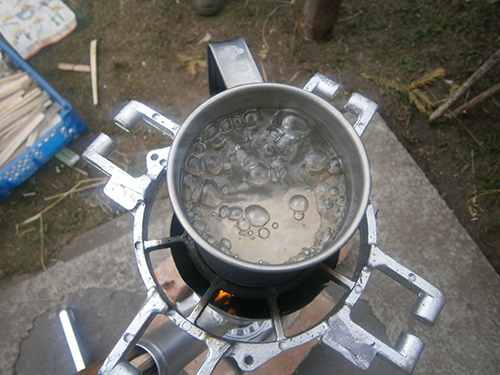
If you make the larger pipe longer, you could have some serious heat distribution, but without anything to hold it in, it won’t be as useful as it could be.
By stacking it up high with bricks or even stone, you will have yourself a great heat source that will keep giving you warmth even after the fire dies down, like a mini furnace.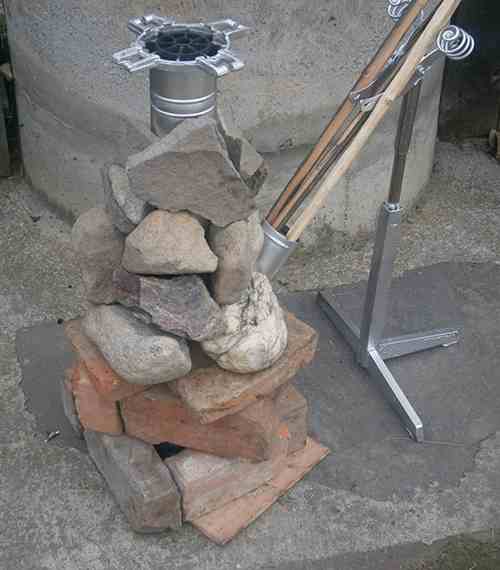
These rocket stoves are amazing things that you can make easily (but with a limited use) or make in a more complicated way (to have it with you at all times in the size of a paint can or a drainage pipe), but however you do it, rocket stoves will be useful even in the toughest of times. Just light it up and enjoy your freshly cooked or heated meal.
You may also like:
 50 Low-priced Items That Will be Invaluable when SHTF
You Will Not Survive An EMP Strike Without This (video)
10 Great Depression Era Strategies For Saving Money


Just a thought for possible materials for the 1st model “tin can”, triple wall flue pipes from a wood burner and corn/pellet stove. Find a lot of stuff at architectural 2nd hand stores or remodeling jobs.
KUDOs to the author for a good build list, clear instructions, and lots of photos 🙂
Very useful
I hate to be a nay-sayer but sometimes I think we need to say that the emperor is buck neked. By the time one buys or spends time scrounging the materials to make the second stove, or, indeed, even the first stove, one could buy a rocket stove that does similar for under $100.00 For less than $150 one can buy a rocket stove that also, using a thermocouple (I think that is the correct term) will generate enough energy to run the fan to make the stove a real blast furnace, a light and recharge your phone or other small chargeable device. This is like the bicycle driven washing machine or the device that makes logs out of paper pulp. Too much energy expended for the return. If you need a hobby because you have too much time on your hands, these are fine but if your day is pretty darned full anyway, save up your pennies and buy professionally made items. Or even an easier item to make is a 3# coffee can and a beer can opener. You do remember those, don’t you? Used to be standard equipment in the glove compartment of every teenager, aka churchkey. Take the 3# coffee can (metal, not plastic) and the churchkey. punch holes through the bottom of the can. I like 8 holes. Punch holes through the side of the can around the bottom. Now coms the tricky part. at the other end of the can repeat the hole punching, being careful not to bend the can up too much. Now using some kind of metal cutting device, a hacksaw blade, a dremel tool with a cut-off wheel cut an opening in the can so that you can put your fuel in. I recommend leaving the rim of the can uncut to add structural integrity to the can. Turn the can upside down so that the open part is on the ground and the closed part is up. You rest your pot on the former bottom of the can. Voila! A hobo stove. Lacking a churchkey, one can use a large nail to punch holes in the can. You can use a knife to cut the fuel hole if you are careful and can re-sharpen your knife.
Having said that, this information is handy to know in the event you have been robbed of everything in an ETOW situation by the criminal gangs that will form and all of your stuff has been stolen. Then you will have to get busy and make your own stuff from items you can find. If that is the case though, a Dakota fire will do the same thing and can be accomplished with a sharp stick and clothes can be rinsed out in a 5-gallon bucket that you stole from the local bakery — or bought at Home Depot. —Or, as someone else suggested, pounded on a rock with a stick. Although, for the first few years after an ETOW, I wouldn’t touch any surface water without boiling it first. I think when the Indians were using a rock and stick the water was a lot cleaner than it will be after the ETOW.
Your thermocouple thing should be a Thermo-Electric Generator. Made in China, range in price from about $5 each to $40 or more. One side gets hot, the other needs to stay cool. Presto, DC electricity. That is what the old Systems for Nuclear Auxiliary Power used for the satellites put in orbit back in the mid 1960’s. Spent nuclear material from reactors provided the heat. This thermo-electric generator (TEG) device is what is being used in the cook your food, charge your cell phone devices that are being offered in various stores. The cells used in the electric coolers will actually do the same thing, but lack the material strength that the TEG’s have.
Yah, left coast chuck, but this was FUN! Fun to make, fun to use, and you get to feel so virtuous recycling and repurposing all that stuff! My first thought was, Who let you keep all that handy stuff? Somebody is always nattering at me to get rid of all that detritus, what is it good for? I’m not Arminius, but making something out of “nothing” inspires me. So instead of feeling impoverished by my lack of creativity (or of stuff, or money or whatever), I am tickled to see someone else do it, and I may even get better at thinking outside of the box. And also learn a little practical physics along the way.
I was just thinking about the value of a good sense of humor, which so many who write here have, and how that alone can shrink the fears and anxieties down to size, so we can really just live in whatever moment we have.
Thanks to all of you who share your delight, knowledge, and wisdom with the rest of us!
Most of your comment can be negated just by pointing out that these burners aren’t for camping, for sh*ts & giggles, or to get rich quick/mass production. All articles, items and plans from here have one thing in common, right off the bat: their primary purpose is for when SHTF. Zombie apocalypse comes down on us, civilization collapses, everyone stealing from each other, profit will no longer be a concern. That’s what these burners are for. You might have noticed that, if you had paid attention, and read pretty much any of the articles, they make it pretty obvious that the driving force behind this whole website is for when the SHTF. Instead, you choose to look like a fool, when you sling blind insults. Good luck with that.
I built a rocket stove out of a #10 can and couple of bean cans. Its fun to build things like this. I’d love to build a rocket stove that had a secondary burn.
Thank you very much for your post, it makes us have more and more discs in our life, So kind for you, I also hope you will make more and more excellent post and let’s more and more talk, thank you very much, dear.
Stove burns hot and long. Yours looks well made- mine is a little more shoddy.
An EXCELLENT tutorial! Thank you. It is nice to see someone use “junk” to make something useful.
Well, the safety fairy reared its head again in the schools. They demonstrate how to make a rocket stove but out of plastic instead of metal. Can not have or kids slicing their little fingers. I guess flaming and melted plastic isn’t as bad except when the school burns down.
Has any one gotten that DIY Solar Box to power your house. If so how is it or was it another scam
Did yo ever get an answer to this question? I’ve been wondering the same thing myself. They make you pay for the plans to build these things, but I haven’t been able to get one to work. Wondering what I’m doing wrong or if it is just a scam like I suspect?
Wouldn’t accept my comment. Said I’d already commented! How rude! If so, where is my comment!
Did yo ever get an answer to this question? I’ve been wondering the same thing myself. They make you pay for the plans to build these things, but I haven’t been able to get one to work. Wondering what I’m doing wrong or if it is just a scam like I suspect?