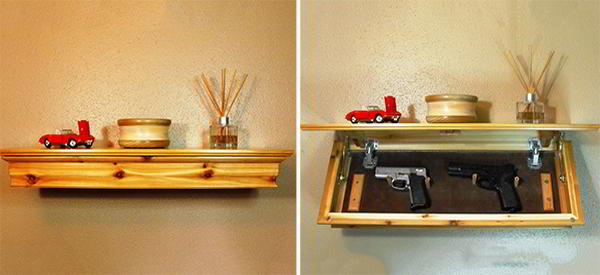
There are certain items you want to conceal from the eyes of anyone who enters your home, particularly when society goes south. But a good place to hide these items can be extremely difficult to find. Any visible drawer or cabinet is a target to anyone going through your home, so you need a place to hide these things that is concealed and does not appear obvious in any way. Fortunately, there is a fantastic solution to this problem.
The ideal hiding place is a concealment shelf. The beauty of the concealment shelf is that it just looks like a wall-mounted shelf. It is beautiful to look at, can hold family pictures, ornaments, or plants on it, and is incredibly unassuming.
But preppers can use this sort of shelf to conceal any number of important items, such as:
 Important documents, such as passports
- Spare keys
- Extra money
- Weapons
- Emergency kit
- Hand-held radios
- Anything else you can think of
Building a concealment shelf is quite simple, provided you have the right tools and materials to get the job done.
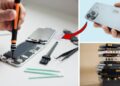
Materials and Tools
The following are the materials and tools you will need to build your concealment shelf.
- 4 feet of 1-inch by 12-inch common board
- 4 feet of ¼-inch by 1-inch emboss rope
- 4 feet of 4-inch hardwood emboss crown molding
- 12-inch miter saw or hand tools
- Wood glue
- Finishing nails and hammer or nail gun
- 2-inch wood screws
- Drill with standard bit and 1 3/8 forstner bit (or chisel)
- Mortised full overlay cup hinges
- Magnetic locks (child safety locks)
- Toothpaste
- Wood stain and finish
- Diamond-plated aluminum tread for decorating the bottom of the concealment section (optional)
- Half-inch No. 6 sheet metal screws
- 6 flat washers
- 2 feet of jack chain
Directions
When cutting the common board, you will need to be careful and make use of the old saying “measure twice, cut once.” If you are careful in how you cut the pieces, you can maximize the use of the board and get the following:
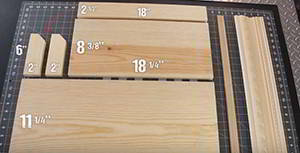 A piece measuring 24 inches by 11 ¼ inches
- A piece measuring 18 ¼ inches by 8 3/8 inches
- A piece measuring 2 ½ inches by 18 inches
- Two pieces measuring 2 inches by 6 inches with a 1-inch 45 degree angle cut off one corner on each piece
- Use the scraps to make two triangular prisms
Now you need to cut the crown molding to the right size. Here is what you do:
- You want to cut a piece of crown molding so the width of the bottom is the same as the width of the piece of common board measuring 18 ¼ inches by 8 3/8 inches. Simply line up the crown molding and measure from the right end, marking with a pen or marker where you need to cut the piece.
- Set your miter saw blade clockwise to cut at a 45 degree angle and cut right through your mark.
- Mark the other end of the remaining piece of crown molding the same width of the first piece. Make sure you are marking from the flat end, not the angled end you just cut.
- Set your miter saw blade counter clockwise to cut this end of the crown molding at 45 degrees the other way. You will end up with two smaller pieces of crown molding that have one flat end and one angled end.
- Take the leftover piece of crown molding, and with the miter saw blade still set counter clockwise, cut the right end of it so the angle at that end is angling out from the bottom to top.
- Measure the bottom of the crown molding from the end you just cut so the bottom of it is the same as the length of the common board measuring 18 1/4 inches by 8 3/8 inches.
- Set your miter saw blade clockwise and cut the angle so it is the opposite of the other end.
These crown molding pieces make the wall of the shelf and should fit snuggly together. Next you want to cut the trim, which is the emboss rope measuring 2 1/2 inches by 18 inches. You want to cut this emboss rope into three pieces, two to match the width of the common board measuring 24 inches by 11 1/4 inches and one matching the length of the same board. You will then use your miter saw to cut 45 degree angles at one end of each of the short pieces and at both ends of the longer piece so they fit together the way the crown molding fit together.
You now have all the pieces you need for the concealment shelf. All you have to do is assemble it as follows, making sure to use wood glue and finishing nails to help secure all connections:
- Start by securing the smaller 6-inch by 2-inch blocks to the flat side at each end of the piece measuring 2 1/2 inches by 18 inches. This forms the support bar. Make sure the smaller pieces are secure and flush against the side and top of the larger board, which will leave a slight offset at the bottom. The 1-inch angle cut should point down. Secure these with finishing nails and drill a two pilot hols at each end, using the 2-inch wood screws to make the shelf more stable.
- Glue the bottoms of the crown molding pieces to the sides of the second-biggest piece of common board and secure with finishing nails. Use glue and finishing nails in the corner joints, as well.
- Secure the trim to the largest board with glue and finishing nails, ensuring it hangs half off the bottom edge of the board. This is the top of the shelf. Place it over the bottom to ensure it fits well.
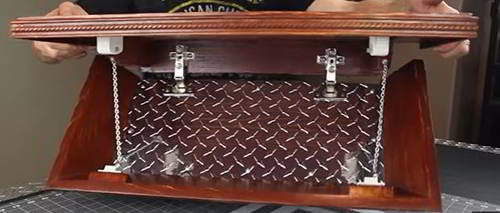
- Center the hinge template 3 1/2 inches in from each side of the inside of the bottom of the shelf. They should be placed at the back edge. Mark the center, then use the forstner bit to drill a hole the hinge will fit into. If you are using a chisel, be sure to make the just deep enough for the hinge to settle into. Adjust the hinges so they are at their longest and attach them to the bottom of the shelf. Then bend the hinges and attach them to the support bar such that the top can fit snuggly on the base of the shelf.
- Secure the top of the shelf to the sides and back of the support bar. Test the hinges to ensure they work properly.
- Install the magnetic locks inside the front of the shelf. First, glue and nail the small prism pieces inside and flush with the top edge of the crown molding. Screw the locking plates onto the inside of the prisms, then place your toothpaste on the tops of the locking plates and close the lid. Open the lid and the toothpaste will mark where the locks should go on the inside of the top of the shelf. Screw in the locks and adjust them to fit with the locking plate.
- Stain and finish the shelf. It’s best to remove the hardware before doing this.
- Install the diamond-plated aluminum in the bottom of the shelf if desired, making sure to cut out the sections where the hinges go and securing the hinges in place over the plate.
- Cut two pieces of jack chain, each of which is 7 inches in length. Using the sheet metal screws and the washers to secure one end of the chains to the center of the 1-inch angled cut on the support arms and the other ends into the front corners of the base.
That’s it! You can get small magnets and secure them to the bottoms of ornaments. These are well-hidden and can be used to unlock your shelf when needed. This concealment shelf is ingenious and inexpensive to make. You can make as many as you need and they make such a nice addition to your décor. Happy construction!
Check out this video tutorial:
You may also like:
 16,000 Woodworking Plans For Beginners
If You Are too Weak to Prep then You Need to Watch This (Video)


Thank you so very much.
Been looking for a way of concealment I can afford
Thanks a bunch You gave me some great ideas.
You didn’t show how you attached it to the wall. That would be helpful. Love your shelf idea and will be using it. Thank you.
Awesome Job, Great ideal my son and I will be making one. Thank
I agree do not cut the top until you confirm the final size of the assembled bottom and cove molding
Don’t cut the top board until you measure how big the molding actually is.
Well, I just finished my first shelf unit. There were a lot of adjustments I had to make. I cut all the pieces to size/length but the cove that you use makes ALL the difference. The 4” cove I used changed the top length and I had to add a 3/4” piece to the top of the cove allow the hinges to have enough room.
I’m going to start a second one I’ll make some adjustments.