If you think food security means having a few extra cans in the pantry, think again. When the power grid flickers out, supply chains crumble, and “just-in-time delivery” becomes “never,” your survival depends on one thing — how well you preserved what you’ve got. That’s where Mylar bags come in. These shiny, unassuming sheets of metalized plastic are the unsung heroes of long-term food storage. But here’s the kicker: you don’t need fancy gear to use them. You can seal them tight with nothing more than a household clothes iron — the same tool used to flatten dress shirts and hide wrinkles from your boss. Let’s break down how to do it right, why it works, and the mistakes that can quietly destroy your emergency stash.
Why Mylar Bags Are the Backbone of Real Food Security
Mylar isn’t just plastic — it’s a multi-layered barrier designed to block light, moisture, and oxygen. And oxygen is the real enemy here. It’s what causes your rice to go stale, your beans to spoil, and your powdered milk to turn rancid. When you remove oxygen and seal food in Mylar, you’re not just storing it — you’re locking it in time. Done right, this setup can keep your food safe for 10, 20, even 30 years.
But here’s what most people don’t realize: expensive heat sealers, “food-grade” gimmicks, and “survival kits” on Amazon are just marketing fluff. Preppers from the old school knew you could get the same airtight seal using the one tool everyone already has — a clothes iron.
What You’ll Need
You don’t need a bunker or a $500 dehydrator. Just a few simple things:
- Mylar bags – Usually 1-gallon or 5-gallon sizes depending on what you’re storing.
- Oxygen absorbers – These little packets remove any leftover O₂ inside.
- A clothes iron – Preferably one with adjustable temperature.
- A wooden board or ironing surface – You’ll need a flat, heat-safe base to press against.
- Your dry goods – Rice, beans, flour, pasta, oats, sugar, salt, powdered milk — anything low in moisture.
Step-by-Step: How to Seal Mylar Bags with a Clothes Iron
- Fill the Bag
Pour your dry food into the Mylar bag, leaving about 3 inches of space at the top. Don’t pack it too tight — you’ll need room for the seal. - Add Oxygen Absorbers
Just before sealing, toss in the correct number of oxygen absorbers (usually one 300cc per gallon of volume). Don’t waste time — these start working fast once exposed to air. - Flatten and Position
Lay the open edge of the Mylar bag flat on your wooden board or a clean countertop covered with a towel. - Set the Iron
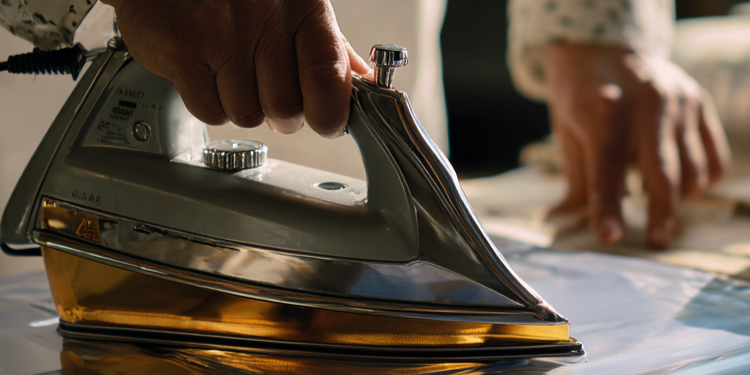
Turn your iron to wool or cotton setting — usually around 350°F (175°C). You don’t need steam; make sure it’s dry heat only. - Seal Slowly and Evenly
Press the iron across the open edge of the bag for about 2–3 seconds per section. Work your way across slowly, overlapping slightly as you go. You’ll feel the material fuse together under the heat. - Check the Seal
Let it cool for 30 seconds, then press lightly to check for leaks. A proper seal should feel smooth and rigid, not flimsy or crinkled. - Label Everything
Use a permanent marker to write what’s inside and the date. Trust me — six months from now, every silver bag looks the same.
The Mistakes That Ruin Mylar Bags (and Your Food)
- Sealing with Moisture Inside:
If the food’s even slightly damp, bacteria and mold can thrive — no matter how airtight your seal looks. Always dry your food completely before packing. - Using Steam or a Low Heat Setting:
Moisture or weak heat won’t melt the Mylar layers properly. That means microscopic air gaps — and spoiled food later. - Overfilling Bags:
You need at least a few inches of free space for a solid, even seal. If you cram too much in, the iron can’t press evenly, and the bag will fail under pressure. - Forgetting Oxygen Absorbers:
This one’s fatal. Without them, your “sealed” food still has enough oxygen inside to rot from within.
Why This Method Still Works When Everything Else Fails
When the grid’s down and your vacuum sealer’s a paperweight, this trick still works. A clothes iron can run on a generator, solar inverter, or even a hot flat rock if you’re desperate enough. That’s the beauty of old-school knowledge — it doesn’t depend on fragile systems.
And don’t be fooled — Mylar bags are not just for hardcore preppers. They’re for anyone who understands that supply chains are one bad week away from collapse. Governments have their stockpiles. Corporations have their bunkers. You? You’ve got knowledge — and a clothes iron.
Final Thoughts
The world may have traded resilience for convenience, but that doesn’t mean you have to. Learning how to seal Mylar bags with a clothes iron isn’t just a storage trick — it’s an act of defiance. It’s taking back control of your food, your future, and your independence. The same tool that smooths shirts can secure survival. All it takes is a little heat, a little patience, and the will to prepare while everyone else scrolls and hopes.
If you think sealing food is enough to survive what’s coming — think bigger. When the lights go out, it’s not just about food, it’s about shelter, safety, and staying hidden while chaos unfolds above ground. That’s where Easy Cellar comes in. It’s not a “prepper fantasy” — it’s a blueprint for building your own underground refuge using simple tools and backyard materials. No government oversight. No fancy contractors. Just pure survival engineering the elites hope you never see.
👉 Learn how to build your own underground bunker before it’s too late!
You may also like:
 Instant Eggs: The Survival Protein They Don’t Want You to Have
DIY Device That Turns Air Into Fresh Water! (video)
The “Calcium Loaf” That Can Strengthen Your Bones When Milk Runs Out
Your Pantry Is Full… How Long Until It All Runs Out?
Canning Supplies: The Ultimate Guide for Preppers


A new shop project, sealing scissors! Two angle bars with a hinge at one end and wooden handles at the other ends. I picked angle bars for stiffness when the flats press together. May be able to use rebar if you grind two very good surfaces to mate. Heat over any source you have, place the end of the bag between the bars and squeeze down to seal. Once you have that done make one with baskets for grilling fish and small game. Then just for “luxury”, use your now mastered metal skills to make a little personal branding iron for your grilled steaks and grill a steak to celebrate! Yes you can buy these type items relatively cheap but make them instead as a reason to develop those skill and experience under a no pressure environment.
Sounds like a solid plan. Smart use of scrap and a good way to sharpen your metalworking skills. The sealing tool comes first, then the grill basket, and finally the branding iron for the victory steak. This way, nothing is wasted.
Prepper Staff – I try to champion knowledge and practical physical skills with people I meet. Your article is a great example of that priority. Yes people need quick response items and a stock pile of items for longer duration emergencies but all of those items can and will be compromised at some point (expiration date, weather spoilage, simply used up). Knowledge and skill will always be with you even if you end up “Naked and Afraid” (yes a fun reference to the TV show). So using the information from the article people now understand how Mylar works, they can experiment or practice with an iron as an alternative sealing method (easy for most people), the result being they have both knowledge and skill! Now those two seeds can grow with ideas for making tools and improvements or in a very bad situation the knowledge and skill can support the application of “Improvise, Adapt, Overcome” (credit to the Marines).
We have to admit, it was definitely a fun reference to “Naked And Afraid”. There are so many small things that can help us a lot in various situations, not just SHTF or serious conflicts. These small things have been lost along the years and we have to get them back. It will help us do a lot, even if we end up on “Survivor”.