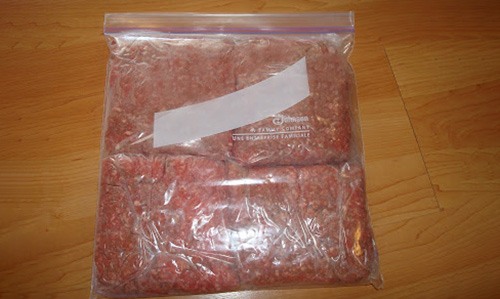
You probably already know that the best, easiest way to keep your food storage fresher for longer is to vacuum seal your stock. Without the presence of oxygen, the vacuum sealed food can stay fresher for up to 2-3 years when frozen, compared to 6-12 months when not vacuum sealed. Non-frozen vacuum sealed food will last 1-2 weeks in the refrigerator, compared to 1-3 days.
Fancy vacuum sealers can range from $150 to over $1000. Not everyone wants to dedicate that much money to an appliance with only one function, and you don’t need a whole machine to seal your food anyway.
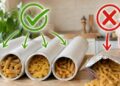
The main item that you will need to vacuum seal anything are zip-top bags, which you may already have a surplus of. Use a nice quality bag, perhaps one with a double-zip for extra protection. The flimsy inexpensive ones will work, but they are typically not as fail-safe as a thicker, better quality bag. Some of the methods require submerging the entire bag in water, and water penetration from a faulty bag will ruin your efforts.
There are a variety of ways to vacuum seal your leftover foods. You never know in this world when you will suddenly need a surplus of fresh food, but you can succeed if you are prepared.
Related: Vacuum Sealing Could Be Hazardous to Your Health
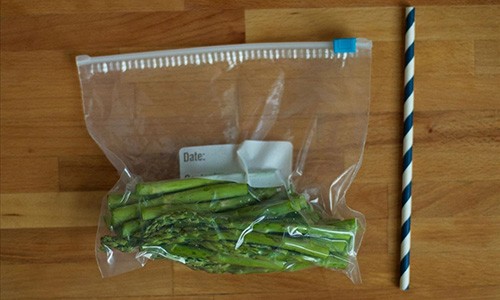
The Straw Method
This method uses a zip-top bag and a straw, that’s it. It is an affordable way to vacuum seal, however you may not get as close of a seal using this method.
- Place the food that you would like to save inside your zip-top bag.
- Zip it closed completely, aside from a small opening in the corner of the bag, big enough for your straw to fit into.
- Suck the air out completely through the straw, until there is an even seal inside the bag.
- Quickly and carefully pull out the straw, now allowing any air inside.
- Seal the bag immediately after the straw is out.
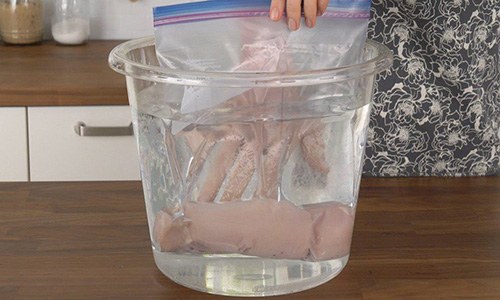
The Water Method
This is the simplest and most effective way to seal your food without a vacuum, and you only need a zip-top bag and a pot or large container of water.
- Fill a large pot or container with room temperature water.
- Add the food to your zip-top bag.
- Carefully seal the bag, leaving an inch of space open.
- Submerge the bag upside down into the water. This creates a vacuum because of the water pressure outside of the bag.
- Watch carefully. Before the bag fills with water, seal the bag.
- Pull out of the water and you have a vacuum sealed bag.
 The Double-Bag Method
This method is similar to the first one, but with a few additional steps to ensure the items are indeed sealed. You will need smaller, sandwich-sized zip-top bags, in addition to one larger, gallon-sized bag.
- Seal individual portions of your food into the smaller, sandwich size zip-top bags as directed in the first method.
- Open your larger gallon-sized bag and place each smaller filled bag inside.
- Seal the large bag almost completely, leaving room for a straw.
- Place your straw inside the large bag and suck out the air completely.
- Close the bag, leaving a perfect double seal.
Related: Survival Uses For Drinking Straws You Normally Throw Away
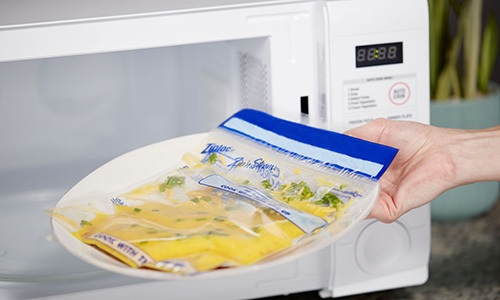
The Microwave Method
This method uses the microwave to remove oxygen from your zip-top bag.
- Place all food inside the bag that you would like to save.
- Leave a 1-inch opening at one end of the bag, seal up the rest.
- Microwave on high for 20-30 seconds.
- Carefully remove the heated bag from the microwave, being cautious to not burn yourself in the process.
- Quickly seal up the bag upon removing, as to not let any air inside.
- Store in the appropriate place when finished.
 Some Helpful Tips:
Sealing dry foods is different from sealing wet items, such as soup or other leftover stews. All the above methods will work for both dry and wet foods, however wet foods are slightly more complicated.
To combat that, seal any wet foods in this manner:
- Fill the bag about halfway full, leaving about 1-2 inches of headroom at the top.
- Press out as much air as possible with your hands.
- Press the seal almost all the way closed, leaving about 1 inch open in a corner.
- Lift the bag off of the counter and press it against the edge of the counter at the food’s water line. All the liquid will be hanging below the counter, while the air and top of the bag is above.
- Be sure there are no air gaps in between the liquid line and the top of the bag.
- Lay the top completely flat, ensuring there is no air.
- Seal the bag completely while it is still laying flat.
Vacuum sealers are a great kitchen tool to have, but sealing on your own takes very little time and patience. There are many different ways to seal your foods. Liquid seals need a little bit more TLC to ensure the contents do not go spilling out. To save money on wasted groceries, think about investing in multiple sizes of zip-top bags, and you will always have an at-home way to vacuum seal your foods.
You may also like:
Sealed Foods that Last Forever
The Most Powerful Medicinal Plants You Should Have When SHTF (Video)
What You Should NEVER Do In a Real-Life Winter Power Outage
What Really Happens When You Only Eat Walmart Cans For 30 Days?


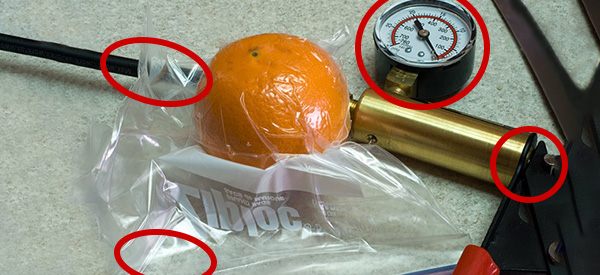
The lead photo shows a brake vacuum pump but there is no mention of it’s use in the article! Why show something like that if it is not discussed?
What, no mention of simply using your everyday vacuum cleaner and a straw, with some duct tape, an iron and a broom stick? (I actually prefer those thin rigid squirt straws that come on the sides of WD40 cans, etc.) Or how about sealing a plastic bottle with PVC pipe, a little length of tubing and a brake line vacuum pump? So many more alternatives than just the few low effort, low results, ideas mentioned above although … at least it gets the conversation started.
I like the straw method but I would throw in some O2 absorbers also.
If anyone doesn’t have any O2 absorbers you can make them from fine steel wool 0000, salt, and a piece of cloth to wrap it up in.
Tear off about a 1×2 inch piece of steel wool and rub about one table spoon of salt into it then wrap it with a piece of cloth.
Throw it into your bag or bucket.
These may be methods of sealing the bags, but I don’t see that any of these methods will do the same thing as a vacuum sealer, which will literally suck all the air out (or at least it should).
Agreed. I use this method when I want to remove most of the air, knowing full well that my lungs don’t suck out air nearly as well as the vacuum sealer which if nothing else can draw down on the package much longer than I. If I could suck out air for 90 seconds or 2 minutes like the vacuum sealer then I could probably emulate its efficacy.
If you are a deep free diver, you may be able to such the last bit of air out of a baggie but lacking the ability to dive to a hundred feet or so without air support most of us aren’t nearly as good as a moderately priced vacuum sealer.
It’s too bad there isn’t a hand operated reverse air pump where one can pump air out as opposed to pumping air in. It shouldn’t be too hard for someone with fairly modest machining capability to make one. It merely entails reversing the air valve. I’m afraid my machine shop isn’t quite sophisticated enough to perform the task but I bet someone on this list has the mechanical capability to make reverse air pumps from “normal” air pumps.
I would suspect such a device would find a ready market in the preppier world for preserving food after the End of the World. Actually, preserving food and lots of other stuff too. Documents that might prove valuable later when some semblance of order is restored; Preserving hand loaded ammunition because, let’s face it, we don’t have the same kind of machinery that large factories have for sealing the neck of ammunition. A whole myriad of things that we want to preserve in an airtight, oxygen-free environment. After the End of the World, it may be significantly more important than it is now.
Great idea !
I read on a prepper site how to use the food saver tops for pint/quart jars if electricity is out.I’ve not tried this method however. fellow wrote: use a brake fluid hand pump that draws out fluid, nipple of pump fits into hole of food saver top, pump air out. When you meet resistance, remove nipple,says the jar is now sealed. Again, not sure this works but bought one a Harbor Tools just in case.
I have an old vacuum sealer that seldom works anymore. I’ve tried the water method as described here with good success. Other than ziplock bags you can use mylar rolls or the rolls all for vacuum sealers. Seal with an iron covered with aluminum foil or seal with a curling iron covered with aluminum foil.
ClergyLady
Please keep it up. The wife and I love your suggestions. You have a lot of very good methods for doing many different things. You are a wealth of info.
Thank you
Use a Vaccum cleaner with the crevis. Tool. Ok seal the top of a Mylar nag with a hot flat hair iron. Leaving a 3 inch space.
Suck the air out and then extract the crevis tool with vac still on and at the end clamp down the hot iron to seal the bag. Takes PRACTICE..works great.
We used the water, but not the mic. And, while we have a vacuum sealer, it doesn’t get used much. Canning and drying are prefered, and when we dry, it’s by the bushel. niio
I’ve been using those little coffee stir straws to vacuum seal stuff for years. They’re cheap and easier to use than regular straws. They work great!
If I remember correctly, I saw a video of someone using a hair dryer to suck air, I just looked it up, and while its really cheesy, It’ll give us DIY-ers enough info to get started. its a YT video by Household Hacker called’5 Pro Hair Dryer Life Hacks. (I’m pretty sure this isn’t the same video I originally saw, but its a good start…
Just found another video, called How to make a Vacuum Sealer-Life hacks, by MAD Science Hacks, and this one is really kinda impressive, and at only a fraction over three minutes, its a winner!
A larger syringe, the kind that comes with the injectable merinadas, could be used to draw air out of a bag either with the needle or small tubing similar to what is used on aquarium pumps. This would require another set of hands to insure positive results. I have a vacuum sealer so have not tryed the syringe method, but if/when the power goes out……..
Ready-made hand operated vacuum pump available for not a lot at Harbor freight or any auto parts store – brake bleeder kit.
I went to Harbor Freight’s website and found a brake bleeder kit for $25.99. It looks like it would do the job for what we are discussing in this article. Although I have an electric vacuum sealer, I just might have to pop the necessary bucks to acquire a hand sealer and see how it works. If I do, I will write a post to this particular topic for all to see the results of my unaudited test.
Steve: Thanks for posting the info about brake pumps. Having quit working on my car when I no longer recognized what all the tubes and lines were for, I had completely forgotten about brake bleeders.
That’s what is so valuable about this website. It doesn’t really matter how weak the basic article is, it stirs comments from the followers of the list and in so many cases the responses from readers provide far more information than the original article. Yeah, there is a lot of chaff among the grains of wisdom but there is always enough to make following this list a valuable experience.
No, Claude did NOT pay me to make this endorsement. However, Claude, if you were so inclined, just contact me and I will give you the account number for making deposits to my off-shore account.
Left coast chuck
I’ve been using a brake bleeder for yrs now and won’t leave home with out it.
I paid 150.00 bucks for mine from snap on tools.
The mason jars can be vacuum down to 15 psi. At sea level. I pull mine down to 17 psi, it dose take a little bit more effort but we’ll worth it. It is tough on the hand also but still well worth it.
I have over 100 or more mason jars vacuum down, all by hand. And still going…
You will find that it will be a great asset to your prep.
I think you should invest in a real good hand bleeder. You will not get the same effect with a cheap one.
Preferably made in USA, not that crappy china junk.
Much easier then a straw or just using your mouth. Plus you can not suck down 15 psi, only 1.3 psi by mouth.
Keep on sealing…
Stay with in the sites…
Reverse air pumps already exist and are very inexpensive. Any sporting goods store should have an “inflatable mattress pump”. They almost always come equipped with the inlet set up the same as the outlet (round, nozzle shape). They come with a switch for inflating or deflating the mattress and their power is plenty for this task. Most even come with a nozzle reduction, reducing the size of air nozzle, even down to……you guessed it, the size of a straw.
You are right. i went on amazon and there are lots of choices. Still a two inch piece of pvc pipe could be used to vacuum a bag. Make a simple piston to fit inside with a cap on each end. On one end drill a small hole for the suction straw and on the other a hole for the piston rod. No valves nothing fancy. Just stick the straw into the bag and pull the piston back. Bag goes flat. Piston can be eights inch threaded rod. Two washers with a nut on each side with a old piece of leather between. No batteries no plugin no fuss. Thats it. Thank You.
The attachment tube on my old Shark Rotator is 1-1/4 inch plastic, I could use fittings to reduce a 1-1/4 inch PVC coupling to a 1/8 pressure fitting for a length of copper ice maker tubing and duct tape it to my old Shark Rotator and suck the air out of bags all day long. A shop vac would be even better, be handy for cleaning grit out of little bitty mechanisms, too. Now I’m thinking up all kinds of survivalist apps for this, maybe I’ll finally get on Shark Tank.
This is such a good article. It gave me an idea. i haven’t tried it but this may work. Put an aquarium air pump in a tupperware type container. Provide three holes. One for the pump exhaust, one for the power cord and one for a hose of whatever size you want for the vacuum.
It works because the pump does what is made for it pumps air. But that air has to come from some where. If the pump is in a sealed container the pressure inside the container will drop. Vacuum results. A line tappped into the container would provide your vacuum. The tighter the container fits around the pump the better. Any remaining free space could be filled with dried beans or peas. This is to reduce the dead air volume around the pump. giving you a vacuum quicker. ‘Seal any entry points into the tub with silicone.
So there you go. Thank You!
Another outstanding suggestion. The only drawback is, I am seeking an after-the-EOTW solution which necessarily means no electricity in order to operate. Yeah, a vacuum cleaner with some reducer fittings will work and the air pump for the fish tank will work but both need good old fashioned electricity to work. When I seek replacement tools these days I am specifically looking for devices that take no batteries and no electric cord.
Regardless of what my individual needs are, those are valuable alternatives to sucking on a straw. That’s a little too manual for me. Sure, I can use the saw on my Leatherman Super Tool 300 to cut firewood but the whole project moves along a lot smoother if I use a full size saw designed to cut logs — unless i am cutting twigs for my Dakota fire hole, my Kelly stove or my hobo stove, then the Leatherman saw is just the ticket for cutting up twigs.
Very smart idea. I’m impressed, turning an air pressure pump into a vacuum pump. That’s using the old noodle, Two thumbs up.
I’ve been sealing bags with straws for – prob’ly as long as they have made zip lock bags! Glad to see I’m not alone. Oh if you continue to inhale as you pull the straw out and have your finger on the seal as the straw exits, there is no way any air can get in
is there a way to seal glass jars without the canning process?
They make rubber cups that fit over the top of mason jars. Put the lid on and apply vacuum. The lid itself acts as the valve and lifts as air is removed. When done the jar lid seats on the jar and the jar is vacuum sealed. However the contents are not sterile. May be good for dry goods or coffee. Thank You.
Quick question.
How exactly does the microwave method work? I tried looking it up, but didn’t get anything on it.
John: It heats the air and moisture in a bag. Collapse and seal the bag when hot, and it acts like shrink wrap. Canning jars do the same. niio
I use my lips. I close up the bag from both sides into the middle, leaving a small hole in the center of the seal. I put my lips over this hole and suck, suck, suck. When done I remove my lips rapidly closing the seal up. OLEY
Take a 2L plastic bottle. Make a hole in the cap and a hole at the bottom of the bottle to fit 2 small pipes. Seal of the pipes in holes with silicon or glue. Put the bottle in a container. Fill up the bottle with water while you twist the bottom pipe to prevent water flow out in the container. Put the top suction pipe into the corner of your sealing or zip bag. Zip close the bag. A vacuum should build up in the bottle when you open the bottom pipe for waterflow in the container. Just fill up every time.