As a prepper, you need to be well-prepared for any crisis. For instance, you should know how to use survival off-grid tools, build a shelter, or grow enough food for your family.
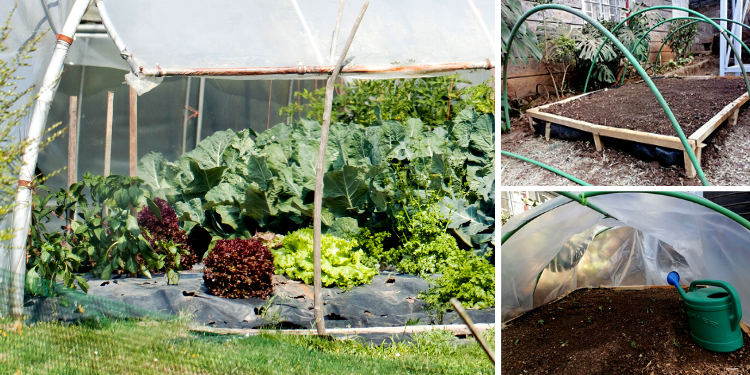
Without electricity, water, or modern infrastructure, a simple greenhouse can be a good idea to grow your favorite plants. Remember that greenhouses are structures that allow you to control the environment that favors plant growth.
With a small greenhouse in your backyard, vegetables and fruits will grow in humid and warm conditions during winter.
I will demonstrate how to build a poor man’s greenhouse in this project. Also, I will include all the practical steps I used.
Related: 7 DIY Prepper Projects You Can Make This Spring
This project can take less than 30 minutes if you have all the necessary supplies within your home’s compound. However, it might be longer if you must gather supplies outside your compound.
Here are the steps I took.
Find Materials
For survival, the idea would be to use durable but economical materials. I used PVC pipes, a polythene cover, and a few lumber panels for the garden bed. All these materials were budget-friendly, with some available in my compound.
I decided to use polythene paper for the greenhouse cover because it is often the best material for different climates.
I used durable green PVC pipes because they flex easily without breaking the greenhouse hoop frame.
Choose An Ideal Area
Similar to a survival garden, the second step is choosing the ideal spot to build the greenhouse. You need an area that receives enough direct sunlight.
Never build the greenhouse under a tree or a roof because these obstructions prevent sunlight from hitting the greenhouse.
You should also confirm that the ground is level for the greenhouse to be firm.
Finally, check whether the drainage is adequate.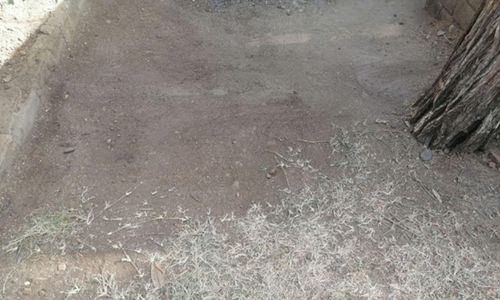
My greenhouse was next to a dried tree stump. So, that was also another reason I chose a raised garden bed. I knew that the tree had used up all the nutrients in the soil over the years it had been alive.
Prepare The Backyard
After you find the correct spot, prepare it well. I found an ideal area and cleared the ground by removing all stones, rocks, weeds, and wild grass.
Build The Garden Bed Perimeter
It is necessary to build a garden bed to provide a foundation for the soil.
I used a raised rectangular garden bed because, in this situation, it provides adequate drainage and gives the soil good aeration. I also learned that beds prevent pests and weeds from thriving – which is great.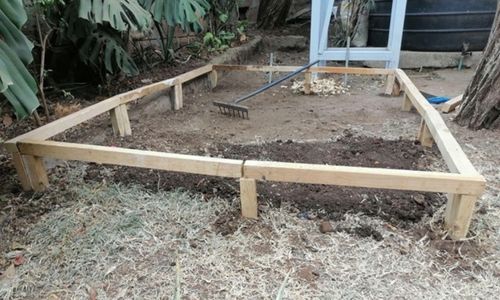
Therefore, I used 7 feet by 5 feet garden bed to increase the volume of plant growth. Though, you can adjust the measurements according to your preferences and the space you have.
Materials:
- Old lumbers
- Used nails
- Old wood screws
- Black vapor barrier
- Staples and pins
Fill The Garden Bed
I filled the garden bed with standard gardening soil, organic compost, and topsoil to provide enough properties that guarantee plant growth.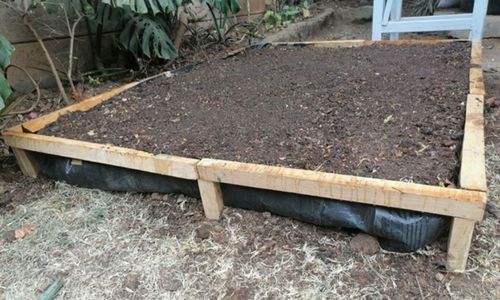
Afterward, I used a rake to level and clear the topsoil before I planted the seedling. I left a 5-centimeter allowance from the tip of the bed to prevent the soil from overflowing whenever I watered the garden.
You can add organic additives like peat moss in the greenhouse to grow acid-loving plants like pepper or sweet potatoes.
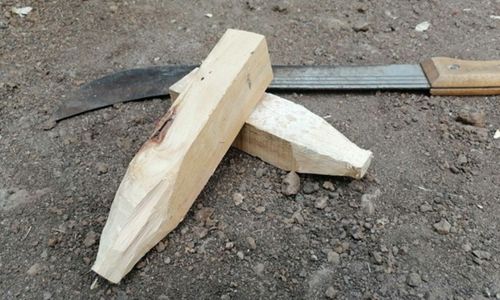
Cutting Metal Rebars
You need eight pieces of (⅜ inches x 1 foot) rebars to support the PVC pipes. I used a 1-foot-long metal rebar because the soil in my bed was firm. 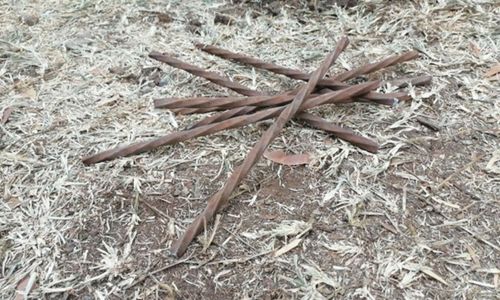
You can cut longer rebars that sink deep in the garden bed if your soil is loose. You can use more metal rebars if you want a bigger greenhouse.
Inserting The Rebars
Evenly mark where to put them along the length of the garden bed after all the support rebars are ready. Though, these posts should be directly opposite each other for uniformity.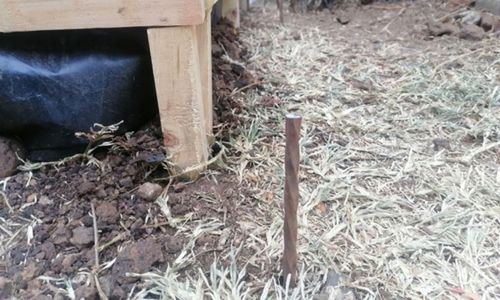
I hammered my metal posts 2 feet apart to support the greenhouse. But you should leave a few inches peeping above the ground.
Cutting And Positioning The PVC
After everything, you need to cut the PVC according to the length of your garden bed. In my case, I cut 7 feet long PVC pipes.
Related: 10 Survival DIY Projects You Can Start on Your Property Right Now
Slide one end of the PVC pipe on one post, then bend and insert the other end on the opposite rebar post.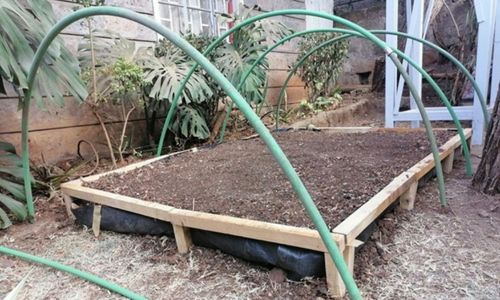
Continue until all the hoops are in place. If you like, add a horizontal running PVC pipe to increase support.
Before laying the polythene cover, I added a horizontal PVC pipe to support my greenhouse.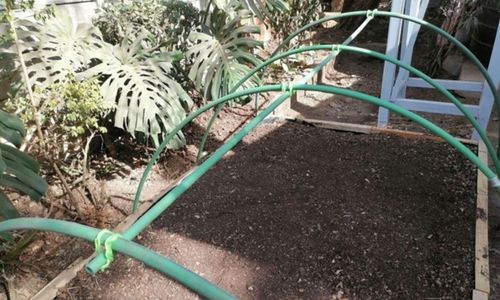
Always tie the horizontal PVC pipe underneath the hoops because it works better when tying up the polythene cover to the PVC pipe.
Drawing The Polythene Cover
Draw the polythene sheeting to cover the entire structure and secure it after all the hoops are secure.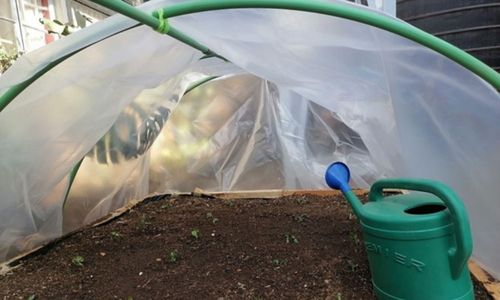
I secured the sheeting with a few paving blocks to ensure the greenhouse had enough tension and did not lose moisture from any open spaces along the floor.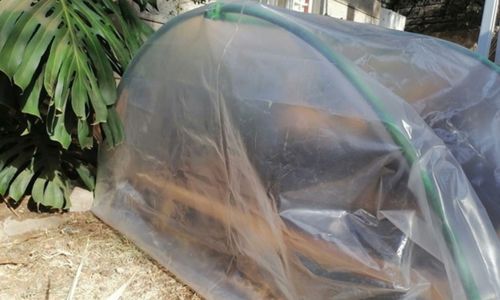
Fertilizing The Greenhouse
Always use organic vegetable waste as fertilizer to provide enough nutrients for plant growth in the greenhouse.
For even more helpful information on how to grow your own food, check out this guide on how to make a year-round self-sustaining garden.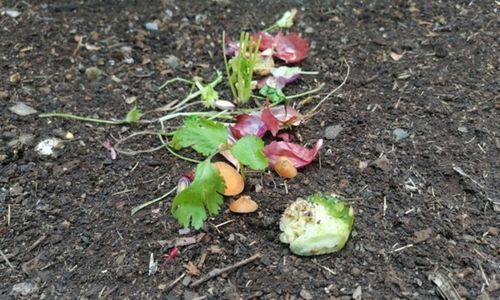
What You Need To Consider
If possible, build the greenhouse in an area that is not visible from the outside of your property, so it doesn’t attract looters in an SHTF situation.
A small indoor greenhouse would be ideal if you don’t have the space to build an outdoor greenhouse. Indoor greenhouses allow you to grow food even in bad weather.
Polythene covers are necessary to keep the greenhouse warm in winter. On the contrary, row plant covers are critical for keeping critters, birds, rodents, and other persistent pests away from your outdoor nursery.
Remember to include beneficial herbs that might be used as medicine for your family in a survival situation.
You may also like:
 No-Electricity Cooking Techniques To Use During A Power Outage
Cheap And Easy Way To Build A Root Cellar in Your Backyard (Video)
The Only 4 Painkillers You Need to Stockpile For SHTF


I appreciate the article and it’s intention, however, only the naive would believe that you could grow enough food to survive. Supplement maybe but thrive and survive, no. It might take several acres, cooperative weather and intense effort to live off of a garden.
It only takes 1/10th of a acre to feed a family of 4 and then you can still make $3000 plus per year selling extras.
It is how you do it, that matters.
Check out permaculture
I’d like to know how that’s done.
There was a report on the local news here about an civil engineer with a green thumb, who turned a shipping container into an organic farm which produces the equivalent of 2 acres of produce and is all controlled automatically from an iPad. On the iPad there is an APP that he developed for each specific crop he grows. This enables him to control and create the perfect micro environment for each crop. Seeds are sowed embedded in flat screens. Grow lights are embedded in flat screens. All of the screens are remote controlled. Amazing.
Let’s all go buy shipping containers! ?
I believe if you follow a plant based diet , you could do very well eating only from your garden. I really don’t think it would require several acres either.
English “Victory Gardens” saved civilians from going hungry during WW2. Most people were working with about 1/4 acre or less. Rationing restricted access to meat/cheese, even eggs…unless you could grow your own. We are coming back around to patio gardening that can be sustained on carts in garages in winter with grow lights. Suddenly there is a real use for a sunroom or conservatory!
Yay, more plastic. What ever happened to planting in the ground? Why do you need raised beds. I grew tomatoes, beans, peas, cauliflower, corn, 3different kinds of squash, all in the ground. Also that greenhouse wouldn’t work everywhere. Where I live (southern Arizona) we get lots of strong winds and then there’s the 100 + degree sun in the summer that pretty much rots everything.
Hmmmm, I am guessing “Farmer” is just a screen name for you. My mother was one of 10 kids. They had a garden about 1/8 of an acre that kept them fed and stored food for the winter. When you use your space properly and rotate your crops through spring, summer, and fall, you have three growing seasons. Yes, it is VERY possible.
1/10 acre, sorry but NO !
engineer grew it all in a thimble with his I pad, NOPE
FIRST, lets talk about a years worth of food, AND that not everyone lives in the tropics.
1/10 acre, most every where in the 48, we will give you 180 days or growing. IF you use the grocery store for MOST of the food, 1/10 will grow all the tomatoes you can eat for a YEAR, but I can eat more corn than that can grow. PACK those plants in, and the block the sun from each other. you can strategically plant 4 to 10 foods that will be more of THOSE than you can EAT FRESH ! which you can then sell some of, and good luck getting 3 grand, dont think so, especially while many have gardens and farm stands.
Try growing all your food in a shipping container, with I pad, in year 7 after SHTF, you might be out of homemade electric by then. those panels and battery cells, dont last like they say in the real world. just like an electric car WONT get that range, when you use the heat or defrost, or the air-conditioning. OPTIMIZED 1/10 acre will HELP you, but your going to need more.
real truth, if you dont live in the boondocks, you wont see year 7 after SHTF
5 or 6 kinds of bean seeds, peas, tomatoes, potatoes, BEETS, and learn about wild rice ( might be down the road a mile).
WE DID IT ! as kids, you remember, but think about it, was that ALL the food you ate ? never bought ANYTHING from the store ?
so you ate no bread or corn ? or you bought the flour and the corn, and actually a lot MORE. And, in Jan, what did you feed the chickens ?
think of all the food you grew, and then think of what you ate that you did not grow
I beg to differ with your post. I grew up in Northern Minnesota. We had maybe an acre or two of land. Mom & Dad had a garden in less than 1/4 of the property. They grew all kinds of veggies for a family of 8. We hunted, fished, raised rabbits and had the veggies we grew, both fresh and canned. I remember shelling peas, beans, shucking corn, pulling carrots, beets, radishes, rutabagas, turnips, parsnips, wiping and snapping wax and green beans, rhubarb, hazel nuts, plums, 2 types of squash, cabbage, lettuce, etc. We would go out hunting wild strawberries, raspberries & blueberries, we even had a crab apple & choke cherry trees. That was enough to feed us well all year and even some to can and keep in the cellar for fresh in the winter months. It most certainly didn’t take many acres to feed 8 and stash away for healthy winter eating. You just had to know what you were doing.
I don’t think some people realize this is to be a small greenhouse to help grow food in WINTER as stated in the 3rd paragraph. Grow some food or get some crops started early for spring planting. Different parts of the country may not need that help, but those of us with cold and snowy winters may get some use from it. Not sure how low temps could get and still survive, but I like the idea.
Excellent
Since the collapse of monetary system will start end of year , this will be absolutely necessary for food supply due to delivery system being stopped by the elite village idiots in charge
Indeed! It’s already begun, and it will only get worse! Start planning now! I also regrow as much as I can from store-purchased produce (lettuce, celery, green onions, onions, carrots, rutabagas, potatoes, tomatoes (use the seeds!), and anything else that I can regrow. Since I live on 10 acres, I use small areas here and there to plant things that will continue to grow year after year.
I did my hoop house a bit different than yours.
1. First I cut down the soil where I was going to place blocks.
2. Then I set blocks that are made for holding 2″ X 4″ pieces to hold the 4″ X 4″ surround and leveled those.
3. I then spaced and pounded down 12″ long PVC in 1″ to hold the 3/4″ HOOPS,
4. Hoops were made from 2 ea 10 ft. long pieces glued together.
5. I set one end of those and let them dangle a bit (in the sun) so they would start drooping.
6. Once I determined they would go all the way down into the 1″ pieces on the other side those were installed.
7. I placed 2 sheets of 1/2″ plywood side by side – lengthwise on the cement driveway.
8. Then it was time to take one hoop out to the driveway and lay it down spaced out exactly as those when installed into the 1″ pieced in the ground – using blocks and bricks to hold it in place. I just drew the arch of the hoop onto the plywood and then used a saber saw to cut out the end pieces.
9. I took ideas from those seen on the Internet and designed the ends with framing for rigidity and doorways. I cut a rectangle dead-on top center to allow a 2″ X 4″ to stand on edge and get assembled on both ends with other 2″ X 4′ pieces for attachments. The ends were painted white – both sides and the doors installed on hinges.
10. When both ends were assembled and set up, I made sure that both ends were plumbed and the on the sides 2″ X 4″ pieces were installed to stabilize the ends.
11. I installed a layer of 6 Mil Plastic sheeting over the whole hoop house.
12. I then installed netting with 1″ squares to hold the second layer of sheeting up off of the first layer.
13. I then installed the second layer of 6 Mil Plastic sheeting.
14. Both layers of sheeting and netting were attached to the end pieces.
15. On both sides at the bottom we rolled up the excess layering materials up on a 1″ X 1″ piece of wood to both help hold the materials down and for rolling up somewhat for venting.
16. Installed some wooden pieces to keep the doors closed.
Photo?
Can you take a picture and post it? A picture is worth a thousand words. I saw a hoop house on a episode of a guy who helps people who want to live on their own, I believe in Alaska. But did not see the entire build. I am thinking of a PVC greenhouse. I have seen the plans for this green house, which includes a door and a window. Add misters and it would be perfect.
Jesse…thank you for the information but a photo would have been nice to go along with all of the detailed info you provided.
“You cannot put-up photos on this site”…
so, you will have to use your imagination, if you want to see what “Jesse Gasser” was wanting to tell everyone.
Thank you for your input on how you built your hoop green house.
stay sharp
For those who want to to show their handiwork they could post a link to a file in a cloud storage (google drive). Just make sure to make it public ?
These types of blogs won’t allow for photos to be inserted.
I’ve had raised beds for years and found its better to have a narrower bed (I have four) so you can weed in the center and harvest easier. My 6 feet wide bed was too much but the 3 to 4 foot ones are perfect.
Couple people near me built PVC pipe greenhouses, last week a typical Texas thunderstorm destroyed them. Not a practical construction method, if a greenhouse is going to be important to your food supply build it from wood or steel.
Yes, the same thing happened here in S/W Fl… Only houses and all went with it! Along with all of your hard work it pays to keep a good attitude just in the case you have to start over!
As far as a hoop greenhouse goes, it works great depending on size. I used one in my garden in NC. When it got warm enough that I didn’t need the plastic covering, I swapped the plastic for deer-netting. The beds I covered were two 3’X8′ beds with a 2′ walkway between them. I used gray electrical 1/2″ conduit (very inexpensive), it comes in 10′ & 20′ sticks.
If a poor man can’t build a green house you could stand up in it really ain’t worth building
Yahoo seriously.
I’m sorry, but it is POLYETHYLENE.
Hoop houses are worth the trouble. No, they are not wind/snow proof, but if you build smaller ones, against the side of a house and maintain it by brushing snow off of it, it will work. You just have to take care of it, and know what you are doing regarding planting and caring for those plants. Also, you could build taller ones to walk through, but again, they will be less sturdy in high winds or when there is a lot of snow…..
I have several smaller, narrow raised beds against my foundation…and plan to make more in my front yard that is protected against neighbors by a fence and hedges. I do plan to cover these in winter with stakes and plastic sheeting and in summer for protection against deer and other predators.
As many mentioned, you CAN grow a LOT of your food on your property, even small lots or even on patios/terraces if living in apartment buildings. Just be willing to learn by mistakes and try again. Something is better than nothing.
It is also NOT rebarS, it is rebar.