
The making of butter goes back at least 4,000 years, with the earliest known reference to it written in the Bible. When Abraham entertained the three angels, before they went on to destroy Sodom and Gomorrah, butter was amongst the foods he offered them to eat. Apparently butter has been used ever since mankind first domesticated cattle and was considered by many in ancient times to be food of the Gods.
While we don’t know how butter making was first discovered, there is some evidence to early butter making methods. The earliest such reference talks about putting the butter in a skin, suspending it and swinging it slowly. Interestingly enough, this method, or at least something similar, was used by the pioneers in the westward expansion of the United States.
Butter is a natural product of milk, essentially the milk’s fat. It has been gathered, separated from the liquid part of the milk and solidified. In this state it keeps much better as the fat doesn’t turn rancid as fast as the liquid. In fact, old examples of butter have been found, buried in casks in the bogs in several countries of Northern Europe. It seems as long as air is kept away from the butter, and the butter is kept cool (which burying will do) it will last for a much longer time than we would expect. Not only does the butter keep, but its flavor improves.
While we normally say that butter is made from milk, it is actually made from the cream. This is because cream has a much higher percentage of fat than milk does, and the butter is just the fat.
Step 1 – Making Cream
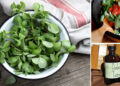
 To make butter, the first step is to separate the cream from the milk. This is done by allowing the milk to sit for half a day, undisturbed. The cream will then rise to the top and the milk will settle. Usually, several wide containers, called settling dishes, were used. These settling dishes, or pancheons, looked much like ceramic pie pans or casserole dishes.
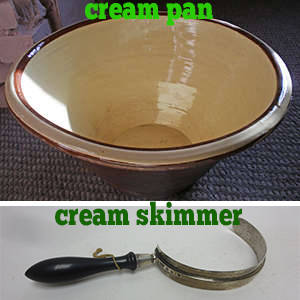
The cream was then skimmed off the top with a cream skimmer. There were many styles, but the most common was saucer shaped, with holes in it for the milk to drain out through. The collected cream was put into a churn and the milk saved for other purposes.
Cream could be gathered over a few day’s time, in cases where a family only had one cow and one day’s cream wouldn’t be enough to churn. Depending on the ambient temperature, keeping the cream for up to three days wasn’t a problem, and was actually considered beneficial. The aging of the cream was thought to improve the flavor, as long as it wasn’t kept long enough to sour.
A number of types of churns were used through the centuries, with the most common being the plunge churn or dash churn that we are all accustomed to seeing. In more recent times, barrel churns became more popular, turning the barrel end over end or just rocking the barrel to churn the butter. The advantage of these churns is the larger amount of butter that can be churned at one time. There was also no paddle inside the churn, so no risk of it breaking and no need to clean it.
Step 2 – Churning
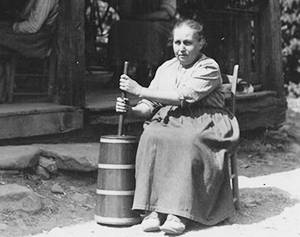 Churning is the act of gathering the fat together and separating it from the buttermilk. A relatively slow motion is used in moving the paddle through the cream or rocking the barrel. About 40 beats per minute is perfect. Slower, and the process takes too long; faster and the cream starts to become whipped. While this can still lead to butter, it’s slower.
Many cultures had churning songs that would be sung while churning. The idea was to help regulate the speed of the churning, much like marching armies sing ditties to help them keep their cadence. If you think of a normal walking speed, that’s the right speed for churning.
The churn itself can be made of almost any material, although wood and ceramic were the most popular. If we go far enough back in history, copper churns were used, although these affected the flavor of the finished butter. Coming forward in time, glass churns were sold for families to use in making their own butter. These glass churns had a hand crank to move the paddles, making them easier to use.
It takes about an hour of churning for the majority of the milk fat to separate from the buttermilk and gather together. This point is easy to recognize, as the yellow butter will stand out from the white buttermilk. The buttermilk is then poured out of the churn, filtered through a sieve and saved to be used for baking. The butter is scooped out and placed in a bowl.
As I mentioned earlier, the pioneers churned their butter by something similar to swinging it in an animal skin. Rather than a skin, they would place it in a bucket with a lid. This would then be hung under their wagon as they went down the trail. The natural movement of the wagon was perfect for churning the butter. When they stopped at night, all they had to do was separate out the butter and rinse it. Considering they only had a small amount of time when they were in camp in the evening, this labor-saving method allowed them to have fresh butter, without problems.
Step 3 – Butter
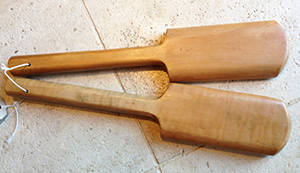 It is necessary to get all the buttermilk out of the butter, in order to prevent spoiling. Buttermilk will spoil much faster than butter, so the “cleaner” the butter is, the better. This is done by rinsing the butter in a succession of water baths, using the hands or a pair of paddles, called “butter hands,” to work the butter. Since butter is fat, it doesn’t stick to the hands, either yours or the wooden ones.
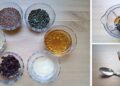
As the butter approaches its last rinse, salt is added. This helps to flavor the butter, as well as preserve it. Salt is a natural preservative, killing bacteria by drawing the water out of it. Therefore, salted butter will last longer than unsalted will.
The nearly finished butter is moved into containers for hardening. This could be butter molds, in order to make sticks or crocks. It could also be rolled into balls with the butter hands and stored that way for use. Rolling into balls was convenient for serving at the table, rather than placing a large crock on the table.
Homemade butter is harder than that which you buy in the grocery store and will keep longer without refrigeration. However, the length of time it will stay good varies with temperature. During the summertime or in hotter climates, butter does not last as long as it does in cooler temperatures. It will turn rancid if it is not used quickly enough.
You may also like:

An Awesome 72 Square-Feet SHTF Medicinal Garden Plan
5 Best Countries To Move To Before SHTF
H2O Dynamo – The Awesome Device That Turns Air Into Water (Video)


Great article but how does one wash butter?
I will try to explain the way my father did it. I apologize for my bad english but my native is greek so please be patient…..
you put the butter in bowl and you pour warm water over it. not boiling but warm enough to allow the butter to melt, you stir that mix with a spoon or with your hand and then you let it cool down until it starts to form butter again.
you drain the water and you repeat the above steps until the water is clean. on the last “wash” you add some salt and perhaps some spices (like paprika, black pepper, oregano etc).
if you think thank that you waste a big amount of water (like I do) for the “washing”you can use it for cooking for your animals…..
Thanks Elen. Great info!
by rinsing it several times and working the butter to make sure all of the milk whey is gone. Using cool water only.
Thank you Elen, this is great to know.
This way of washing butter was interesting to read. I had not heard of using warm water before, so will give it a try. We use room temp to cool water & run the churn for a bit, then drain & repeat until the water runs clear.
KATIE,
We also use cool water for rinsing.
I make butter by simpli puttring heavy cream into the blender.in afew minutes you will have fatfree
milk in the blender plus soft butter.
Heini,
We do the same, or you can put heavy cream in a jar and shake it.
The liquid that is left is real buttermilk.
A couple points of note.
The butter is likely to be more white (like the cream) than yellow. Most commercially produced butter is colored using beta carotene that is a natural vegetable dye & antioxidant that converts to vitamin A and plays a very important role in health. It’s responsible for the red, yellow, and orange coloration of some fruits and vegetables like carrots.
Buttermilk is not just for baking, since some people, like me, like to drink it.
I think it’s better to wash the butter with cold water, squeezing it and rinsing it. The color of the final product depends on the cow and her time of lactation.