Seed tapes were created for gardeners, amateur and veteran alike, who struggle with keeping seeds and seedlings in organized rows that are easier to control. Separating them, as well as planting them in straight rows for easier gardening can be a real headache.
People Who Will Benefit from Seed Tapes
Whoever it was that came up with the idea of seed tapes is a genius, in my opinion. So many people who are limited with what they can do because of lack of dexterity can enjoy gardening more now because they don’t have as much frustration stemming from working with small items.
They are also great for the person who would rather speed up the planting process because they have a busy lifestyle. Or, the gardener just starting out. Learning all the details can be overwhelming…when to plant, where to plant, and what to plant! They will also enjoy seed tapes, because it’s easier to get the seeds planted in uniform and organized rows much quicker, freeing up time later on when everything starts to grow.
Another Great Perk of Seed Tapes
It’s also a great way to avoid the need for thinning your veggies as they start to grow. Thinning young seedlings is an important part of gardening, a necessary evil if you will.
It’s necessary because it allows the seedlings enough room to grow. Without enough room to grow, some of the seedlings will not get enough water, light, and nutrients. But with seed tapes, it eliminates most, if not all, of that monotonous step in gardening. Even if you take the time to make sure the seeds are all laid out in tidy rows and appropriately spread out, heavy rain could easily shift the seeds. Seed tapes diminish the likelihood of that happening.
Unfortunately though, buying seed tapes can be costly, as well as limiting with what seeds come in tape form. However, a DIY form of seed tapes is a great option to enjoy all the perks above, without the cost of having to buy them. So, all gardeners can now sow their gardens with impressive rows of produce, without costing much more than a few sheets of toilet paper. Yes, toilet paper.
So, how is it done?
Related: Homemade Substitutes for Toilet Paper
Making Your Own Seed Tapes
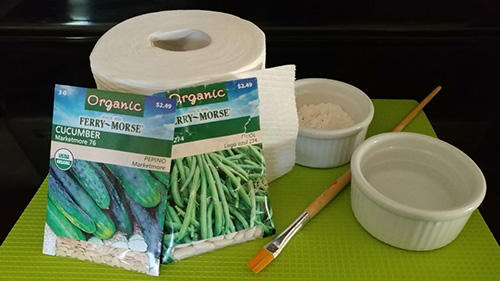
It doesn’t take too many supplies at all, especially beyond what you would normally need for planting seeds without a seed tape. In addition to the seeds, which you would need whether you use seed tape or not, you will only need toilet paper, flour, water, and a paintbrush.
Supplies
 Cut the toilet paper to the length of the garden row, then cut another identical in length.
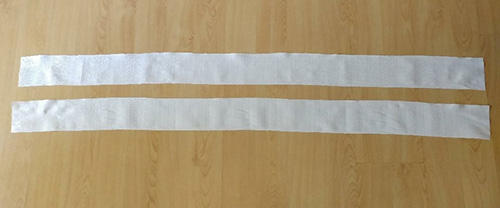 Make a paste out of flour and water: 1 part flour to 3 parts water.
 Using a paintbrush or something similar, brush small amounts of the paste along the first sheet of toilet paper, about every 2-3 inches, or the distance recommended for each packet of seeds.
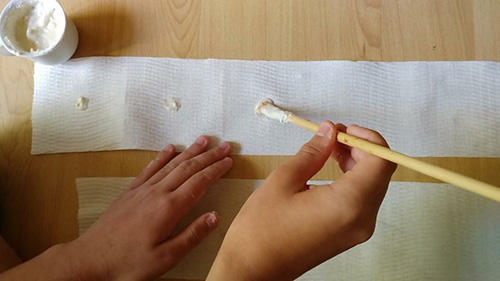 Place the seeds into each spot of paste on the toilet paper.
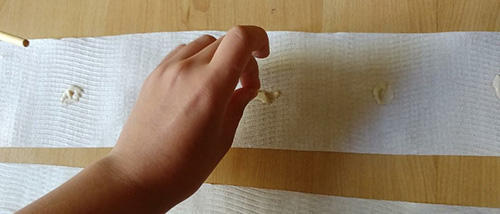 Place the other sheet of toilet paper on top of the one with seeds and lightly press the two layers of toilet paper together, careful not to disturb or spread the seeds or tear the toilet paper.
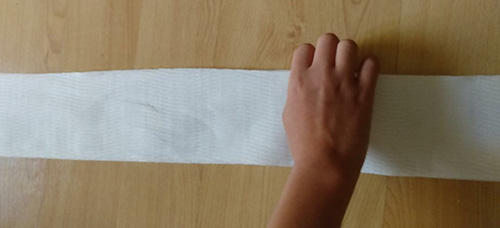 Roll it up! (you can store them in a plastic container if you are not ready to plant them immediately).
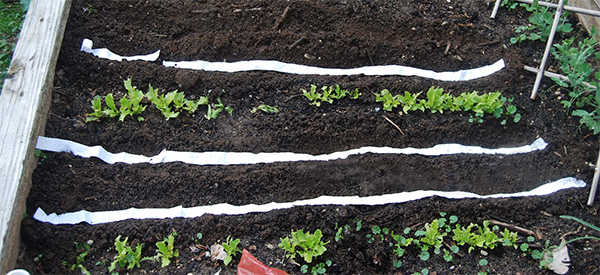
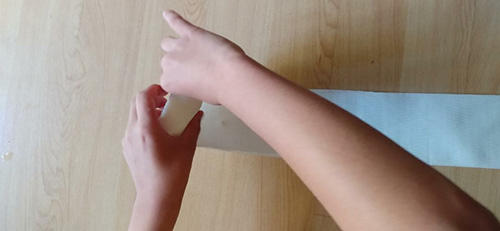 Dig the row in the garden and gently unroll a roll and lay it down in the area dugout.
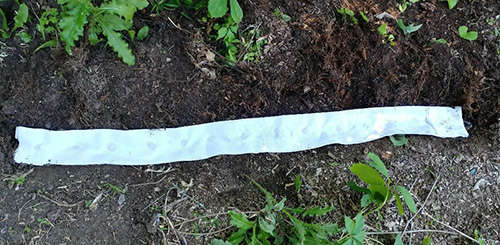 Cover with dirt or potting soil.
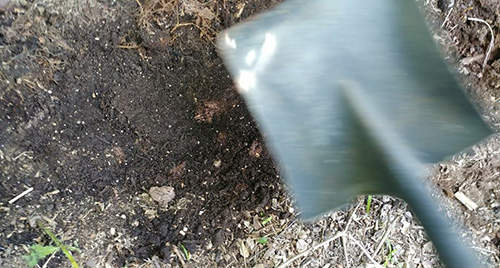 Finally, tend to your garden as you normally would when it starts to sprout. Well, there won’t be any need to thin the seedlings as they grow, of course!
You may also like:
This Bug Will Kill Most Americans During The Next Crisis (Video)
The Only 6 Seeds You Need to Stockpile for a Crisis


While DIY seed tapes are an interesting project, there is a device we’ve used for decades, that obviates the need for a lot of the advantages of the tape, and works quite well.
Farmers use their large seed planters, sometimes called drills, for planting large fields of corn, soybeans, or other grain crops. These drills have plates and settings to drop the seeds at the correct depth & interval, working fro ma din of seed grain.
We have a smaller version of that same device, equipped with plastic plates for each seed type. The plates have notches that grab a single seed at a time from the small bin, and other notches that control how far apart to drop the seeds. Depth and row width are set manually by adjustment and the unit is simply filled with seed and pushed down the row.
There are numerous suppliers of this device; but, a search for ” Precision manual Garden Seeder” will show you a selection including a good video of the one we own.
Earthway Precision Garden Seeder (Model 1001-B) – Product Review by Alderman Farms
https://www.youtube.com/watch?v=TZZ0XXEM4To
A homemade seed tape my still work for some; but, more than 35 years ago we found this little gadget that is a great way to speed up planting the garden
I bought one of those useless Earthway seeders, and regretted it immensely!
The plates do not pick up the seeds properly , so you have long spaces with no seeds.
The wheel, which powers the seeder, does not have the traction to keep it moving. It skids a lot.
The fertilizer attachment is constantly clogging up.
All in all, another prime example of cheap chinese GARBAGE!
BUYER BEWARE!!!
Ted,
That’s correct for small seeds like radish and carrot; but, we sow those instead of planting and only use the planter for the long rows of larger seeds, like beans & corn.
I’ve found that if you have well tilled slightly moist soil and keep downward pressure on the handles, it generally works quite well.
I didn’t know they had one of those and don’t have one, so it’s not a problem. We only fertilize with compost or occasionally with chicken litter water, made by putting chicken litter (scat & straw) into a bucket, adding water & mixing.
I’m sorry that you have a lemon since EarthWay Products Inc, located in Bristol, Indiana (some 200 miles northwest of my location) used to make great equipment. Mine was made in the US; but, then again, I’ve been using it for nearly 40 years and newer units may be part of those Chinese imports.
Will the moisture in the paste cause the seeds to start germinating prematurely?
It would seem that this is to be prepared maybe a few days ahead. Since most seeds need to be well watered for a few days to germinate, I shouldn’t think it would be a problem, so long as you don’t make them up too far in advance.
I had exactly the same experience. Yes, I made sure I was using the correct plates, kep it moving at a slow and steady pace, etc. Problem is you don’t know how much space was left blank until the seeds start sprouting up and often by then you have lost two weeks or so. In a short season like mine, that timing is important. I still do it the old fashion way by hand. Pretty accurate after 50+ years. LOL
I think this is a great idea, and I plan to use it next growing season.
OT: much love to Left Coast Chuck and all of our brothers and sisters in California – just got a news update that said there’s been another earthquake in Cali. A seven. Hope everyone is OK.
Thanks for your kind thoughts. We just had a 2-minute rock and roll session. Nothing fell; nothing broke. OTOH, my brother who lives somewhat closer to Ridgecrest had lots of water sloshed out of his pool. We don’t have a pool so no problem in that regard.
The folks in Ridgecrest are really taking a beating. Aftershocks that don’t make it this far (we are 180 crow-fly miles from Ridgecrest) are beating them up. They have had fires and lots of roads buckled and rocks strewn on the road. The highway from Bakersfield over to Mojave is closed due to land slides. It doesn’t look as if their water supply is shut down as there were videos of fire trucks spraying water on the fires. I would think electricity is off, however. A town about 30 miles closed to Ridgecrest from us reported that they had lost electricity due to the earthquake.
Unfortunately, the seismologists at Cal-Tech are not making pleasant predictions. They have had over 1400 shocks from this and the folks at Cal-Tech say that the particular faults involved are notorious for many many aftershocks which could last up to a year.
Still no word from Naval Air Station China Lake, just a terse, “We’re handling it.” From the map that Cal-Tech has been showing, the fault runs right through the base. Hindsight indicates that might not have been the best place to situate an air station. If I remember my naval air terminology correctly, an air station is a bigger base than an air facility.
Glad to hear you and yours are well. Stay safe! ?
While the planting devices may be more accurate, the toilet paper method is certainly cheaper. Personally, I would fold the toilet paper at the perforations and cut about ten sheets in half with a pair of scissors. I can cut eight paper towels in half with a pair of scissors, I feel I could probably cut ten or twelve sheets of toilet paper just as easily.
Starting my toilet paper strip in the morning – bet it works great and it’s cheap!
I think this is a great article, I first saw seed tapes in Auckland New Zealand about 10 years ago, they were available only for sweet radish and green beans, and I used them with great success. Later I made my own, but without the flour & water paste, I used a stapler. Now I prepare my seed tapes in the winter, ready for planting in the spring, I grow many different vegies, and all are successful with this method.
Rod Scott,
I haven’t seen too many seed tapes lately; but, I have seen many kinds of seed mats for both vegetables and flowers including wildflowers.
Personally, if I can’t eat it, I don’t put any real effort into planting and caring for it.
Good idea! Maybe I missed it…but you should use biodegradable toilet paper to make next years planting easier. Also, I have seen some materials that absorb water. Would it be possible to include some of this with the flour and water mixture?
Pengyou,
Is there such a thing as non-biodegradable toilet paper?
Toilet paper, like most paper is made from wood fibers and is inherently biodegradable.
The flour and paper would do that rather well; but, including rice flour in the final process might help, since it forms a gell that more easily holds additional water.
I am referring to the kind of toilet paper recommended for use in septic tanks – and that which does not have dyes used to color it. I suppose it is all biodegradable but some does more graciously than others.
Pengyou,
That would be something like the Scott single ply we use, for that very reason, a septic system.
It is all biodegradable, and for the seed tapes it really would not matter, since that tiny bit of paper has a whole season to compost and disappear.
When used in the septic system however, Charmin, Quilted Northern, and similar multiply TP simply take too long to decompose and be flushed out of the system.
Back when my daughter was living with us, between her and my wife, the good TP clogged things up to the point of having the tank pumped, at which point the septic tank guy told us to switch and it has worked OK.
The problem with the single ply is that it often takes more of it for some cleanup jobs; but, it is still more fragile than the multiply and works OK once you get used to it.
Ever try a Bidet?
You could add a pinch of peat moss to the seeds, either sticking to the glue or making little seed and moss “raviolis” and gluing the edges together.
Another option (and I know that this may sound crazy) is the “stuffing” in so-called super absorbent feminine hygiene products. Depends on what it’s made of, but if it too is biodegradable, the little ‘pellets’ do hold a lot of liquid.
Miss Kitty…I may have just fallen in love with you.
Aw, shucks! With li’l ole me? ( Girlish blush, eyelash flutter).
Cant really use the cheap toilet paper it tears apart when it gets damp from the flour mixture.
Guess I have to fold it over a few times.
I just broadcast radishes. Beans and corn are easy enough to plant per directions for spacing. Unless I’m using up old seed I plant aiming at final spacing after thinning since I expect most seed will come up.
I’ve used seed tape but never buy it. If done ahead during the winter I might try it to speed up spring planting. I did have an old comb with teeth missing to plant at 3″ intervals. It marked where to drop seeds but wasn’t really needed.
If I’m investing time it will be in well prepared beds, soaker hoses et.
I’m thinking that if the seed tape is not going to be used immediately, that it would be important to let it dry out before rolling it up and storing it. The dampness from the paste would likely cause parts of the paper to stick to other parts, thereby creating a mess when trying to unroll the seed tape.
I’m thinking I may try making a paper mush, spread it thin on a screen like making paper. Add seeds barely cover with the pulp. Let dry. Cut into strips, Mark with a permanent marker, and store keeping dry.
Good winter activity.
Clergylady,
This is a great idea that sounds a lot easier than playing with wet TP. LOL
Instead of just a paper mush, you could make Papier-mâché by adding a bit of flour & corn starch to the water as a glue to bind everything. Assuming you would dry this on an old screen, it could be many sizes; but, perhaps instead of cutting into strips, you could make something large with preset seed spacing, and plant the entire thing as a mat, planting an entire vegetable garden with only a few of these, and no real effort, except what you did while watching TV in the winter. I really like this idea.
I often see roll up mats advertised, generally for wildflowers, that allow you to simply unroll, hose down into place, and watch your garden grow.
Papermache sticks to its self wonderfully without a binder. A bit of white glue added renders it water resistant. I’d stick with just the paper and water. I make paper for artwork this way. I spread it 1/2 inch thick and let it drain well then turn it onto a pad of news papers to pull more moisture out. If needed I’ll repeat with more dry news paper. Then it’s well on its way to drying and I turn it again onto an old desk top and let it finish drying. At the point it could be turned onto the dry screen to finish.
It can be made as large as your screen will allow.
I’m wondering if the mache water couldn’t be a weak compost tea? Just a thought.
When the paper is nearly dry I’d lay out the seeds and add a very thin layer of quite wet but drained and formed paper mache.
I start with nearly 1/2″ of the mush on the screen for my art project. I’d go for just a very thin layer 1/8″-1/4″ it dryers much thinner. My 1/2″ drys to about 1/6th of an inch and is very strong. Not reliable either. I think I’d write the seed name on the dry sheets with a permanent matker then store stacked in a box where they will stay dry.
All you’d really need is lots of old news paper or many sheets of toilet paper laid out a few layers thick and just damped in place on the screen with a spray of water. You might try 2 or 3 layers on the screen but dry it well. Lay out the seeds as desired then cover with one layer and lightly dampen it with a spray bottle. That would stick easily and dry quickly. You’d have to judge if it will be stored rolled or flat.
Still, yes, a good winter evening project.
I make my screens for larger projects but for smaller projests Wal-Mart sells a sliding screen in with the art or the hardware area. If you’re using TP it could easily be laid out 1 row, a space and another row then a space till your screen is full. I’d go for two or three layers thick and spray it till damp enough to stick together then let it dry. The TP could easily be cut to 1/2 inch or 1 inch strips before laying it out. Dampening is all that would be needed to stick it together. Bit I’d dry the bottom layer completly, add seeds, cover with one layer, spray to damped and quickly dry completly, writeseed name on the strips with a permanent marker, store to keep dry.
Dampening on a screen lets air circulate and dry it quickly.
Clergylady,
I’ve made it for artwork and sculptures this way; but, didn’t think the glue was advisable for a food media, although it could well be fine.
I’ve done this for small things; but, normally just use a screen in the workshop fir slat pieces.
I don’t see why not. We make a tea of chicken litter & water strained to get out the big pieces of straw that would probably work nicely.
I think we are on to something.
As an engineer I would often flesh out ideas for a design with other people, with each pulling out or contributing ideas to the final design. Now in retirement I had forgotten how much fun this can be, even if it’s via a blog forum designing a seed mat.
I think this all makes perfect sense.
For an art project this is correct; but, for something used to produce food, you would need to make sure the newspapers did not contain toxic chemicals. I think most now use vegetable inks; but, some colored papers at least used to use metals that could be toxic.
You could also use old brown corrugated box material, and due the the ”Amazon effect” I have quite a few of those boxes around.
I would personally, definitely be storing it flat, since unrolling it could be problematic,
I already have some 3×3 & 4×4 foot screens in the shop that we usually ise for drying and curing nuts, so these would be easy to use.
It’s the same for drying walnuts and other things.
Clergylady, I think we’re on to something here.
Ohio.
I don’t used any colored ink pages in my art projects either. Just black ink news print or unused roll ends if I can get them from the printers. The finished paper from 3/8 thick wet paper mache ends up strong and about the thickness of the paper formed for egg cartons. It could easily be molded as it finishes drying. I go for a slightly textured sheet to paint on. Most often I use very thin acrylics. It’s absorbent so it dries quickly and I paint in a watercolor style. Beautiful thin washes for sky and two quickly done layers to give shading and add depth for mountains or Adobe structures if I’m painting landscapes. If I’m doing my impressionistic children it’s quick washes and light second layers for shading. Most are in older style pueblo Indian clothing. Just a cute child or a child offering a handful of wild flowers or eating an ice cream cone. Sometimes a boy with his bow and arrows carrying home a rabbit. I framed them with cholla cacti skeleton branches cut to length and a slit cut on the table saw down the length of each piece. A sheet of 20 lb white paper for backing and a thin plexiglass cut to fit to protect the painting. The dried paper mache and thin plexiglass were strong enough to not need a seperate backing. They fit tight in the grooves cut in the cacti branches.
I’ve thought about making a gift box. Simple enough to do on a screen made to the size and shape I want. A lid made with shorter sides to fit over the box top. Just two parts. I’d bet a hardwarcloth inner form covered in screen would be strong enough to hold shape while the box dries. Some white glue or milk in the paper mache mix would make it quite water resistant. It could be colored during the making or left the natural color for painting on.
I make bead jewelry and my younger son makes sterling silver with stones or old style sand cast pieces for concho belts. Unique boxes for the nicer pieces might be a nice touch. I guess I’ll make one for me to try it out.
For mine I may add bits of leaves or flowers dried into the outer layer. I might try it with yarrow. I need to gather some for a tincture and some to dry for tea. I don’t see it growing here but in the mountains east of Albuquerque there is a lot in areas near the roads. The leaves are lacy and pretty. I’ll take a trowel, scissors, and baskets. I’d like to try transplanting some here. Otherwise it’s around a 100 mile drive to get it.
DIY. Actually askaprepper.com. has a lot of good information and a few published books. Some of us post here along with the site owner who does the lions share of the work on this.
Glad you enjoyed it. Please do look at the articles listed after the comments section.
Were on a rural septic system so I have plenty of single layer TP. I think I’ll try 2 or 3 layers of TP dampened and dried on the screen. . Then seeds and a single layer of TP and a light water spray. It should dry quickly and not interfere with the seeds. May need to add another layer if its too fragile. May end up 3 bottom and 2 top.
I enjoy trouble shooting and keeping the mind active. Working to keep the body active as well. I especially enjoy gardening but do some building for the place. Next two planned projects are a walipini ( pit greenhouse) and a new coop and pen for my chickens and ducks. I tore down a 12′ singlewide mobile home and reused the siding. Saved the trusses to carry a plastic cover for the walipini. Wall framing was saved for the chicken wire to cover the pen area. Pallets with smooth 1/4″ plywood on them will be screwed together for the coop walls and used corrugated metal roofing will be used for the coop roof. Mostly free for the taking or for the work.
I’m enjoying semi- retirement.
What I was considering is to fold the TP into little squares with the seed inside, maybe with a touch of paste just to keep it together. I do my planting in pots, and I think this would be easier for that, at least for making sure that the seeds are evenly spaced and don’t get washed out. Might also discourage the critters, too.;)
Little squares for planting in pots may be a great idea.
I salvaged a case of adult diapers from an old car here. The plastic was sunburned. The absorbent fiber in them is great for holding moisture in containers.
I use paper towels to make the seed tapes. More durable, less tear.