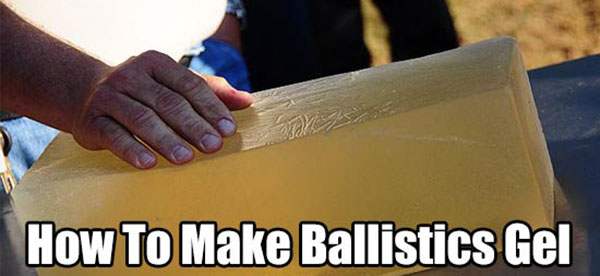
Gel testing was made famous by the FBI. They used ballistic gelatin to test a wide variety of rounds and calibers to determine the most effective combination for their agents. Police across the country have adopted the same standard of testing ammunition. A popular Discovery Channel show, Myth busters, also made ballistic gel famous with their testing procedures. However, did you know that you can make ballistic gel at home? It’s actually quite easy. This would allow you to test your own ammunition, and would be especially handy if you reload your own defensive ammunition. You surely want to test your ammo’s capability before a SHTF situation develops.
Before we start making ballistic gel we have to gather the ingredients. The cost for our block of ballistic gel is pretty low, so it’s a project you can mess up on a time or two. It’s also pretty fun to shoot the shell and see how ammo works, so buy extra and you can make extra.
You will need a few appliances that I imagine anyone with internet already has. Namely, you need a fridge and a stove.
To appropriately test ammunition you want a 10% gel mixture. This involves balancing the amount of water per ounce of gelatin appropriately. 8 ounces of gel requires 10 cups of water to be exact. If you want to simplify it a bit you can do 8 ounces of water per 1 ounce of powder. This simplifies it but will not give a 10% mix, just close.
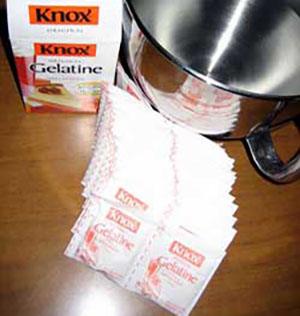
First and foremost you need the gelatin. I use Knoxx gelatin. Specifically the unflavored variety, get the unflavored it works the best. Knoxx gelatin can be found in almost any grocery store, or ordered on Amazon. It typically comes in 8 ounce boxes. I suggest the 8 ounce boxes because all of my measurements use 8 ounces of gel. I use 12.6 ounces of gel.
12.6 ounces can be hard to measure without a good scale, so 12.5 can be used, or 12.5 and just a dash. A tablespoon will measure out a perfect half ounce by the way. The difference will be very small, and not really noticeable. Your margin of error when it comes to measuring will be minimal.
You’ll also need:
- 15.5 cups of water
- A measuring cup
- Stirring Spoon
- Cooking thermometer
- Non-stick cooking spray
- A 14’’x4’’x4’’ polymer/plastic box. (A bigger or small box will change the formula slightly.) The most common and easiest to find mold is a Tupperware breadbox.
- Cooking pot big enough for 15.5 cups of water. Aka smaller pot
- Pot big enough to hold first pot aka Bigger Pot
Step One
 Grab your Knoxx Gelatin, your non stick bowl, your spoon, and water. Go ahead and dump your Knoxx gelatin into your pot, and follow it up with water. If you add the water and then the powder you will deal with lots and lots more lumps. After you add the water you are going to want to start mixing the gelatin.
Step Two
Start with your spoon to break up the biggest chunks of the water-gelatin mix. Once the big chunks are broken up it’s time to dive in hands first. Your hands are much better suited for breaking up the smaller chunks. You want to attempt to break as many clump as possible. The less clumps the cleaner the mixture will be. You want to avoid adding air to the mixture is possible. Don’t fluff the mixture.
Step Three
This is the easiest, but also hardest one. Set it in the refrigerator. Not the freezer! If it gets too cold it’s rather useless. Keep it undisturbed for two hours. Do not disturb the mixture. I know it’s tempting to touch it, tilt the bowl around, try and see how it’s setting. Just leave it alone, I know two hours is a long time. I suggest watching Empire Strikes Back; its 2 hours long and interesting enough to change your focus. This process is known as blooming by the way.
Step Four
It’s been two hours, Vader is Luke’s father, and he’s no good to you dead. It’s time to remove the concoction and the pot. Take your second, even bigger pot and add a bit of water to it. Set this pot on the stove and start warming the water. I keep my mine set on medium/ medium high.
Step Five
Set smaller pot into larger pot and let the gel begin to melt. As it melts you need to slowly stir it. Prevent it from boiling at all costs. Don’t try and rush it by turning the oven up. Occasionally check the temperature using your thermometer. Aim to keep the temperature below 107 Fahrenheit.
Step Six
Once the gelatin is liquefied continue to stir and prepare your mold. Go ahead and turn off the oven and let it cool. Again my mold is a 14’’ x 4’’ x 4’’ straight walled plastic box. This provides me with over 12 inches of gel to test rounds in. I spray the inside of the box with non stick cooking spray. I then slowly and carefully pour the liquefied mixture into the container.
Step Seven
Finally, place the gel into the fridge once more. Different people suggest different amounts of time for the gel to properly condense and harden. The most commonly accepted is 36 hours in the fridge. I’ve used them after twelve hours to test slings and bows, but for gun testing I always waited the full 36. After 36 hours you should be ready to go.
Finally
The great thing about them blocks is that they can be melted down and kept in the fridge and used over and over. Eventually they’ll weaken and start to fail, but they can be used a few times at least. Avoid washing them off with water. This will add water to the mixture. I simply cleaned them off with baby wipes. They will melt in left outside, so keep them cool. So folks, that’s how you make ballistic gel. It’s simple, easy, and fun to shoot.
You may also like:
 Home Security Tips From an Ex-Burglar
This Bug Will Kill Most of the Americans during the Next Crisis (Video)
What Should You Do in Case of a Terrorist Attack?


Thank you for this article, I had not realised it is something I want to do (want an accurate analogue for knife throw and crossbow)
Are you planning on doing a similar article for simulated bone? If not, do you know of any articles I can read up on?
Thanks again to your excellent article, much appreciated
Hi Damien,
Thank you for your kind words.
We will let you know if we decide to write an article about that particular subject.
If you place a bone on the not the gel before it sets it will resemble a limb with bone..add balloons with fake blood for veins….all with strings attached to top to hold in place as it sets