This post was contributed by Coureton.
The Lady of the House has been working extensively on the hides of our first two litters of rabbits, and has been doing a great job. I have mostly been a secondary assistant doing as I am told in between everything else going on. Despite life being crazy she has managed to get most of the skins to a fairly significant level of progress with the two hides nearly done. This is what we’ve been doing.
Step 1:
Wash the skinned hide. You are just trying to get the dirt and blood off the hide. For us we just dunked them all in a 5 gallon bucket, and had a second one to rinse them off as we took them out one by one.
Step 2:
Take the fresh, or green skin from the rabbit and tack it out on a board fur down. We have a lot of plywood scraps around and had a 4’x8′ sheet of OSB cut into 8, 2’x2′ squares for the rest. Make sure you have pulled it tight as you do so. We recommend using tack nails rather than anything larger since rabbit skin is so sensitive.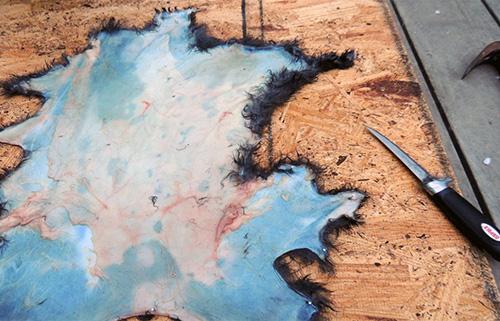
As you can see a skin, somewhat ragged due to my lack of expertise in properly skinning rabbits. The pink and somewhat lumpy parts are places where there is still fat or pieces of flesh on the skin that we weren’t able to get off. In our first attempt at this we tried to flesh the hides as much as possible. In the future we will be salting first to reduce the damage we do to the hide while fleshing.
Related: How to Assemble a Flawless Snare for Survival in Just 5 Minutes
Step 3:
Salt the hide, for us with our limited and scattered time this is a vital step. This preserves the hide so it doesn’t rot while we are unable to work on it. It also makes fleshing the hide much easier as we learned the hard way! You put down a thick, full covering layer of salt. You want non iodized salt in large quantities. Just pure sodium chloride. Get what ever you can that has no additives to it if you can manage it.
This is one of the first hides we salted. As you can tell we used a LOT of salt.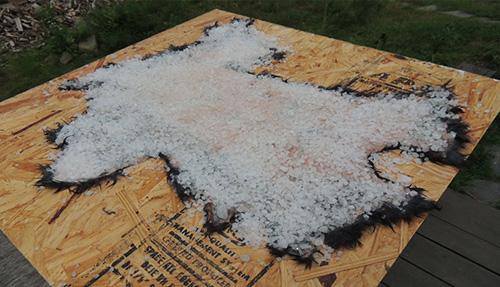
Step 4:
Flesh the hide. In this step you scrape off all of the salt, and remove all of the flesh and fat from the hide. We’ve mostly been doing it by hand, but spoons have been a great help. The Lady of the House has been getting good results by scoring the fat with a sharp knife, but making sure to not cut the skin below. You have to be thorough, and also have to not get too deep and get to the hair roots because then you will lose the fur to fur slippage.
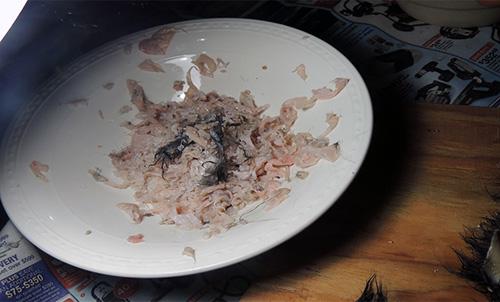 This is a bowl of mixed scraps of fat and flesh from the skins. Having a better person skinning the rabbit makes this process a lot easier from what I hear. Unfortunately at this point I am not skilled at skinning, which makes things that much more difficult for us as we try to clean off the hides. If you can’t finish fleshing all in one go, re salt the hide and store it away again. Try not to leave it too long, they do start to stink after a few days, and we suspect they may also degrade in quality as this happens.
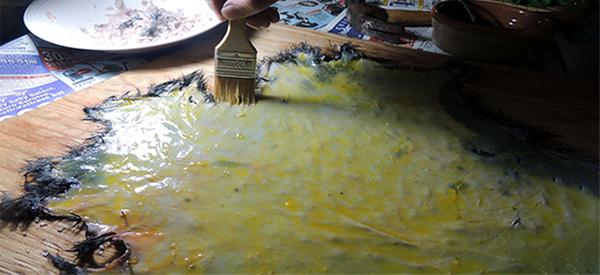
Step 5:
Apply your tanning agent. In our case it is egg yolk mixed with a teaspoon or two of water. We have been using a pastry brush to brush the mixture on evenly. You need to be absolutely sure you are getting an even coating all over the hide. You also need to make sure you don’t get any of the egg on the fur side. This is a photo of me trying to get a good coverage with the brush at the edge of the skin.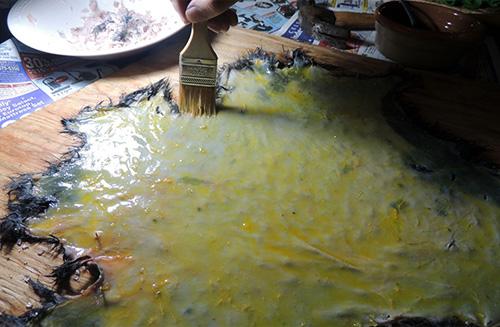
Related: How to Keep Eggs Fresh for a Year with Isinglass
Step 6:
Once you have good coverage of the skin with the mixture of egg yolk and water, cover the skin. You will need to cover the skin with a damp rag and make sure you cover all of it. We used a beat up old set of sheets, and the jersey cotton seemed to do just fine for this. We thoroughly wet the sheet, then rung it mostly out before putting it over the skin.
Step 7:
Wait. Set the covered skin aside. Most places say overnight. Many say 12 – 48 hours. We have been setting it aside for a fairly consistent 24 hours.
Step 8:
Carefully remove the skin from the board. Since we had used tack nails we just removed them gently and nailed them back into the board for re use later.
Step 9:
Take the skin that has been sitting for 24 or so hours, and wash it clean. You want to get the egg mixture off thoroughly. This will also let you get any crud you missed when doing your first washing.
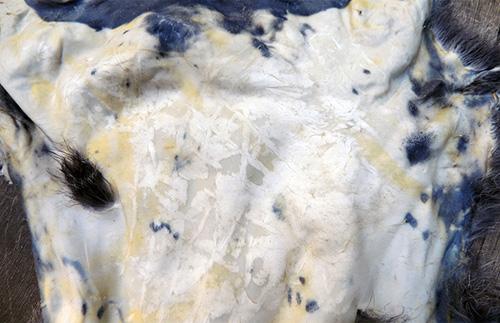
You can see the top and bottom of a skin that has just been rinsed off. It doesn’t look very good or luxurious at this step and both the Lady of the House and I were a bit concerned that maybe we’d messed something up. From what we can tell though, other than the holes in the skin from one thing and another they are doing just fine. 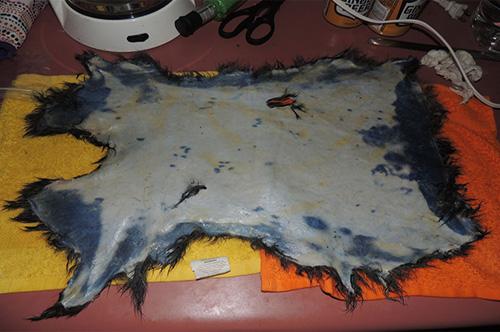
Step 10:
Allow the skin to dry out. I don’t mean let it get bone dry. You need to let it dry to the point that it is damp. In the nasty humid weather we have been having lately where we are, this is taking a good long time, and can be very frustrating when we leave the skins out to dry for multiple days. It is important though to not try to force drying by using heat. You can use a fan to blow air across it, but anything like a hair dryer with a heating element can damage the hide. You want to work with the skin when it is soft, pliable, and just damp enough to feel cool.
Related: Six Primitive Traps For Catching Game In The Woods
Step 11:
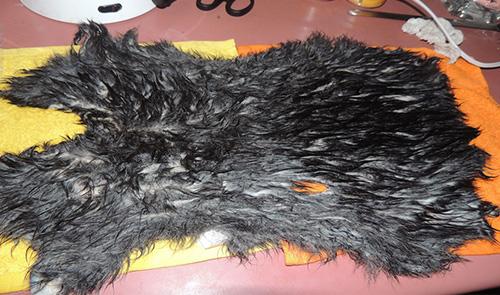
Work the hide. This is the longest, but easiest part of the process for us so far. Work the hide by rubbing it over a rope, corner of a table, something relatively smooth. The Lady of the House uses the non clip end of a clip board. I’ve been using chair backs and my knee from time to time. In humid weather it takes for EVER.
 From what we understand it takes much less time in a dry climate, or in the effects of air conditioning. Again, don’t use heat in this process. Just room temperature working. You have to work the hide until it is completely dry. If you don’t constantly work the hide it will end up hard as a board. If you have to stop mid work at this step, put the hide in a plastic bag in the fridge to keep it damp. You don’t want it drying out overnight on you and having to re soak and restart.
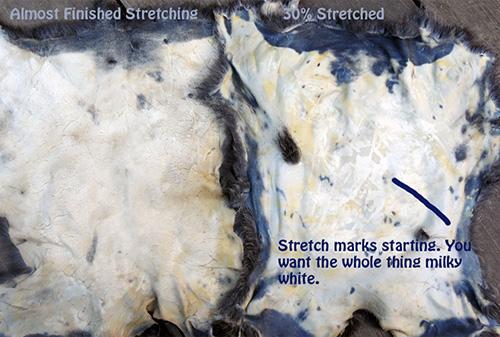
One of the things we had most difficulty with our first time was “How do we know when it is done?” Everywhere says that it will turn a milky white. Well, what exactly does that mean. Above the lady of the house has done a quick side by side comparison for ease of use.
Step 12:
Sew closed the holes in the hide. The nice thing about fur is that if the fur is good you can’t even see the stitching lines if you’re any good at sewing.
Step 13:
Trim the hide. Basically take off the ragged edges. We haven’t reached this step yet but will update with more information about it when we do.
Step 14:
Smoke the hide. We obviously haven’t gotten to this step yet. This step is to waterproof the hide. If you don’t do this step any time the hide gets wet you have to rework it, and that’s a pain in the ass. All we know now is to smoke over low heat so you don’t cook the hide. We are trying to, as we did with the rest of this tutorial gather as much information as we can and compile it in a way that makes sense to us to pass on to you. Smoking will probably be its own post in the future.
This article was written by Coureton from and first appeared on Hillside Homestead.
You may also like:

Affordable Vehicles That Can Survive an EMP
10 Things Cowboys Carried With Them In The Wild West To Survive (Video)
How To Hide From Thermal Vision
A Strange Thing That Might Save Your Life in A Nuclear Aftermath


a lot of people are trying to get away from aluminum (alum) since it is toxic to humans. That is why some are interested in using egg yolk.
When you are working it to make it pliable, it is skin side down (to the object you are working it on), right?
Yes, you are right.
I tan my own buckskin. While doing so, I get stock salt from a local farm supply store…It is about 6 bucks for 50 lbs. After defleshing, I salt the hide, roll it up, and put it in a sealed 5 gallon bucket. Hides are still good a year later. As for smoking the hide….a word of caution….smoking does not “waterproof” the hide. Merely the fibers are resistant and will not dry hard.
Up to the point before smoking, the hide is not truly “tanned” yet. The egg yolk is allowing the fibers in the skin to be relaxed, along with the stretching, to allow the smoke to work its magic. You can smoke it with a small fire or a smoker. Use cool smoke. You don’t want to burn it.
Good article. I will have to try the egg method. Thank you.
I have been tanning hides for over sixty years and never ever salt a hide. The better way is Borax hand soap. Salt takes out necessary proteins that keep the hide from spoiling. Add Alum powder and use the whole egg. On a rabbit hide it is not necessary to let the hide soak over night.
Thank-You coureton! This has been an interesting article to read. The pictures were a nice touch. Interesting stuff. I look forward to seeing your final results.
While reading this, I remembered hearing about using urine for tanning. I found an interesting article about that, and the comments were interesting, too. It seems that if you want to keep the fur on, urine isn’t as helpful for tanning.
http://www.instructables.com/id/Urine-Tanned-Salmon-Leather/
Ted your wrong about salt as all us professional taxidermist use salt first as it kills the bacteria that causes slipped hides as for the egg yolk those hides will fall apart your not really tanning the hide all borax does is take the moisture out if the hide get any dampness on it it will rot.best way is to buy a professional tanning product such as krowtan and do it right …love you do it yourself people who read this crap that some yuppie homesteader came up with
Thanks for the experienced insight, Randy. I enjoyed reading this article, and learning from Coureton and partner’s pleasant experimenting some of the things to watch out for. This IS a prepper website, after all, and we are all trying to learn what we don’t know, sharing our knowledge and experiences (and sometimes, our unintentional ignorance, too). It is deflating, at best, to be sneered at for our efforts and have our best information labeled “crap.” How are we supposed to know the difference between the best information and the uninformed? Now is the time for us to learn, and sometimes to learn by our mistakes and from others’. If the SHTF, we will be too busy scrambling to compensate for the things we did not learn or have the opportunity or time to share with others to have the time to learn. We need to be respectful of each others’ earnest efforts and lack of knowledge, experience, time, aptitude, and insufficient resources. If we’re on this website, we are sincerely trying to learn.
well said. Society in general needs to be more respectful.
You get better results with smaller animals by not flaying open the hide but removing in one piece. With rabbit and squirrel, cut a slit in the scruff on the back of the neck. Cut of tails and feet. Put fingers in teh scruff slit and start peeling the hide off inside out. Then put on a fur board
http://www.ebay.com/bhp/fur-stretchers
… if you only do hide curing occasionally, you can bend wire coat-hangers into a fur stretcher.
Salt and dry on the stretcher. If you want it open and flat, you can cut with scissors.
This helps prevent the shallows and voids that knife skinning does to thin hide like rabbit.
(Learned from my grandfather around 50 years ago.)
I peel the rabbit skins off the way you mention, but I don’t have any stretchers. Right now they’re in the freezer. My main question is this – what is the best place to cut for a usable flat fur?
I used to give the skins to an acquaintance who used alum, but I never thought to ask where he made the cut before he moved. The furs were lovely.
What is the best method for tanning beaver hides?
Best way is to flesh it clean, scrape it well, then brain-tan it (or use alum) and finish by smoking the hide so it stays soft and won’t stiffen up later.
Randy
What did tanners use long before professional tanning products were available?
@blanch…The brains of the animal.
I have 2 beautiful goat hides in the freezer, waiting for me to actually do something with them. Obviously the brains are long gone, but someone mentioned to me that I could just go to a local butcher and get the brains from another animal.
The brain I believe
This is very interesting. Thanks for sharing, and thanks to all the commenters too. I have been looking into tanning, and learned a method of tanning that has you soak the skin in water that has tree bark in it. The source that I learned this from said that all tree bark has tannin in it, and that this is how tanning was originally done. Does anyone have any more information or insight into this? Has anyone ever tried this method before?
You can also get tannins from leaching acorns, plus you can make acorn flour or just eat the acorns after you leach the tannins out so it’s a win-win.
If you ever saw the movie my side of the mountain the kid soaked the hide in chopped up oak chips in the stomp he chopped up
I do ” natural tanning/ dressing” because out here it’s easier to just use eggs and brains I will be checking what bark has tannin in it and Randy like politics we all have our views and opinions we are entitled to them and respect for all is absolutely necessary now a days I tan the way I do because that is my heritige and I am very proud of who I am
i think that white oak bark or evev better white oak ashes is the highesst in tannic acid but when i was a youngster we just used the brains and then rolled the hide in the brains and covered in plastic and burried it 1 to 2 feet below ground for a week then dug up and scraped then salted and sprinkled heavely with vinager and scraped again then let dry for a couple of hours then rubbed lightly with an oil then lay asiden for a while then wiped dry.
Question I haven’t found answered anywhere – once I smoke the furs, how do I get rid of the strong smoke smell? I don’t want to wash them, but they smell so strongly that they make the whole room smell like an old campfire when I bring them inside.
That smell goes away on its own, especially as you work it.
The egg tan is known as a chamis tan which is the oldest form of tanning. Brain tanning falls into this category as well. Bark tanning or as its better known, veg tanning (vegetable tanning) is likely the second oldest form of tanning. So heres a trade secret for you all. Each tree posses different amounts of tannins but also will produce a slightly different finished product. Willow will make your hide more pliable whereas alder would make your hide more stiff, combining different barks can also help you achieve varied effects you would normally be unable to obtain with just one tree. The rule to this is that you use finely shaved bark thats as fresh as can be. But it must equal the hide in its weight. Your bark liquor should start off weak and moved over the course of time from a weak solution to medium to strong.
Then of course theres the alum tan and combination tan which are two very different kinds of tanning and i will not speak on either of them. I will say this though, alum tan is by far the fastest form of tanning. Whereas chamis tan, if done truly correctly, produces the strongest and best furs on the market. Your egg tan will produce a different hide from a brain tan. I wont go into specifics as to why because that knowledge is what keeps me working. But all the same, yall are doing great! Oh and Randy…im not sure what krotan is but my ancestors used veg and chamis as the methods to tan their hides. Being that they lived in the arctic circle their furs needed to outlast the harsh environment…so that egg tan may not be a true chamis tan but it will serve its purpose and be good enough for what they need. Any pre mixed solutions are for those that dont know what theyre doing as far as im concerned.
Oh my, Randy I do believe you have been schooled my dear. I think I will put my faith in the tried and true ways of the past. Loved all your comments and the knowledge I have gained from you all.