In a grid-down scenario, we will not have the luxury of popping down to the local grocer to buy our vegetables and fresh herbs.
If you are a person who likes to garden, you will be very aware that most areas have a definite growing season. The problem is that we still need to eat even when the plants are not growing outside.
Since our homes are nicely climate-controlled, it makes sense to bring some plants inside to keep them growing during the cold and dark winter months.
Inside our homes’ walls, we can easily provide a warm, well-lit, and moist environment for the plants to grow in. This is where a small indoor greenhouse comes into play.
Why Use an Indoor Greenhouse?
There are many reasons we would want to use a greenhouse indoors, but the primary reason is that we can exercise far greater control over the conditions when we move the plants inside our homes.
Temperature, humidity, and moisture are a few of the variables that we can fine-tune to maximize our plant’s growth potential. Since the plants are inside our homes, we can also check on their condition with greater frequency.
Things to Consider
You will need to consider several factors before beginning construction:
- How much sunlight makes its way into the house. Walk around your home, examining all the areas around your windows to determine which areas have the greatest amount of direct sunlight. There are situations where there will be no good access to natural sunlight. In these cases, you will need to use grow lights in place of the sun.
- After you find a location with good sunlight or a space that you will provide artificial light, you need to determine the maximum size that the greenhouse can be.
- Once you have a location in mind and know what size of indoor greenhouse you can construct, you can determine which plants you can grow. Choose vegetables and herbs that your family enjoys and will fit the space. It is beneficial to plant some herbs that provide medicinal benefits in an off-grid or a grid-down situation.
- It would be best if you also considered whether you want to grow vegetables and herbs all the way to harvest or grow seeds for transplant later in an outdoor garden. This will have a determining effect on the size of your greenhouse and the volume of plants that you can grow at a given time.
Indoor Greenhouse Design
Once you have a plan for what plants you are going to grow, you’ll need to acquire suitable containers for them, and the size of these containers will be what you use as a template for how you are going to plan and build your indoor greenhouse.
Related: 8 Medicinal Plants You Can Grow Indoors
Be it pots, planters, or trays; you need to make sure that they will easily fit with room to grow.
What to Grow in an Indoor Greenhouse
Indoor greenhouses are often used to grow seeds into seedlings which are transplanted into gardens outside.
You can also grow a wide variety of herbs, vegetables, and even fruits as long as you have the available space to devote to their cultivation.
Please do your research before cutting any wood and plan for what you are going to grow and how you will grow it. Be mindful of the individual needs of each plant, and design your greenhouse around these needs.
Construction of the Indoor Greenhouse
The instructions that I am providing here are for the greenhouse that fit my needs and space. I used four 15″ x 8″ plastic planters as the containers for the dirt and plants.
You will have to adjust your greenhouse size according to what containers you choose to house the plants.
Determining the Size
Begin by laying out your planters in the orientation that works best inside of your greenhouse.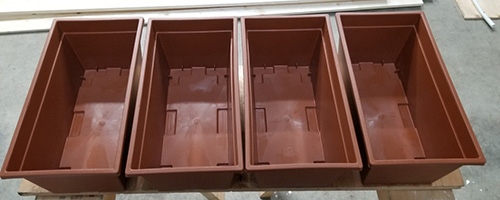
Once you are satisfied with their position, measure the length and width, which will be the basis for which you dimension the shelf or selves that the planters will be sitting. 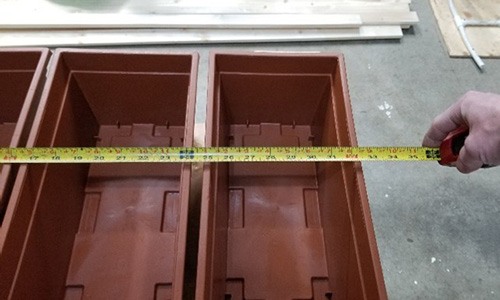
Once you have the length and width, add an inch or so to each dimension to determine your greenhouse shelf cut sizes.
Tools Required
- Saw
- Drill with bits and drivers
- Square
- Carpenters pencil
- Exacto knife
- Staple gun
- Carpenters glue
Materials
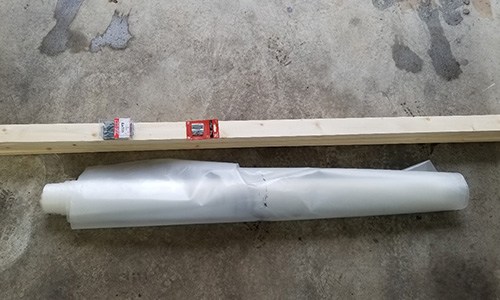 1″ x3″ x8′ lumber available at Home Depot for $4.81USD each. I used nine boards for my build.
- 6 Mil vapour barrier available at Home Depot for $64.00 per 100 ft roll. It may be possible to find lower prices if you select alternative plastic sheeting.
- #6 x 1 ½ inch wood screws are available at Home Depot for $6.25USD for a pack of 100.
- #6 x 2-inch wood screws are available at Home Depot for $5.97USD for a one-pound box.
- Small hinges are available at Home Depot for $2.18USD.
- Staples are found at Home Depot for $13.64USD for a pack of 1000.
- Planters are available at Home Depot for $5.18USD.
- Soil can be found at Home Depot for $8.97USD.
If you had to purchase all these items in the quantities required to construct the indoor greenhouse I built, it would cost around $160USD.
It took me a little less than two hours to design and build this greenhouse. The cost and time your greenhouse will take may vary.
Building the Shelf
#1. I started by cutting the material for the shelf. The inside dimensions were made to match what I determined them to be during the design phase. In my case, I cut five pieces at 33 inches and two pieces at 18 inches.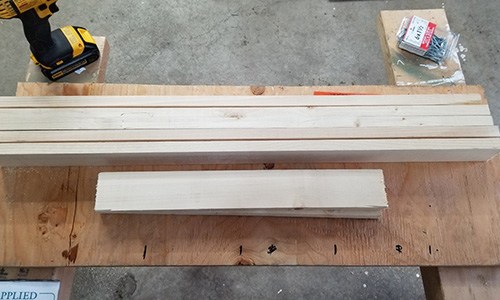
#2. I test-fit the cut pieces before securing them with screws and glue. In this case, I chose to use three cross braces to support the planters.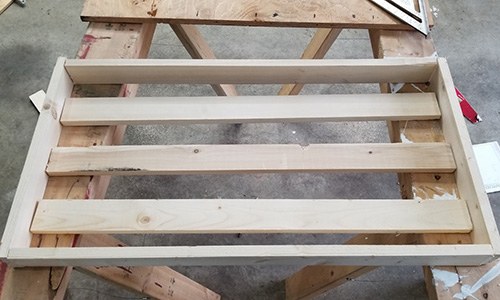
#3. I made sure to place the planters inside of the shelf to confirm that they will fit appropriately.
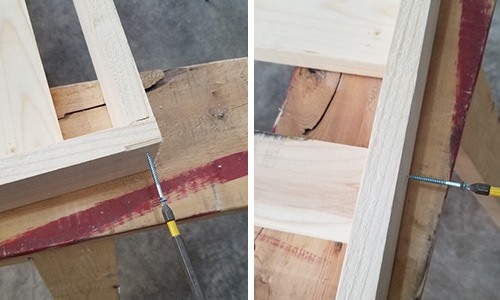
#4. Once I was happy with how everything fit, I glued and screwed the shelf together.
 Building the Sides
#1. To achieve the height that I wanted, I cut two pieces of the 1×3 lumber in half to give me four 48″ uprights.
#2. Knowing that my shelf width is 18″, I spaced my uprights so that they were parallel, square and 18″ apart.
#3. To determine the angle of the top for my greenhouse, I laid a board across the two uprights until it was sitting at an angle that I found agreeable. I made sure to leave space where the cross member and the rear board meet to accommodate the greenhouse door.
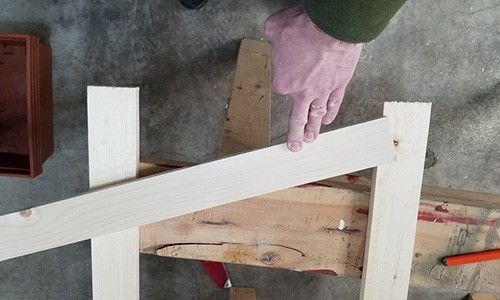 #4. I then marked the cross piece where it met with the uprights, which are now my cut lines for the upper cross members.
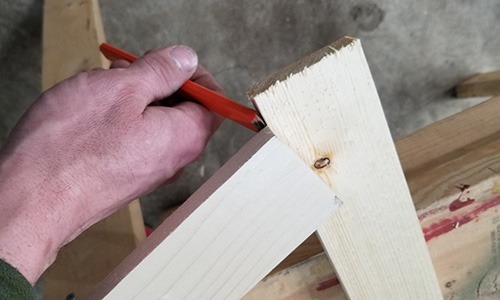 #5. I cut the cross members and tested the fit. Given the boards’ width, I had to drill holes approximately halfway through the uprights’ width so the screws would have less material in which to drive through.
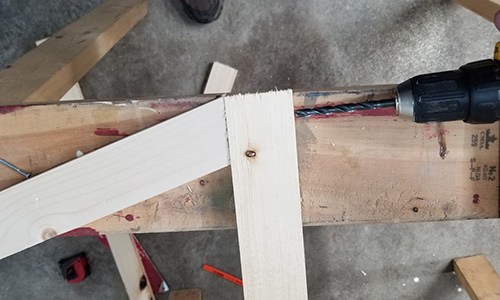 #6. After drilling, I glued and screwed the upper cross-members in place.
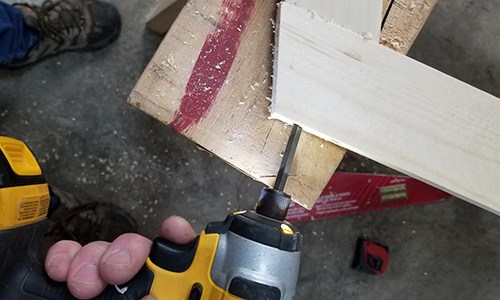 #7. I glued and screwed an 18″ lower cross member about 3 inches from the side pieces’ bottom.
Putting it all Together
#1. The two side panels are connected at the top rear by two boards that, in my case, measured 34 ¾” long. I glued and screwed them in place, forming an ‘L’ shape.
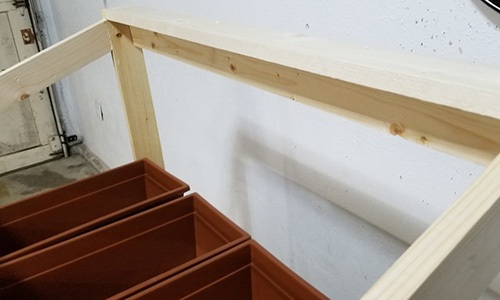 #2. I installed the shelf at an appropriate height, gluing and screwing it in place. Always check the height before continuing and make adjustments as needed.
#3. I attached more cross-bracing on the bottom and at the top front of the greenhouse.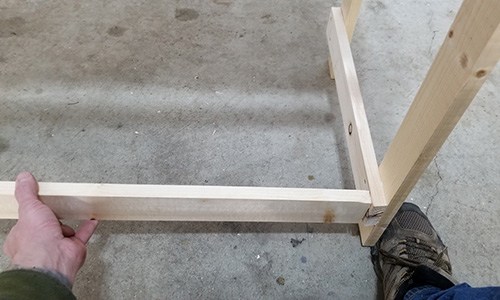
#4. With the greenhouse frame now complete, I placed the planters inside to check the fit.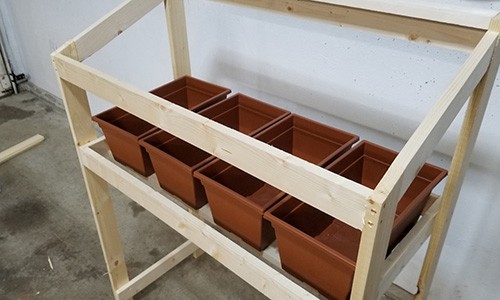
The Door
Constructing the door was very straightforward.
Related: How to Build a Secret Bookcase Door
#1. I cut two boards at the top opening’s full width and two more boards that will fit in between these longer boards once installed.
#2. I had to drill holes to accommodate the screws again.
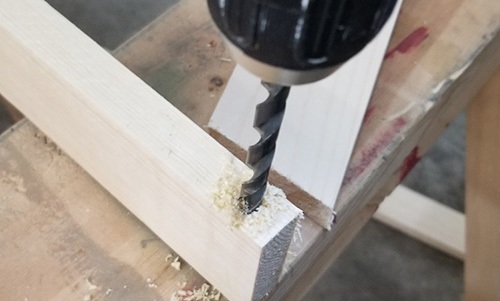 #3. I made sure to test fit the pieces before gluing and screwing them together.
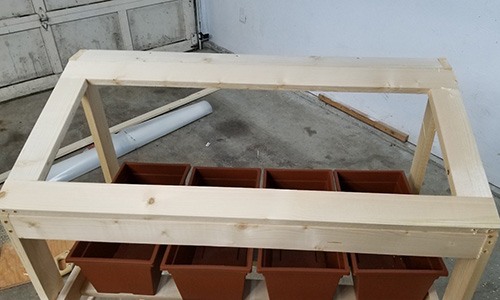
Wrapping the Greenhouse
#1. I cut a piece of vapour barrier long enough to wrap around the greenhouse, and then I loosely wrapped it around the greenhouse.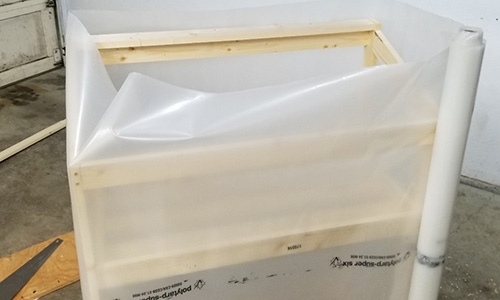 #2. Starting at one corner, I folded a bit of the plastic over the top opening’s edge and stapling it in position.
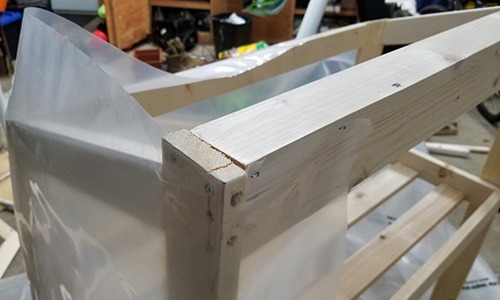 #3. I then continued in this manner around the perimeter of the greenhouse. I had to cut and trim the plastic at the interior corners as I went around.
#4. Once the perimeter was secured, I flipped the greenhouse upside down and cut the plastic at each corner so that each side of the greenhouse had a plastic section that could be folded and secured to the shelf’s underside.
Related: How To Grow Suspended Food Indoors
I made sure each of these sections was long enough to cover the bottom of the shelf fully.
I folded the four plastic sections one at a time over onto the bottom of the shelf, securing and trimming as necessary.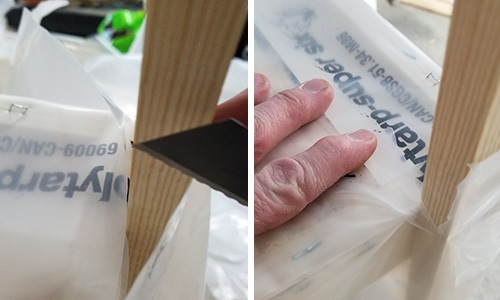 #5. I laid the door down on a section of plastic and folded, trimmed and stapled to get a snug fit of plastic around the outside surface of the door.
#6. Then I secured the door in place with hinges.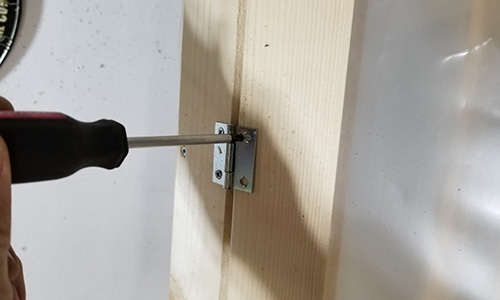
What’s More
Place the greenhouse in position and place the dirt-filled planters inside. 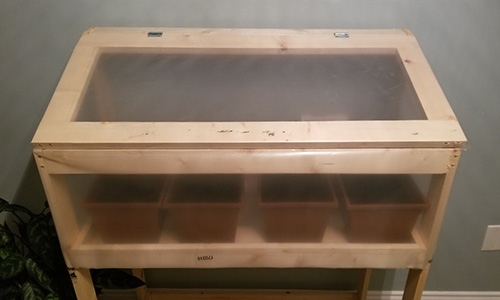 It is a good idea to include a thermometer with a hydrometer to monitor the greenhouse conditions. Plant and water whichever seeds you see fit.
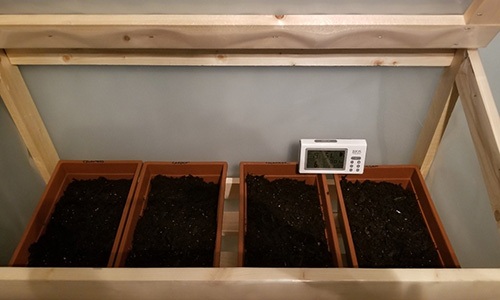
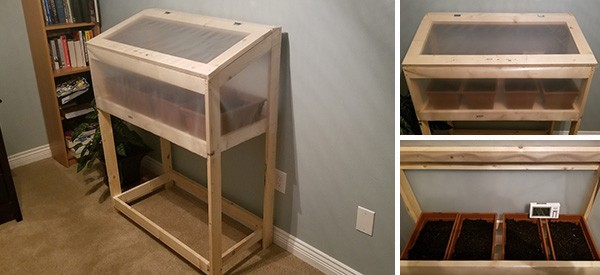
Building an indoor greenhouse may seem like a daunting project to undertake, but it is not difficult.
For a few hours of your time, you can provide your family with food during the cold winter months and give your plants a nursery in which to get the best start at life before moving to your garden.
You may also like:
 No Gas, No Electricity… How To Cook Indoors Without Smoke
How To Make A Year-Round Self-Sustaining Garden (Video)
Emergency Preparedness – A Different Approach






This starts off with a grid down situation and then says you need grow lights in areas without direct sunlight. So now we need a generator. Oh goody.
How many serious preppers don’t have an alternate way to generate electricity?
Don’t forget to add in the PDRK 10% depletion fee for all lumber products sold in the state. This despite the fact that most lumber harvested today is from private timber farms as opposed to the hayday of yesteryear when public lands were cut for timber. Fees only take politicians’ approval; tax increases take voter approval. The legislature in the PDRK has discovered the wonderful world of “fees”.
Every stick of lumber sold in the PDRK has a 10% “depletion” fee tacked on and to rub salt in the wound, you pay sales tax on the “depletion” fee. So a house built in the PDRK is 10% more expensive than the exact same house built in some non-depletion state. And the pols wonder why there is no affordable housing being built in this state.
ok, Ima dumb-ass…… whats PDRK
Peepuls dimokratik reepublik of Kallyforniya. Not so dumb if you are not an inmate of that communist state.
Use recycled wood from demo sites or old pallets, even broken furniture. Glass part can be from reclaimed windows, a large aquarium or made from clear plastic. Even clear bubble wrap, shower curtains or trash bags can be repurposed for the grow box so long as it’s not near a heat source like a radiator or an open flame and you don’t have destructive pets. You are just building a table with a clear box to act as a mini greenhouse. If you aren’t handy, a table in a sunny window will work fine, and for tenderer plants you can cut down plastic soda bottles to use as a cloche. That works outside, too.
Or you could just reuse old pallets as material and avoid any cost at all except for the non-wood bits that you don’t have laying around.
LCC.. The lumber being 10% more doesn’t mean the house costs 10% more to build. There’s a whole lot more than just lumber that goes into the construction cost of a house.
Michael Major, for the amount of space it takes up, I could add a second layer of planters on a shelf below as long I added grow lights to the bottom of the shelf above, right? I’m trying to figure it out – maybe overlapping layers of plastic on the front hanging down to enclose the plants but give easy access to them? I could seal the bottom and sides, but the front is the bother. Maybe a plastic wrapped hinged door that I could hook to the top somewhere to hold it safely open?
do your 8×15 planters have drainage holes? if so, they are going to drain out of the slatted bottom. that bottom is also going to let cool air in. i would suggest starting with a sheet cake pan 13″x18″ or whatever size you find locally that suits you. these are about 2 ” deep, so any pot drainage is contained. thrift stores are a good place to find these cheap. if you are hugging this up to your south facing window or if you are placing on your patio in the sun during the day, you might want to make the door at an angle that would allow the sun’s rays to be perpendicular to the door. you’ll have better light and heat in your box that way.
If the grid is down your going to be rearranging the inside of your home anyway. Make room near a window for this thing. No grow light needed.
I have a tall metal shelves at my kitchen windows. I grow seeds sprouts a n d micro greens there, usually peppers and tomatoes are potted at the end of growing season and set there. Spring seed starting is there and 2 wide metal shelves in the livingroom infront of windows. I’m starting spring seedlings there now. We’ll have outside frosts for weeks more. Garden will be ready to transplant as the frosts end. Lettuce, green onions, and radishes do well in an east or south window all winter. An already bearing small tomatoes does ok or will continuing to ripen set fruit. My cherry tomatoes often continue to bloom so I use a small paint brush to fertilize the flowers.
The idea is good but more work than I need to bother with. The rooms are cool to cold at night… May be hot when there is a fire in the heater… but plants are pretty resiliant.
Off topic but of interest to prepress:
“March 31, 2021
EXTREME SPACE WEATHER: 20 years ago today, a powerful CME slammed into Earth’s magnetosphere, sparking an extreme geomagnetic storm. Bright auroras were seen as far south as Houston, Texas, and San Diego, California. Technological systems avoided damage mainly because a second CME arrived later in the day and, ironically, turned the storm off before it could grow any stronger. Learn more about this fascinating event on Spaceweather.com.”
Twenty years ago I hadn’t become aware of the dangers of CMEs. Of course, twenty years ago we weren’t as heavily involved in computers as we are today. This website wasn’t up and although I had added in some extra food for the turn of the century due to the scare, I only ran into one instance where the store’s computers hadn’t been upgraded to handle the change of the century. It was Auto Zone and I was surprised that a chain hadn’t had the foresight to change the program to accommodate the year change.
Today, CMEs present a much larger danger to the U.S. Our grid system is twenty years older with no major upgrades, at least here in SoCal.
For those who are planning on alternative electrical systems, if the grid is destroyed as some say it will be, you will find that your ad hoc electrical system will run out of parts even though you may scrounge from other sources.
LCC: Even more disturbing is the fact that so much of our nation’s infrastructure is now computerized. If there were an EMP, man made or solar, it could crash everything from the internet and telecommunications all the way to water, sewage and natural gas.
In 2018, there was a surge in the gas lines in the Merrimack Valley area in Massachusetts. This was caused by human error in the computer program, but it’s just an example of the type of thing that I’m talking about. Here’s a link to the wikipedia overview if you’re interested.
https://en.m.wikipedia.org/wiki/Merrimack_Valley_gas_explosions
My thought is to be focusing on having as much of your personal infrastructure as possible separated from the grid, or at least have low tech alternatives standing by.
Miss Kitty – The former administration paid attention to this and took action steps to put plans and programs in place to mitigate and protect our infrastructure against an EMP attack. I’m sure in all of the Executive Orders being churned out in Wash.DC, as I write this by the new administration there are many that either undo or chip away at that. We have foreign, imported tech genies making everything up now as they go along, all based on money and what they like, what they can do, rather than what we need as a nation. If it fails, it’s more money for them to fix it!
City Chick:
Yep, they do seem determined to erase everything Trump did. Kommunist Kancel Kulture at work. Spelling deliberate.
Interesting for sure, but there are many innovations in farming indoors that can add to the design and development of your own farm. Check out Farm.One online. They are located at 77 Worth Street in TriBeCa NYC. They excel in what they refer to as vertical gardening and supply all the best restaurants in Manhattan with specialty produce. Yes, there’s a farm in Manhattan.
Great idea. I will try it this weekend as my prepper project of the week.
Thanks Claude!
How long does it take to build it?
Seems pretty easy.
If you have an extra room with a large window, you can build all of this in the window. I did that in one of my homes. I first put that plastic across the window to help control the light and moisture. It was perfect – an East facing window that got early morning light before it got too hot.
I built 5 shelves. Put an empty planter bin at the bottom that stretched across the entire space (to catch any water overflow… it does happen.)
Plant whatever needs the least water on the top shelf, as there will be drip no matter what you do, so use that to your advantage. Keep in mind growth and climbing. Tomatoes and cucumbers need to climb. Put them on either side of the window, starting at the lowest shelf. Plants like oregano, basil, thyme, mint, sage, and other herbs can be on the top shelves. Green peppers on the second to the bottom shelf. These herbs will also control pests. https://www.treehugger.com/companion-plants-repel-insects-4856578
Always keep an eye out for aphids and ants. Catch that quickly or you’re in a world of hurt. Ants “farm” aphids for food. If you see a trail of them headed to your indoor garden, use something like cayenne pepper along their trail. Diatomaceous earth is also really useful and doesn’t harm pets or plants.
You probably already know all this, but doesn’t hurt to remind…