A loud whistle grabs your attention better than anything you can yell. It’s an essential survival skill, but it’s also a skill that many struggle with. For me, it’s always been about wanting to whistle loudly and powerfully. But I couldn’t quite get it – until recently when I learned how to whistle loud.
I came across a short video that changed everything. I believe some of you might be in the same boat.
You want to whistle with your hands but can’t make the right sound. If that’s you, don’t worry, I’ve got you covered. Here’s a step-by-step guide on how to whistle using your hands, even if you’ve had trouble in the past. Your personal how to finger whistle guide.
Step-by-Step Guide on How to Whistle Using Your Hands
Believe it or not, everything boils down to practice. Whistling is one of the basic survival skills you want to hold and in no time you will get the hang of it. So, how do you whistle using your fingers? Just wash your hands and follow the steps below:
Step 1: Choose Your Method and Position Your Fingers
There is no single correct finger configuration for a loud whistle. Different hand sizes and mouth shapes respond differently. Try all three methods below and stick with whichever produces sound fastest for you. The mechanics are the same across all three: fingers inside the mouth, tips touching or nearly touching the tongue, air forced over the lower lip.
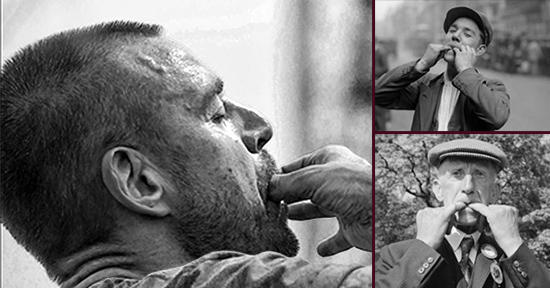
Method A: Two Index Fingers (Most Common)
Bring the tips of both index fingers together so they form an upside-down V shape. Insert the tips about half an inch into your mouth, angling them downward toward your lower front teeth. Your fingertips should rest lightly on the top surface of your tongue near the tip.
Method B: Index Finger and Pinky, One Hand
Using one hand, extend your index finger and pinky while folding your middle two fingers down. Insert the tips of the index finger and pinky into your mouth in the same position as Method A. This is the classic one-handed version and works well for people with larger hands.
Method C: Both Pinkies
Bring both pinky fingertips together and insert them into your mouth the same way. Some people find the pinky method easier to control because the smaller fingers sit more naturally against the tongue without crowding the mouth.
Step 2: Position Your Lips
Roll both lips inward so they fold over your teeth. Think of the expression you make when you press your lips together tightly over your teeth. Your lips should be taut and thin, not puffed out. The corners of your mouth should stay slightly open. This lip position is what creates the edge that air flows over to generate the whistle tone. If your lips are loose or puffed, no amount of breath will produce a sound.
Step 3: Set Your Tongue Position
Your fingers will naturally push your tongue back slightly when inserted. Let them. The goal is to position your tongue so its tip rests just under and behind your fingertips, creating a ramp that directs airflow downward toward your lower lip. Do not press the tongue flat to the floor of your mouth. It should stay slightly raised and firm. The gap between your fingertips and the top of your tongue is the channel the air travels through. Too much space and the air disperses. Too little and it blocks. You will find the right position through trial and error in the next step.
Step 4: Blow Through the Hole Between Your Fingers
Take a deep breath and blow forcefully through the small hole between your middle and index fingers. This is where you’ll need to adjust your finger and tongue positions until the right whistling sound emerges. Play around with the placement of the tips of your fingers if the position feels unnatural.
Aim your breath downward at about a 45-degree angle toward your lower lip, not straight out through the gap. The angle is what causes the air to split across the lip edge and generate tone.
Step 5: Practice, Practice, Practice
Don’t be discouraged if it doesn’t work the first time. I remember when I first tried, I got my fingers covered in saliva. But persistence pays off. Keep practicing and adjusting your finger placement and tongue position until you get the perfect whistle.
Troubleshooting: Why You Are Not Getting a Sound
Almost everyone struggles the first several attempts. The failure is almost always one of five things. Work through them in order:
- Lips not rolled far enough over teeth. If any part of your upper or lower teeth is exposed, roll your lips in further. The teeth must be completely covered by lip. This is the most common mistake and the easiest fix.
- Tongue too flat or too raised. If your tongue is pressed flat to the bottom of your mouth, the air has nowhere to channel. If it is pressed too hard against your fingers, it blocks the airflow entirely. Find the middle: tongue slightly raised, tip just behind the fingertips, not touching them.
- Fingers inserted too deep or not deep enough. Half an inch is the target. Too shallow and your fingers are not redirecting airflow at all. Too deep and you are pushing the tongue back so far the channel collapses.
- Not enough air pressure. A finger whistle requires a firm, fast breath, not a gentle one. Take a full breath and push it out with your diaphragm. If you are not slightly light-headed after a few attempts, you are not blowing hard enough.
- Blowing straight instead of angled. Direct your breath downward at roughly 45 degrees, not straight forward through the finger gap. The downward angle is what creates the split across the lower lip that generates the whistle frequency. Straight breath produces nothing but noise.
Tips for a Louder, More Reliable Whistle
- Wet your lips lightly before each attempt. Dry lips break the seal.
- Practice in front of a mirror so you can see exactly how far your lips are rolled and whether your finger depth changes between attempts.
- Once you get a sound, stop immediately and note exactly where your fingers are, how deep they are inserted, and what your tongue is doing. Repeat that exact position. Consistency is the goal.
- Slightly curling the very tip of your tongue backward rather than keeping it flat helps many people find the right airflow channel. Experiment with this only after you have the basic position dialed in.
How to Use a Finger Whistle as a Survival Signal
A finger whistle carries significantly farther than a human voice. In open terrain with low wind, a sharp whistle can be heard up to a mile away. Your voice under the same conditions is effective to roughly 200 yards at full volume before it becomes indistinguishable from background noise. This difference matters when you are trying to attract the attention of a search and rescue team, another member of your group, or anyone in earshot who does not know to be listening for you. The American Hiking Society and most wilderness survival frameworks identify signaling as the highest-priority skill for anyone separated from their group.
The universal distress signal is three short signals in rapid succession, followed by a pause, then repeated. This applies to whistles, horn blasts, gunshots, and mirror flashes. Three is the number. According to the National Park Service Search and Rescue guidelines, rescue teams are specifically trained to listen for patterns of three and to respond with two signals to confirm they have heard you. If you hear two blasts back, stop moving and keep signaling from your position.
Sound travels differently depending on your environment. In dense forest, sound is absorbed by vegetation and drops off quickly. Signal from the highest ground you can safely reach. In open terrain, sound carries farther but also disperses in all directions, so positioning yourself with a cliff or rock face behind you reflects your signal outward. Near water, sound travels particularly well across the surface. If you are near a river or lake, signal from the bank.
A finger whistle gives you an unlimited-use signal tool that requires no batteries, no gear, and no weight in your pack. A quality safety whistle is louder and more consistent, which is why every bug-out bag should contain one. But if you lose your gear or your whistle breaks, your fingers do not.
By the way, if you’re serious about wilderness survival and want to learn even more life-saving skills, this guide is a fantastic resource. From shelter building and fire starting to advanced signaling techniques, this book will help you thrive in even the most challenging situations. Don’t miss out on learning valuable survival skills that could save your life when you need them the most.
You may also like:
 Items You Need to EMP-Proof Before It’s Too Late
Where Free Land Can Still Be Found in the USA (Video)
The First Water Source That Will Disappear in a Crisis
I Tried Eating Like a Pioneer for 100 Days and This Is What Happened


Kinda gross to stick your fingers in your mouth, and who’s gonna have a damn sink nearby when you’re at the park with your dog. I always preferred the grabbing and pinching the bottom lip method.
This actually works much better with just one finger from each hand.
Or your thumb and middle finger on one hand.
Or thumb and index finger on one hand. This always gives the loudest whistle for me
hello
Ummmm I’m sitting here listening to air coming out of my mouth on to my fingers…….
You told
After trying your directions to whistle then also I was not able to whistle maybe because of wrong placement of my fingers! So can you please clarify where to put our fingers- top, bottom, left or right?
Can you please make one of these using the index and thumb of one hand? *Looks a lot cooler*
Having to use your fingers to whistle is a dumb idea. There are way too many times when you might need help when carrying something you don’t want to put down. Or your arm might be caught in something. With enough practice, you can whistle as loud as anyone without using your fingers.
Still doesn’t work for me. I swear I washed my hands thoroughly many times!! ??jk
Haha! Lol I tried my Slavia came out 😀 😀
How does one whistle with dentures?
How does one whistle when dentures are out of the mouth?
It’s almost impossible but can be done with practice.
Better yet have a survial whistle hung around your neck.