Have you ever thought of how much you actually spend on heating during the winter? This original solution was created in order to reduce heating costs in places where you don’t necessarily want to achieve a constant temperature, as high as 64.4°F. It was originally found useful by farmers that needed to provide some sort of thermic comfort to their animals—and let’s face it, in a chicken coop, every degree matters. This is also true for the shelter of goats or sheep; they are resilient animals, but every extra degree you can obtain during the cold season means increased productivity and decreased costs.
But keep in mind that this method doesn’t make miracles. It works only in moderately cold temps and only in daytime.
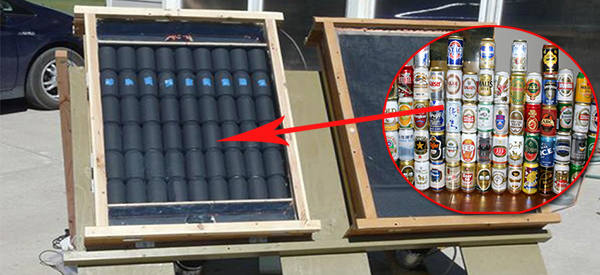
You can actually build a solar panel out of empty aluminum cans. You can use beer cans or juice cans; it doesn’t really matter. The best thing about this project is that you don’t need expensive, fancy materials to build it. You will basically need some pieces of wood to build a wooden frame, a piece of plywood to keep the cans in place, a piece of glass, and some black paint.
Materials:
- Aluminum cans: Their number depends on the size of the unit, but they should all be the same size.
- An old double window or some pieces of wood to build a wooden frame
- A sheet of plywood the size of the wooden frame
- Heat-resistant silicone
- A sheet of glass (Plexiglas would be even better) the size of the panel
- Heat-resistant flat black paint: One can should be enough.
- Screws
- Drill
- Air blower: You can use a recycled one from an old computer for example.
How does it work?
The unit is normally placed in the wall or roof of the building you need to heat. You must be sure to place it facing South so it gets plenty of sun exposure. The panel will be heated by the sun. Air is drawn from the inside of the room, heated through the air columns made of cans, and pushed back into the room.
How do you actually build it?
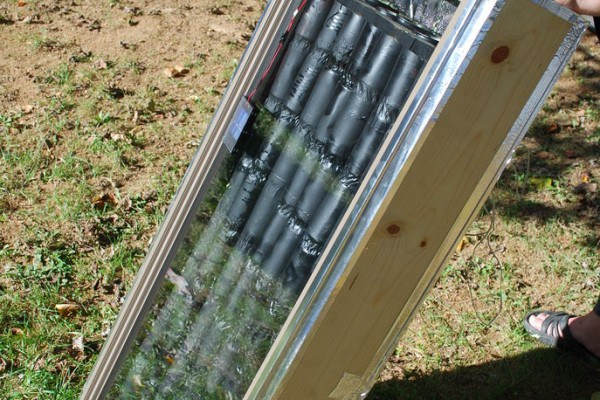
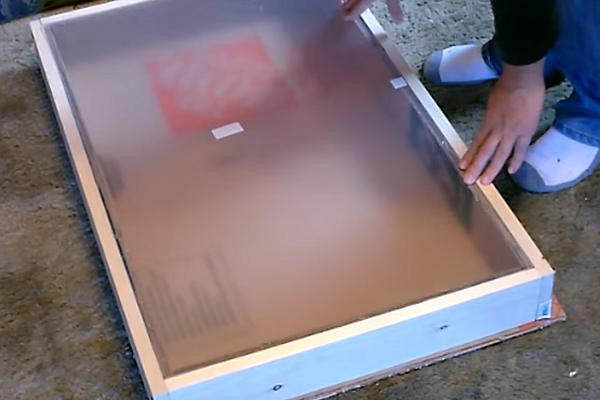
The first step of this DIY project is to build the wooden frame. Once it’s in place, cut a piece of plywood that fits perfectly inside, and nail it to the back of the frame.
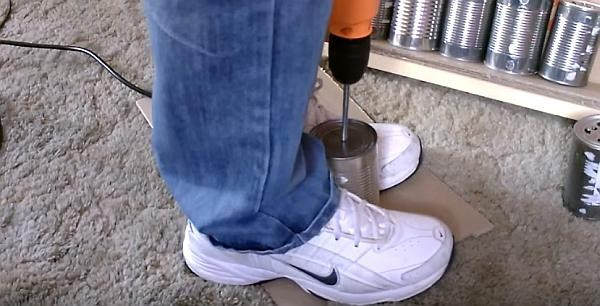
Next, it’s time to put your drill to work. You will need to drill holes in the frame, for the inlet and the outlet hoses. Make sure you drill them on two opposite sides of the frame.
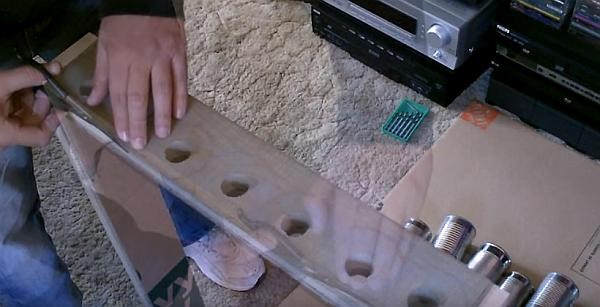
Don’t put the drill away yet! You will also need to drill holes in the tops and bottoms of the aluminum cans so that air can freely circulate inside. Make sure you don’t injure yourself—aluminum edges can be quite sharp. Once you’re done with drilling the cans, it’s time to paint them. One can of flat black paint should be enough. Give it time to completely dry before moving on to the next phase.
Once the cans are painted and dry, it’s time to put them into place. You need to put them inside the wooden frame and seal them together using heat-resistant silicone. As soon as all the cans are in place, it’s time to close the box. Use the sheet of Plexiglas and the same heat-resistant silicone tube, and make sure the silicone has dried completely before moving the solar panel.
Once the solar panel is ready, it’s time to put it into place in either the wall or the roof of the building. The two large holes cut at two opposite sides of the solar panel need to draw air from the inside of the building and then blow it back inside, so make sure they are properly positioned. It’s now time to attach the blower to one of the hoses; it will greatly improve the efficiency of your solar heater.
Where can you place the solar heater?
As I already said, this type of heater was originally used in animal shelters to provide them some comfort and increase productivity. The cold season brings along an important amount of energy loss; animals use extra energy to keep their body temperature in the right parameters instead of using it for producing eggs, milk, or meat.
However, some people brought this project to a whole new level by actually replacing a wall of the house with this type of solar heating panel. So it is up to you to test its efficiency in the particular area where you live and then decide!
You may also like:

Powering an Off the Grid House (Cost-Effective)
This Can be the End of America as we Know it (Video)
3 Amazing Winter Survival Stories


AFAIK the only aluminum cans extant in the market place are beer and soda cans. The cans appearing in the video look like what are commonly called “tin cans,” ie, plated steel. The only reason to use aluminum cans is to prevent rust. No need to use silicone to glue the cans together, that is what duct tape was originally invented for and is what it is commercially used for. If the cans are not exposed to outside weather, duct tape would be fine, otherwise, tape used to seal rain gutter against leaks would be appropriate. Why not use flexible clothes dryer vent pipe and not have to do all the sealing? Just run the flexible vent piping, no drilling, stacking and sealing. It isn’t very expensive and for a few bucks you can save hours of labor.
I made one of these several years ago. I substituted gutter down spouts instead of cans. less work and no deteriorating tape.
In the opening teaser of the story it says ” Did you know that you can build a solar heater that will work without electricity or anything else? “……So how do i get the ” air blower ” to work without electricity then ??? And I dont see this solar heater working worth beans without the fan to circulate the air.
Use a small 5-12 volt solar panel to power a computer fan to pull air through, OR natural convection (like an oven) where hot air rises from the bottom intake hole to the top outtake hole. I’m not an engineer, but know attics are hot & basements are cool. Desert dwellers do the opposite.
Actually, heat rising will turn a blade if it is shaped correctly…do a bit of research about spinning angels over candles to get the notion. Or maybe you’re already seen one of those.
Fred,
See my post below about using convection which is based loosely on this design. When the air heats from the sun it rises into the building and that vacuum draws cool air into the bottom of the system below the baffle. At night, when the sun is gone, it simply stops running.
DIY Solar Heating with the Heat Grabber
https://www.motherearthnews.com/diy/diy-solar-heating-zmaz77sozgoe
The reason aluminum is preferred is for its thermal coefficient–it is better at hear transfer than steel. As for using duct tape, it is going to be in the sun which will deteriorate it. This works by convection. The heat absorbed from the sun will rise creating air flow. Use that to your advantage. The small fan only helps move air.
If you put a duct at the bottom similar to the one at the top and fed it into the lower part of the garage wall, the natural convection flow from top to bottom would eliminate the blower and eliminate having to heat outside air. This would work fine for workshops or garages.
Better to go to http://www.builditsolar.com and learn how to build an efficient one.
When I built my house in northwestern Connecticut I left off the roof sheathing on the south side. I put a curved sheet of blackened aluminum between each rafter, leaving 4 inches top and bottom. I covered the top with fiberglass panels (20-year plus lifespan) and the inside with aluminum covered foam panels. Using styrofoam (the non-bead extruded stuff) I made ducts to feed the bottom and collect the heated air at the peak of the attic. Temperature switches controlled an old air conditioner blower and fed a closet with 142 gallon jugs of water. I down-drafted this at night with another blower. Augmenting the oil heat I had cozy temperatures all winter for less than $400 in the 1990’s.
Balanced styro flaps controlled flow direction automatically.
A box like this around a black water tank can be plumbed to your hotwater tank inlet…Your thermostat won’t see the need to come on when the incoming water is already hot.
how did the the fan motor run? it takes electricity to run the motor, in this video it did show anything on how the motor began running.
Other blogs have suggested a 5-12 volt solar panel to power an old computer fan to vent heated air, but another mentioned the principle of convention using one hole at the top pulling air from the hole on the bottom of the cabinet (like a convection oven!) Cool air moves down. Let’s work together, not criticize!
I have constructed a couple of these panels instead of using cans I use 2 sheets of aluminum (painted flat black) sheathing. It is so much faster, I just cut two groves on the inside of the wall rails. insert the Aluminum in the groves and caulk them in. The rest is the same as the plans. JD
later
Does the solar panel and steel can heater have to be outside or can the heater be inside and the solar panel be outside?
Interesting…
I have built systems like these numerous times both with and without the cans. When placed in a southern or eastern window with a baffle running through the middle of the inside you can get a lot of heat moving with convection alone and no fan required.. The baffle extends into the building through the window, so heat in the top rises into the building, while that moving air causes cooler air to be pulled into the bottom of the baffle. This configuration simply works with no fans or on off switch, and when the sun disappears, the heating stops and the convection stops with it. Once placed in the window, it simply runs itself when the sun is up with little or no maintenance