Candles were a common source of light in many colonial and pioneering era homes. While oil burning lamps burned cleaner and with less odor, oil was expensive and could be hard to get. Candles, on the other hand were made at home, usually setting aside one day per year, in the autumn, for making the year’s supply of about 400 candles.
Today, candles are mostly molded and made out of paraffin, which comes from petroleum or coal. However, paraffin didn’t become commercially available until the early 1800s. When it did, it revolutionized candle-making for its availability and low cost.
However, paraffin isn’t actually the best wax for making candles, beeswax is. Paraffin candles are cheaper to make, but beeswax burns slower, so the candles last longer. Of course, making beeswax candles requires having a large enough beekeeping operation in order to have wax to spare. Bees use about 7 parts of honey for each part of wax they produce, so the cost in lost honey production is considerable.
But while beeswax makes some of the best candles, due to its hardness and slow burn rate, its cost and availability, reduced its use mostly to the wealthy. Even then, it would often be mixed with other materials, especially tallow. Poor or what we would call middle-class families used mostly tallow candles, due to the high availability and low cost of tallow.
The waling industry brought a new material to market for candles, which was superior to either paraffin or beeswax, spermaceti. This is a waxy substance that came from the whale’s head. It was found to make harder candles than any other material, which burned longer and brighter. However, candles made from spermaceti were quite expensive and only available near areas where waling was practiced.
One other material was used in some areas, bayberry wax. In areas where bayberries grew (mostly along the east and west coasts) the bayberries were picked in the fall, for making candles. However, it takes a lot of bayberries, as about 15 pounds of berries only produces about a pound of wax. This made rendering the wax out of the bayberries a time-consuming chore. So, bayberry wax was often mixed with tallow, improving the odor of the tallow candles and making the bayberry go farther.
Rendering Tallow for Candles
 Before candle-making could start, tallow needed to be rendered out of animal fat. Pretty much any sort of animal fat could be used, but the various fats did vary in the hardness of their tallow, how much tallow was produced and the tallow’s odor when burning. Pig fat was considered the worst, for its odor; the fat of wild animals, such as deer, was hard to gather, as most wild animals didn’t have much fat; so the best was fat from sheep or cows.
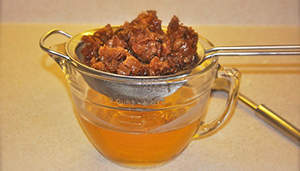
Tallow is a natural component of the fat. In order to render it out, chunks of fat are melted over a fire. A wide, shallow pot works best, almost like a giant frying pan. The fat must be stirred more or less constantly while melting, in order to prevent burning. A high heat is not needed and in fact can be detrimental to the process.
Melting the fat is a slow process and can take four to six hours. But once it is melted, allow it to cool slightly, but not to solidify. The fat is then filtered through cheesecloth or muslin, removing the solids. The liquids are then allowed to cool. As it does, the tallow will rise to the top. This can be skimmed off and returned to the shallow pan for re-heating, straining and skimming once more. The double-skimmed tallow is then ready for use.
Tallow can be stored by wrapping it and allowing it to cool. It will solidify once it cools. If candles are to be made immediately, this is not necessary. The tallow merely needs to be remelted (if it has started to solidify) and mixed with any other wax that is going to be used.
Beeswax, bayberry wax or paraffin can be added to the tallow, depending on availability. Alum or steric acid can also be added to the wax to help it harden and burn slower. These two materials are currently available from candle making suppliers.
Related: 5 Ways to Make Survival Candles From Household Items
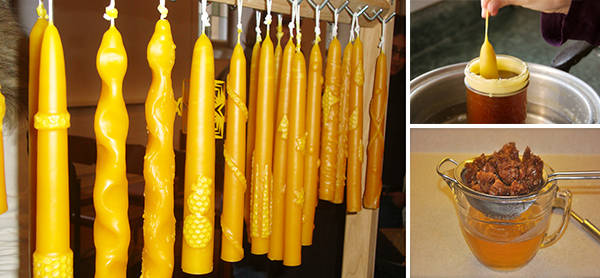
Dipping Candles
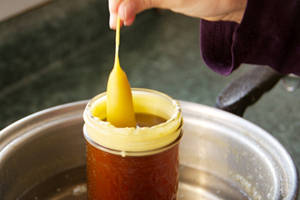 In order to dip candles, the wax has to be melted, but not too hot. Ideally, it should be just barely melted, so temperature control is very important. If the melted wax gets too hot, it will melt the existing layers off the wick, when the candle is dipped again.
Today, we use a double-boiler for making candles, as it allows us to control the temperature of the candles more exactly. In pioneering times, they didn’t always have that option and often used any container they could for dipping candles, usually a large can that they had salvaged and saved just for candle-making. By using the same container every year, they eliminated waste and the problem of cleaning the wax out of their cooking pots.
Cotton string was the most common wicking material used, although braided or twisted strips of cotton cloth were used if string wasn’t available. Scrap fabric, whether cut off from sewing projects or salvaged from damaged clothing, had many uses in olden times; using them for candle wicks was just one.
Wicks were typically about 18 inches long. Today, many people attach a piece of hardware (usually metal nuts) to the bottom, in order to weigh down the wick and keep it straight. That wasn’t always possible in olden times, so the wicks were first dipped and then straightened out by hand to form the base for the candle to form on.
By doubling over the 18 inch wick, two candles could be dipped at a time. Dipping had to be done fairly rapidly, so that the existing wax wouldn’t have a chance of melting. However, if it was done too fast, all that would be accomplished would be to splash the wax on people’s skin and clothing, not a desired result.
Some people would dip the candles in a bucket of cool water, after dipping it in the wax, in order to help it harden faster. This is not necessary if you are making many candles at a time, as the next step is to give the candles a chance to cool and harden. This is done by hanging them over a broomstick or other convenient piece of wood.
The problem with using water to cool the candles is that they then need to be dried thoroughly before re-dipping. Water left on the candles can produce bubbles in the wax, which will stay there, trapping the water. When burned, the candle will sputter, spitting small droplets of water and wax onto whatever is around it.
It is also possible to dip several tapers at once by hanging pieces of wick over a stick or narrow board. The pieces all need to be the same length and separated by about two inches, to prevent them from touching. This also requires a cooling rack that the stick can be placed in, allowing the candles to hang.
The type of wax or tallow used will affect how many times the candle need to be dipped, in order to be big enough for use. Beezwax wins here as well, as it only requires six or seven dips to make a good taper. Paraffin, which is thinner when melted, requires twice as many dips. Regardless of which is used, the outer diameter of the candle is pretty much regulated by the candleholders you have. Ideally, the candles will be just the right size to fit the holder, without having to trim them or add anything.
Storing the Candles
As homes in colonial and pioneering times didn’t have air conditioning, storage of the finished tapers was important. If they were stored lying down, there was a good chance that they would melt together in hot weather. For this reason, they were usually hung, often from the rafters.
If a family had a root cellar with a high enough ceiling, that was an ideal place to store their candles. The candles could be hung from the roof, keeping them cool and out of the way until they were needed.
You may also like:

Have a Backup Generator? Do this immediately! (Video)
30 Lost Ways of Survival from 1880


Youu really make iit sem so easy with your presentation but I find this
matter to be really something which I thinkk I would never understand.
It seems too complicated and extremely broad for
me. I am looking forward for your next post, I’ll try to get tthe hazng of it!
entertaining read- thanks for sharing
I really enjoyed the article and the detailed information. With all the helpful tips and instructions, I feel excited to give dipping candles a try. Thanks!
I have just about amassed everything I need to do this. Honestly, I am kind of excited.
With the price of beeswax I kinda think I am not saving money by making some myself. I’m just saying. We’ll see. Perhaps I may find a better (read that less expensive) price for beeswax.