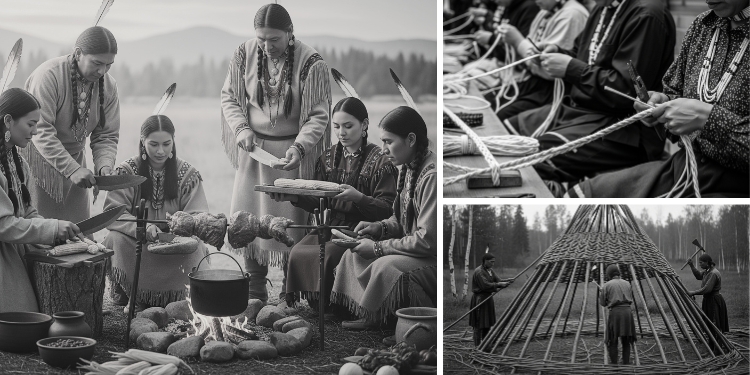
The Native Americans were masters of self-reliance and survival skills. Their ingenuity featured often incorporated projects that every modern-day prepper should have in their arsenal. Rooted in centuries of living off the land, the following 5 Native American Projects can help you thrive anytime society’s infrastructure breaks down and resources are scarce.
The Three Sisters Gardening
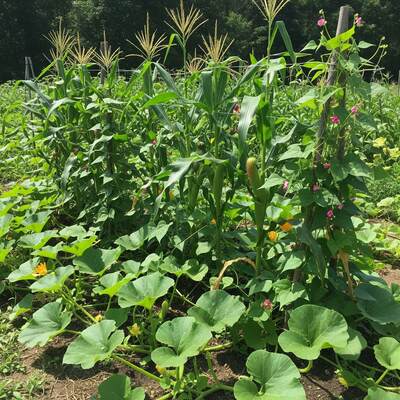 Three sisters is an ancient companion planting method combining corn, beans, and squash. The three plants offer something that helps the other two providing you with the maximum yield possible of all three.
Corn
Provides a natural trellis for the beans to climb. Ideally, you want to choose a variety of field or dent corn that grows a stalk roughly 7 feet tall.
Beans
Extract nitrogen from the air and “Fix” it into the soil via root nodules. Ideally, you want to choose a type of bean that is “Shade Tolerant” like Kentucky Wonder.
Tilling some organic rhizobium inoculant into the soil when you plant the beans will also improve their ability to fix nitrogen into the soil. This will help the corn and squash grow strong.
Winter squash
Such as acorn squash, pumpkins, and butternut squash spread out broad leaves that shade the soil to help hold in moisture. The sharp spines under the leaves and stems are also a strong deterrent against raccoons to keep them from raiding your corn as it ripens.
You’ll be glad you put this project into practice, because what you get from it can be used in so many valuable ways: for food, preservation, and even survival. The Three Sisters method gives you corn, beans, and squash, three powerful staples that can be turned into hearty meals. You can make cornmeal for porridge or bread, cook up protein-rich beans in stews, and roast or puree squash for soups and pies. These foods are filling, nutritious, and easy to prepare with minimal resources.
When it comes to preservation, they’re just as useful. Beans and corn can be dried and stored for years, while squash can be kept in cool storage for months or turned into canned goods. Together, they form a solid base for long-lasting food stores, perfect for off-grid living or emergency prepping.
If you’re looking for more ways to create long-lasting meals and become truly self-reliant, I highly recommend The Lost Ways 2. This guide is packed with ancient techniques and forgotten projects that still work today. And best of all, you can do them yourself, right at home.
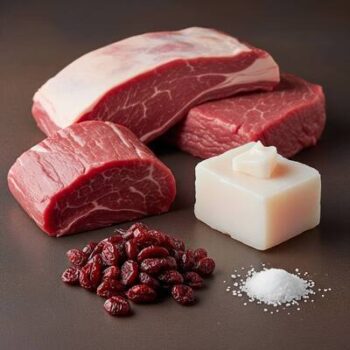
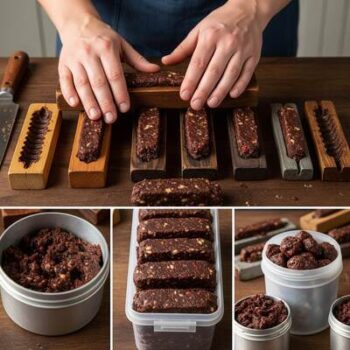
Making Pemmican
Pemmican is the ultimate survival food and was a staple project in many Native American cultures. It’s portable, calorie-dense, and has a real-world shelf life that puts freeze-dried meals to shame. Perfect for bug-out bags or emergency stash of supplies.
How to Make Pemican
The following is a basic Pemican recipe using modern ingredients you can buy at a grocery store.
Ingredients
1 lb. lean beef (eye of round or sirloin tip)
1/2 cup dried cranberries or blueberries (unsweetened)
Half cup rendered beef tallow (or substitute coconut oil if necessary)
1/2 tsp salt (optional)
Prepare the Meat
Slice the beef into thin strips (1/8 inch thick). Trimming away all fat.
Dry the meat using a dehydrator (145°F for 6–12 hours) or oven (170°F for 6–8 hours) until brittle.

Grind Ingredients
Pulse dried meat and berries in a food processor into a coarse powder.
It should have a texture like rough cornmeal, not a paste.

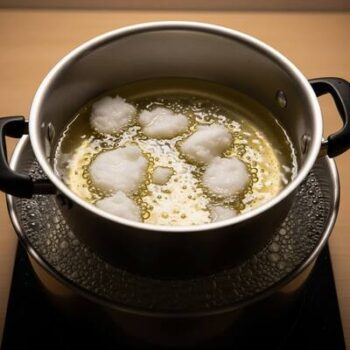
Melt the Fat
Use a double boiler to heat the tallow gently or warm the coconut oil until it’s a liquid.
Mix
Combine meat-berry powder and melted fat in a bowl. Stir until fully coated but not greasy. Add salt if desired.

Shape & Store
Press mixture into molds or shape into half-inch thick bars.
Let cool and harden. Store in airtight containers at room temperature or refrigerate for longer shelf life.
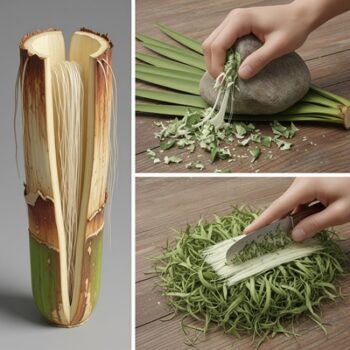
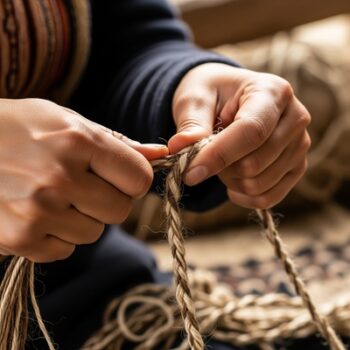
Natural Cordage Making
Native Americans often made natural cordage from yucca, dogbane, or milkweed, by carefully twisting the natural fibers into strong rope. In a long-term survival situation being able to make natural cordage like this for simple things like nets, hanging baskets, firewood bundles, and everyday ties will help you save your good rope and 550 cordage for important things.
How to Make Natural Cordage
The following are basic instructions on how to make natural cordage. This is a skill I recommend practicing now during normal times, as there are a lot of little things that make-or-break success when it really matters!
Harvest Fibers
Gather stalks of dogbane, milkweed, or yucca leaves. For stalks, collect in late fall after plants die back. In a pinch, you can use strips of sapling bark in late spring or early summer.
Process Fibers
Split stalks lengthwise and peel off the outer bark to expose fibers. For yucca, pound leaves with a rock to break up soft tissue, then scrape off any green material.
Dry Fibers
Lay fibers in a dry, shaded area for 24 to 48 hours until they are pliable but not brittle.
Twist Cordage
Divide the fibers into two bundles. Twist one bundle tightly clockwise.
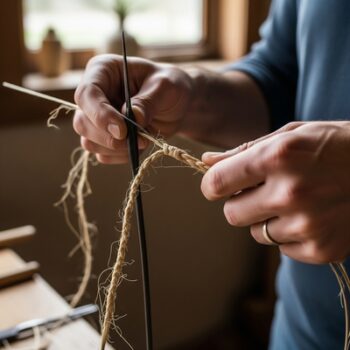
Wrap the twisted bundle counterclockwise around the second bundle. Repeat twisting and wrapping (this is a reverse wrap).
Join Fibers
To extend the cordage, overlap new fibers by 6 to 10 inches into one bundle while twisting. This is something that requires a fair amount of practice to get right.
Knot the Ends
Tie knots at both ends. Smooth with your fingers. Your cordage is ready for traps, nets, or lashing tools.

Building An Atlatl
An atlatl is an ancient spear-throwing tool used by Native American cultures to launch lightweight darts or spears with greater force and distance. Knowing how to make one, some darts, and practicing with it will give you the ability to hunt without using up precious ammunition. It also allows you to harvest game silently, without giving away your position like a gunshot does.
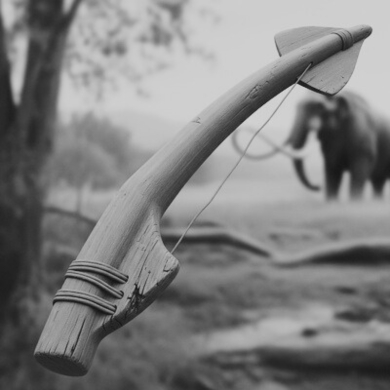
An atlatl acts as a lever, it extends your arm’s reach, allowing you to throw projectiles faster and farther than by hand alone. Traditionally used for hunting large and small games, it combines simplicity with surprising power and precision.
How to Make a Simple Atlatl for Small Game
You can use the following steps to make a small atlatl for hunting things like rabbits, wild turkeys, pheasants, and grouse.
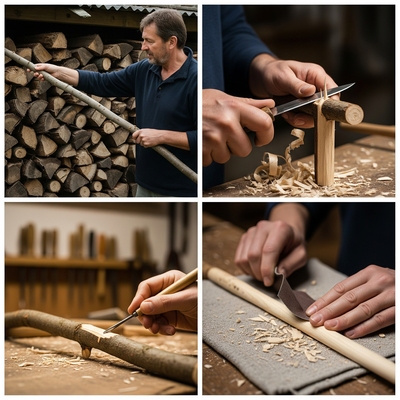
Choose the Wood
Find a straight, dry hardwood branch about 24 to 30 inches long and ¾–1 inch thick. Hardwoods like hickory, oak, or maple work well.
Shape the Handle
Whittle one end to fit comfortably in your hand with a rounded grip.
Carve a Spur
Carve a shallow groove or notch on the opposite end of the handle. Leave a little bit of wood at the end, about the thickness of a finger. This might come in handy later if you decide to add a small peg to help hold the dart’s end.
Smooth and Sand
Sand the entire atlatl smooth to remove splinters. I would use multiple grits of sandpaper that’s at least 100 to 150 grit.
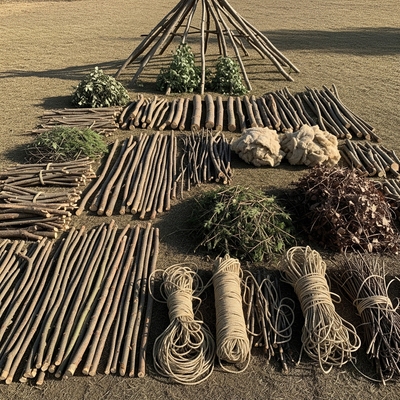
Constructing a Wickiup Shelter
While most people think of Native American shelters at tipis, the humble wickiup is far more common and easier to assemble. It’s the sort of thing that you can do in a pinch in the forest with a tarp and some small trees. This type of improvised shelter is far easier to create and move than a classic tipi which requires massive buffalo skins and sturdy lodge poles.
It’s also better than a lean-to if you need to stay where nights are going to be cold or windy. The small amount of extra effort it takes to build a wickiup is saved by not having to gather such an enormous amount of firewood to keep warm. It also minimizes the light and smoke presence of a lean-to, which might matter if you’re in a survival situation where you don’t want to be found.
How to Build a Wickiup Shelter
These instructions are for building a wickiup shelter using only natural products. If you have a tarp in your bug-out bag of survival supplies, you can use it to make a perfectly waterproof roof.
Materials
12–20 long flexible saplings (8–12 feet long; willow, cedar, or young pine work well)
Smaller branches or brush
Cordage (natural cordage, paracord, or even strips of bark)
Insulating material (leaves, grass, bark, pine boughs)
Step 1: Choose Your Site
Find a flat, dry area near resources like saplings, brush, and leaves. Avoid low-lying areas that might be prone to flooding or water pooling.
Step 2: Clear the Ground
Remove any rocks, sticks, and debris to create a comfortable sleeping area.
Step 3: Create the Base Circle
Mark a circle about 6 to 8 feet wide which will serve as your shelter’s footprint.
Step 4: Secure the Main Poles
Drive 3 sturdy saplings into the ground in a tripod formation and lash the tops together. These are your main support. Depending on what the soil is like it might help to pack rocks into the hole or around the base of the three main saplings to hold them firm.
Step 5: Add More Saplings
Evenly space additional saplings around the circle and bend them to meet at the top. Lash them securely to the tripod frame.
Step 6: Weave Cross-Supports
Weave smaller sticks and branches horizontally between the vertical saplings to strengthen the frame.
Step 7: Cover the Frame
If you have a tarp, drape it over the peak of the wickiup. Otherwise carefully cover it with a later of brush, securing it with natural cordage where necessary.
Then do your best to shingle the roof with bark before completely covering it with grass, leaves, or pine boughs over the frame to create insulation and block wind and rain.
The colder the weather might be, the thicker you want the layers of light material to be. Yet don’t overload it to the point where the weight collapses the structure.
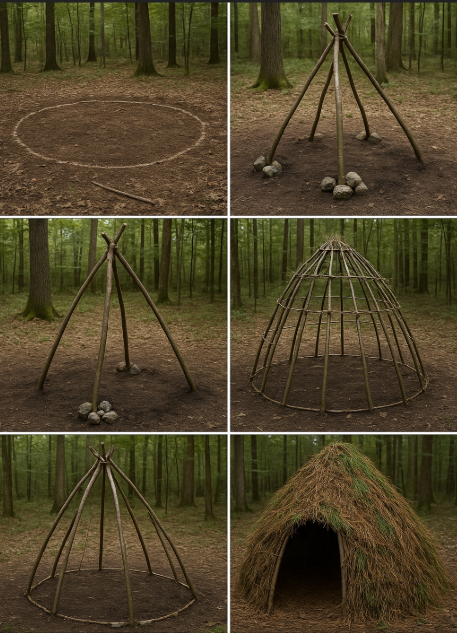
Step 8: Leave an Entrance & Small Smoke Hole
Leave a small opening for a doorway and optionally a small smoke hole at the top if you plan to have a fire inside.
Step 9: Add Bedding
Pile dry leaves, pine needles, or grasses inside for comfort and insulation.
Just like securing any home – a topic covered in detail in A Navy SEAL’s Bug-In Guide by Joel Lambert – securing this type of shelter is also important. If you feel the need, you can enhance the shelter by adding extra features, including an access door.
PRO TIP: If you’re going to have a fire inside the shelter double-ring it with rocks, and make sure someone is always inside the shelter while the fire is burning. A small spark on the dry bedding that goes unnoticed could burn the whole shelter down.
What About the Amish Projects?
Outside the Native American community, there’s another group in America well worth taking a closer look at. When it comes to prepping and survival, the Amish community has a lot to offer. We’re talking about a large group of people who have managed to live completely off-grid for over 200 years—without access to public water systems, electricity, or many of the other modern comforts that make life easier… but also more fragile!
In The Amish Ways Book, Eddie Swartzentruber shares all the priceless secrets of the community he was part of for 17 years! Eddie grew up learning the projects and skills that have helped the Amish remain self-sufficient and exceptionally well-prepared for any kind of crisis. I wholeheartedly recommend reading the book Eddie wrote, where you’ll find valuable insights on:
- How to Brew Yourself a Batch of Amish Ibuprofen
- DIY Off-Grid Water Filter
- Amish Survival Hacks that Can Help You Thrive in a Long-Term Blackout
- How to Handle Money and Barter Like an Amish
- How to Take Care of Your Livestock When They Are Sick
If you want to deepen the knowledge you gain from this book, you have the chance to take advantage of the excellent offer at The Amish Ways Academy, where the same Eddie shows you, step by step (video HERE), how to put into practice various projects from the community he was once a part of.
Final Thoughts on Native American Projects
By adding these five Native American projects into your arsenal of skills you’ll gain more than just practical knowledge. You’ll be tapping into survival strategies that have proven to work over thousands of years.
Each of these projects has little lessons hidden within it that you can only learn from first-hand experience. By taking them on in a functional, real-world way, you both broaden and deepen your survival skills in ways that are time-tested and proven to work.
You may also like:

Depression-Era Foods Making a Comeback
Preserve Eggs Without Electricity for Years (Video)
How To Dig A Native American Dakota Fire Hole


In these trying times these are great skills to learn. Our native American brothers & sisters knew how to live without all our modern day conveniences. We should all take a cue from them & diligently acquire these skills. I will do my best & hopefully be able to use them when the time comes, or help my family. Thank you for posting this knowledge.
*LOVED this article. Maternal Grandmother was Apache / Yaqui. i love working with my hands. are boys and girls still being taught these skills at summer camp? i taught my daughter some things, she’s in schools chorus ensemble and stage. she’s hands on and has used what i’ve taught her. plus she’s self taught in knitting and crochet which her stage teacher gave her extra credit for teaching basic crochet since it’s a skill used in stage.
Regarding “Making Pemmican” I’ve been through culinary school and the first thing they teach us is safety and sanitation, so basically they freak you out about everything. Proper food storage, rotation, bacterias, and how to avoid spoilage.
I’ve been wanting to make this Pemmican for a long time now, and I can’t get past at what point in this process does the beef become less prone to spoilage. My thinking is that if I make it and store it, I probably won’t eat it thinking back to what I’ve been taught in culinary school, that the food might make me very sick and I don’t want to go there. Can you help calm me down regarding this?
Howdy from high in the desert swamp,
There is zero moisture in the meat or berries. It’s not jerky. It is dry as can be. The tallow you render yourself if a sealant. I had made pemmican several times since 2018. I just finished off a jar from 2020. I have no worry on if it’s safe or bad. If it is bad you will know. If you open it and smell strong beef smell, that’s great. The way it’s supposed to be. Pemmican was found long decades after Lewis and Clark went through. They buried crates of this and hardtack to have something on the way back if need be. I don’t remember where the piece of hardtack is in a museum but it’s like 150 years old and no mold, no bacteria. Pound it to flour or drop it in your coffee. Pemmican lasts decades. I like to dissolve a hunk in my coffee. I eat the rest but a piece of hardtack or pemmican in coffee goes back centuries in doing it that way. Also, you may want to keep in mind this is survival food or depending on how much you make, food for a month. I made 10 pounds of this and took it on a camping trip. There were 30 of us and everyone raved on how it made them feel. I say to myself if they can do this in the 1400’s and thrive? I can make this in my kitchen.
Just try it first with a pound of beef and a pound of blueberries. The tallow is easy enough. Ask the meat cutter for 5 pounds of trimmed fat. Crock pot it for 8 hours on low. The liquid is the tallow. The solids are gristle and fat. Ladle into a quart jar through cheese cloth. It will get solid and tan color. Warm up some and mix it in the meat and berry dust enough to bind. That’s it. I used the last of my tallow made in 2022. I have more from 22, 23 and 24. I gave a couple quarts away to some people who said they want more.
Like the old alka seltzer commercial. Try it, you’ll like it.
Remember the Alamo
Remember North Carolina
Remember to have your soul prepared
My favorite Indian recipe is from the Pacific Northwest. Catch a big salmon and bury it in the ground for a couple of months. Resting atop the permafrost the fish rots and ferments and turns into a delicacy (?). Haven’t tried it myself, I’m an old camp cook and practice good food safety (nobody ever died), but if you consider the good old days and study herbal medicine you realize the majority of effective herbal remedies are for gastro-intestinal distress, nausea, cramps, vomiting, everything you would expect in an environment of no modern storage and challenging food shortage. Most cultures can look back at a point in history when the peasants survived winter eating spoiled meat and moldy bread, washing it down with unrefrigerated dark beer and having no idea how nice a little soap and water can make you feel.
As long as nobody died, we think it is more than ok. :)) Better to be safe than sorry. That salmon recipe you mention is a well-known thing but…. you can easily imagine that it can turn dangerous fast.
A few comments about spoiled food/food poisoning.
TOP TIP
Apple Cider Vinegar, this cures food poisoning quickly, proved it on myself when I had it from fish.
Within an hour of eating it, a few of us were quite badly, (cramps and very loose). I’d read about ACV helping with food poisoning so gave it a large helping (diluted)… Within 30 minutes my cramps weren’t as bad. Don’t get me wrong, I was still in pain with the cramps and loose but it eased the cramps from what it was.
I took a large serving several times through the day and the next day I was fine (I think 8 servings). Those that also had the ACV also got better quicker than those that didn’t.
ACV, cures about 80% of everything, amazing stuff.
My grandmother was American Indian and planted those three together in our garden.